- Objective-C入门教程
- iOS入门教程
- UI控制器
- 容器视图
- 内容视图
- 视图控制器
- Tab Bar接口
- 导航栏
- 安装库
- 请求与解析
- 数据保存
- 多线程
 《iOS入门教程》
 关注我们

OC 中的 Table View函数
它用于显示由多个单元格(通常可重复使用的单元格)组成的垂直滚动视图。它具有特殊功能,如页眉,页脚,行。
Table View - 重要属性
- delegate
- dataSource
- rowHeight
- sectionFooterHeight
- sectionHeaderHeight
- separatorColor
- tableHeaderView
- tableFooterView
Table View - 重要方法
- (UITableViewCell *)cellForRowAtIndexPath:(NSIndexPath *)indexPath
- (void)deleteRowsAtIndexPaths:(NSArray *)indexPaths
withRowAnimation:(UITableViewRowAnimation)animation
- (id)dequeueReusableCellWithIdentifier:(NSString *)identifier
- (id)dequeueReusableCellWithIdentifier:(NSString *)identifier
forIndexPath:(NSIndexPath *)indexPath
- (void)reloadData
- (void)reloadRowsAtIndexPaths:(NSArray *)indexPaths
withRowAnimation:(UITableViewRowAnimation)animation
- (NSArray *)visibleCells
Table View - 示例代码
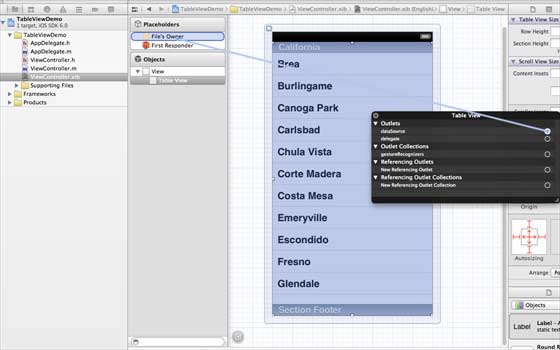
步骤1 - 让无涯教程在 ViewController.xib 中添加一个表格视图,如下所示。

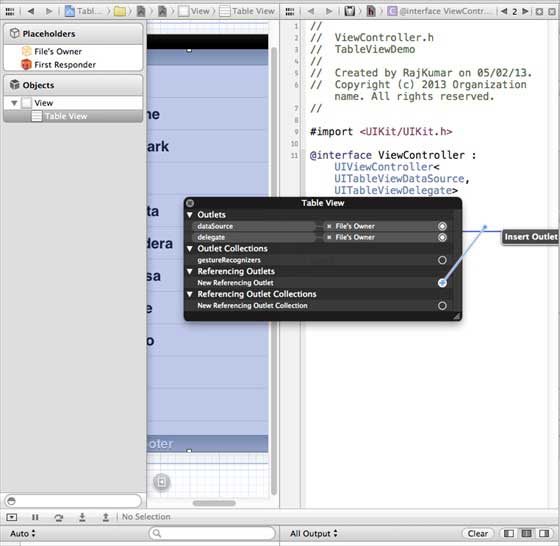
步骤2 - 通过右键单击并选择数据源和委托,将 delegate 和 dataSource 设置为文件所有者进行表视图。设置dataSource如下所示。
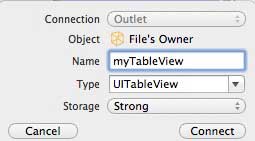
步骤3 - 为tableView创建一个 IBOutlet ,并将其命名为 myTableView 。如下图所示。
步骤4 - 然后添加一个NSMutableArray,用于保存要在表视图中显示的数据。
步骤5 - 无涯教程的ViewController应该采用 UITableViewDataSource 和 UITableViewDelegate 协议。 ViewController.h 的外观应如下所示。
#import <UIKit/UIKit.h>

@interface ViewController : UIViewController<UITableViewDataSource,
   UITableViewDelegate> {
   IBOutlet UITableView *myTableView;
   NSMutableArray *myData;
}
@end
步骤6 - 无涯教程应该实现所需的tableview委托和dataSource方法。更新的 ViewController.m 如下-
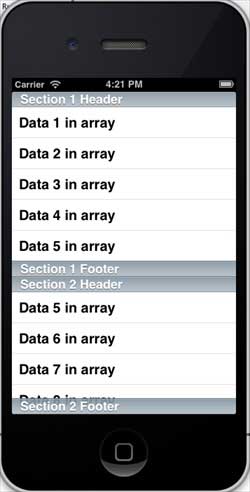
#import "ViewController.h"

@interface ViewController ()

@end

@implementation ViewController

- (void)viewDidLoad {
   [super viewDidLoad];
   //表视图数据正在这里设置
   myData = [[NSMutableArray alloc]initWithObjects:
   @"Data 1 in array",@"Data 2 in array",@"Data 3 in array",
   @"Data 4 in array",@"Data 5 in array",@"Data 5 in array",
   @"Data 6 in array",@"Data 7 in array",@"Data 8 in array",
   @"Data 9 in array", nil];
   //在加载视图后进行任何额外的设置,通常是从一个 nib 开始。
}

- (void)didReceiveMemoryWarning {
   [super didReceiveMemoryWarning];
   //处置任何可以重新创建的资源。
}

#pragma mark - Table View Data source
- (NSInteger)tableView:(UITableView *)tableView numberOfRowsInSection:
   (NSInteger)section {
   return [myData count]/2;
}

- (UITableViewCell *)tableView:(UITableView *)tableView cellForRowAtIndexPath:
   (NSIndexPath *)indexPath {
   static NSString *cellIdentifier = @"cellID";

   UITableViewCell *cell = [tableView dequeueReusableCellWithIdentifier:
   cellIdentifier];

   if (cell == nil) {
      cell = [[UITableViewCell alloc]initWithStyle:
      UITableViewCellStyleDefault reuseIdentifier:cellIdentifier];
   }

   NSString *stringForCell;

   if (indexPath.section == 0) {
      stringForCell= [myData objectAtIndex:indexPath.row];
   } else if (indexPath.section == 1) {
      stringForCell= [myData objectAtIndex:indexPath.row+ [myData count]/2];
   }
   [cell.textLabel setText:stringForCell];
   return cell;
}

//如果未实现,默认为 1
- (NSInteger)numberOfSectionsInTableView:(UITableView *)tableView {
   return 2;
}

- (NSString *)tableView:(UITableView *)tableView titleForHeaderInSection:
   (NSInteger)section {
   NSString *headerTitle;

   if (section==0) {
      headerTitle = @"Section 1 Header";
   } else {
      headerTitle = @"Section 2 Header";
   }
   return headerTitle;
}

- (NSString *)tableView:(UITableView *)tableView titleForFooterInSection:
   (NSInteger)section {
   NSString *footerTitle;

   if (section==0) {
      footerTitle = @"Section 1 Footer";
   } else {
      footerTitle = @"Section 2 Footer";
   }
   return footerTitle;
}

#pragma mark - TableView delegate

-(void)tableView:(UITableView *)tableView didSelectRowAtIndexPath:
   (NSIndexPath *)indexPath {
   [tableView deselectRowAtIndexPath:indexPath animated:YES];
   UITableViewCell *cell = [tableView cellForRowAtIndexPath:indexPath];
   NSLog(@"Section:%d Row:%d selected and its data is %@",
   indexPath.section,indexPath.row,cell.textLabel.text);
}
@end
步骤7 - 运行应用程序时,无涯教程将获得以下输出-
祝学习愉快!(内容编辑有误?请选中要编辑内容 -> 右键 -> 修改 -> 提交!)
好记忆不如烂笔头。留下您的足迹吧 :)