- 入门基础
- 菜单教程
- 存储教程
- SQLite教程
- Andorid 扩展教程
- Andorid 优化与原理
 《Android入门教程》
 关注我们

Android 中的 Table Layout函数
Android TableLayout将视图排列成行和列,您将使用<TableRow>元素在表中构建一行;每个单元格可以容纳一个View对象。
TableLayout容器不显示其行,列或单元格的边界线。
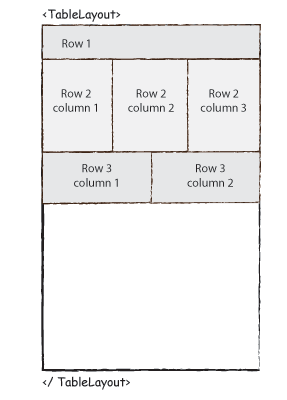
Table Layout - 属性
以下是特定于TableLayout的重要属性-
| Sr.No. | Attribute & 描述 |
|---|---|
| 1 |
android:id 这是唯一标识布局的ID。 链接:https://www.learnfk.comhttps://www.learnfk.com/android/android-table-layout.html 来源:LearnFk无涯教程网 |
| 2 |
android:collapseColumns 这指定要折叠的列的从零开始的索引。 |
| 3 |
android:shrinkColumns 要缩小的列的从零开始的索引。 |
| 4 |
android:stretchColumns 要拉伸的列的从零开始的索引。 |
Table Layout - 示例
本示例将带您通过简单的步骤,展示如何使用Table Layout创建自己的Android应用程序。
以下是修改后的主要Activity文件 src/com.example.demo/MainActivity.java 的内容。
package com.example.demo;

import android.os.Bundle;
import android.app.Activity;
import android.view.Menu;

public class MainActivity extends Activity {
   @Override
   protected void onCreate(Bundle savedInstanceState) {
      super.onCreate(savedInstanceState);
      setContentView(R.layout.activity_main);
   }

}
以下是 res/layout/activity_main.xml 文件的内容-
<TableLayout xmlns:android="http://schemas.android.com/apk/res/android"
   android:layout_width="fill_parent"
   android:layout_height="fill_parent">

   <TableRow
      android:layout_width="fill_parent"
      android:layout_height="fill_parent">

      <TextView
         android:text="Time"
         android:layout_width="wrap_content"
         android:layout_height="wrap_content"
         android:layout_column="1" />

      <TextClock
         android:layout_width="wrap_content"
         android:layout_height="wrap_content"
         android:id="@+id/textClock"
         android:layout_column="2" />

   </TableRow>

   <TableRow>

      <TextView
         android:text="First Name"
         android:layout_width="wrap_content"
         android:layout_height="wrap_content"
         android:layout_column="1" />

      <EditText
         android:width="200px"
         android:layout_width="wrap_content"
         android:layout_height="wrap_content" />
   </TableRow>

   <TableRow>

      <TextView
         android:text="Last Name"
         android:layout_width="wrap_content"
         android:layout_height="wrap_content"
         android:layout_column="1" />

      <EditText
         android:width="100px"
         android:layout_width="wrap_content"
         android:layout_height="wrap_content" />
   </TableRow>

   <TableRow
      android:layout_width="fill_parent"
      android:layout_height="fill_parent">

      <RatingBar
         android:layout_width="wrap_content"
         android:layout_height="wrap_content"
         android:id="@+id/ratingBar"
         android:layout_column="2" />
   </TableRow>

   <TableRow
      android:layout_width="fill_parent"
      android:layout_height="fill_parent"/>

   <TableRow
      android:layout_width="fill_parent"
      android:layout_height="fill_parent">

      <Button
         android:layout_width="wrap_content"
         android:layout_height="wrap_content"
         android:text="Submit"
         android:id="@+id/button"
         android:layout_column="2" />
   </TableRow>

</TableLayout>
以下是 res/values/strings.xml 的内容,以定义两个新的常量-
<?xml version="1.0" encoding="utf-8"?>
<resources>
   <string name="app_name">HelloWorld</string>
   <string name="action_settings">Settings</string>
</resources>
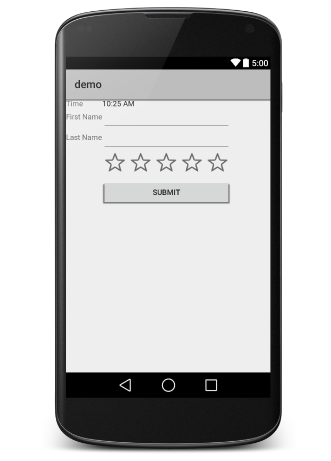
单击运行 工具栏。 Android studio将应用程序安装在您的AVD上并启动它,如果设置和应用程序一切正常,它将在"Emulator"窗口中显示-
祝学习愉快!(内容编辑有误?请选中要编辑内容 -> 右键 -> 修改 -> 提交!)
好记忆不如烂笔头。留下您的足迹吧 :)