- 入门基础
- 菜单教程
- 存储教程
- SQLite教程
- Andorid 扩展教程
- Andorid 优化与原理
 PDF电子书集合
关注我们

Android Bitmap详解
一、创建Bitmap
Bitmap的构造方法的修饰符是default的,意味着无法直接通过构造方法实例化Bitmap。
1. BitmapFactory
Android中提供了BitmapFactory来实例化Bitmap。BitmapFactory提供了多个decodeXXX方法供从不同来源加载图片资源并解析成Bitmap。主要方法如下图所示:

下面以decodeResource与decodeByteArray为例来看加载并解析Bitmap
decodeResource
val bitmap = BitmapFactory.decodeResource(resources, R.mipmap.ic_launcher)decodeByteArray
val bytes = assets.open("pic.jpg").readBytes()
val bitmap = BitmapFactory.decodeByteArray(bytes, 0, bytes.size)
2.Bitmap.createBitmap
Bitmap中提供了众多重载的静态方法createBitmap来创建Bitmap。主要如下图所示:
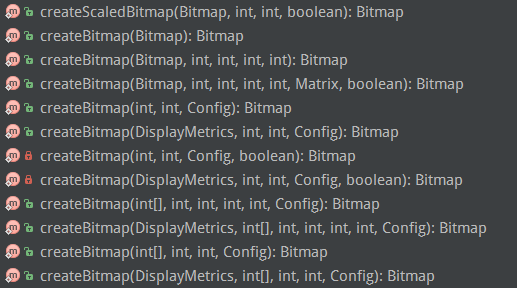
这些方法大致可以分为三类:
1) 根据已有的Bitmap来创建新Bitmap
/**
 * 通过矩阵的方式,返回原始 Bitmap 中的一个不可变子集。新 Bitmap 可能返回的就是原始的 Bitmap,也可能还是复制出来的。
 * 新 Bitmap 与原始 Bitmap 具有相同的密度(density)和颜色空间;
 *
 * @param source   原始 Bitmap
 * @param x        在原始 Bitmap 中 x方向的其起始坐标(你可能只需要原始 Bitmap x方向上的一部分)
 * @param y        在原始 Bitmap 中 y方向的其起始坐标(你可能只需要原始 Bitmap y方向上的一部分)
 * @param width    需要返回 Bitmap 的宽度(px)(如果超过原始Bitmap宽度会报错)
 * @param height   需要返回 Bitmap 的高度(px)(如果超过原始Bitmap高度会报错)
 * @param m        Matrix类型,表示需要做的变换操作
 * @param filter   是否需要过滤,只有 matrix 变换不只有平移操作才有效
 */
public static Bitmap createBitmap(@NonNull Bitmap source, int x, int y, int width, int height,
    @Nullable Matrix m, boolean filter) {

}
2) 通过像素点数组创建空的Bitmap
/**
 *
 * 返回具有指定宽度和高度的不可变位图,每个像素值设置为colors数组中的对应值。
 * 其初始密度由给定的确定DisplayMetrics。新创建的位图位于sRGB 颜色空间中。
 * @param display  显示将显示此位图的显示的度量标准
 * @param colors   用于初始化像素的sRGB数组
 * @param offset   颜色数组中第一个颜色之前要跳过的值的数量
 * @param stride   行之间数组中的颜色数(必须> = width或<= -width)
 * @param width    位图的宽度
 * @param height   位图的高度
 * @param config   要创建的位图配置。如果配置不支持每像素alpha(例如RGB_565),
 * 那么colors []中的alpha字节将被忽略(假设为FF)
 */
public static Bitmap createBitmap(@NonNull DisplayMetrics display,
    @NonNull @ColorInt int[] colors, int offset, int stride,
    int width, int height, @NonNull Config config) {

}
3) 创建缩放的Bitmap
/**
 * 对Bitmap进行缩放,缩放成宽 dstWidth、高 dstHeight 的新Bitmap
 */
public static Bitmap createScaledBitmap(@NonNull Bitmap src, int dstWidth, int dstHeight,boolean filter) {

}
BitmapFactory.Options
使用BitmapFactory时经常会用到Options这个静态内部类。它内部有很多比较重要的属性。如下:
- inJustDecodeBounds 如果这个值为true,那么在解析的时候不会返回Bitmap,而是只返回这个Bitmap的尺寸。所以,如果只是想知道Bitmap的尺寸,但又不想将其加载到内存中可以使用这个属性。
- outWidth和outHeight 表示Bitmap的宽和高。一般和inJustDecodeBounds一起使用来获取Bitmap的宽高,但不加载到内存。
- inSampleSize 压缩图片时采样率的值,会根据inSampleSize按照比例(1/inSampleSize)来缩小Bitmap的宽高。如果inSampleSize为2,那么Bitmap的宽为原来的1/2,高为原来的1/2。那么这个Bitmap所占内存会缩小为原来的1/4。
- inDensity 表示的是这个Bitmap的像素密度,对应的是DisplayMetrics中的densityDpi,density.
- inTargetDensity 表示要被新 Bitmap 的目标像素密度,对应的是 DisplayMetrics 中的 densityDpi。
- inScreenDensity 表示实际设备的像素密度,对应的是 DisplayMetrics 中的 densityDpi。
- inPreferredConfig 这个值是设置色彩模式,默认值是 ARGB_8888,这个模式下,一个像素点占用 4Byte 。RGB_565 占用 2Byte,ARGB_4444 占用 4Byte(以废弃)。
- inPremultiplied 这个值和透明度通道有关,默认值是 true,如果设置为 true,则返回的 Bitmap 的颜色通道上会预先附加上透明度通道。
- inDither 这个值和抖动解码有关,默认值为 false,表示不采用抖动解码。
- inScaled 设置这个Bitmap 是否可以被缩放,默认值是 true,表示可以被缩放。
- inPreferQualityOverSpeed 这个值表示是否在解码时图片有更高的品质,仅用于 JPEG 格式。如果设置为 true,则图片会有更高的品质,但是会解码速度会很慢。
- inBitmap :这个参数用来实现 Bitmap 内存的复用,但复用存在一些限制,具体体现在:在 Android 4.4 之前只能重用相同大小的 Bitmap 的内存,而 Android 4.4 及以后版本则只要后来的 Bitmap 比之前的小即可。使用 inBitmap 参数前,每创建一个 Bitmap 对象都会分配一块内存供其使用,而使用了 inBitmap 参数后,多个 Bitmap 可以复用一块内存,这样可以提高性能。
BitmapFactory.Options的使用
    val options = BitmapFactory.Options()
    options.inPreferredConfig = Bitmap.Config.RGB_565  // 设置bitmap的颜色格式
    options.inSampleSize = 2 // 设置采样率
    val bitmap = BitmapFactory.decodeResource(resources, R.drawable.image, options)
图片压缩
1.质量压缩
质量压缩不会减少图片的像素,它是在保持像素的前提下改变图片的位深及透明度,来达到压缩图片的目的,图片的长,宽,像素都不会改变,那么bitmap所占内存大小是不会变的。
我们可以看到有个参数:quality,可以调节你压缩的比例,但是还要注意一点就是,质量压缩对png格式这种图片没有作用,因为png是无损压缩。
    private void compressQuality() {
        Bitmap bm = BitmapFactory.decodeResource(getResources(), R.drawable.test);
        mSrcSize = bm.getByteCount() + "byte";
        ByteArrayOutputStream bos = new ByteArrayOutputStream();
        bm.compress(Bitmap.CompressFormat.JPEG, 100, bos);
        byte[] bytes = bos.toByteArray();
        mSrcBitmap = BitmapFactory.decodeByteArray(bytes, 0, bytes.length);
    }
2. 采样压缩
这个方法主要用图片分辨率较大,但是设置的目标View较小时进行的。可以通过采样压缩将图片分辨率压缩到View的宽高相等。由于图片的分辨率减小,所有图片加载到内存时占用的空间也会更小。代码如下:
BitmapFactory.Options options = new Options();
options.inSampleSize = 2;
Bitmap bitmap = BitmapFactory.decodeResource(getResources(), resId, options);
3.矩阵缩放
可以通过矩阵来缩放图片的尺寸达到压缩图片的效果,与采样压缩原理一样。
private void compressMatrix() {
        Matrix matrix = new Matrix();
        matrix.setScale(0.5f, 0.5f);
        Bitmap bm = BitmapFactory.decodeResource(getResources(), R.drawable.test);
        mSrcBitmap = Bitmap.createBitmap(bm, 0, 0, bm.getWidth(), bm.getHeight(), matrix, true);
        bm = null;
 }
4. 使用inPreferredConfig压缩
通过inPreferredConfig的配置,修改单个像素点占用的内存来实现压缩。如在包含透明通道的图片中可以将inPreferredConfig设置为RGB_565,相比RGB_8888节省一半的内存开销。
内容来源: