- NodeJS REST API设计
 PDF电子书集合
Node.js 使用 NoSQL 数据库详解
在上一章中,我们实现了一个示例应用,该应用公开了提供目录数据的只读服务。为了简单起见,我们通过使用文件存储在这个实现中引入了一个性能瓶颈。此存储不适用于 web 应用。它依赖于 33 个物理文件,使我们的应用无法处理重载,因为由于磁盘 I/O 操作,文件存储缺少多租户支持。换句话说,我们确实需要寻找更好的存储解决方案,在需要时可以根据支持 REST 的应用的要求轻松扩展。NoSQL 数据库现在大量用于 web 和云环境,确保零停机时间和高可用性。与传统的事务性 SQL 数据库相比,它们具有以下优势:
几乎所有现代 NoSQL 解决方案都支持集群,并且可以随着应用的负载进一步扩展。此外,它们中的大多数都有 HTTP 上支持 REST 的接口,这在高可用性场景中通过负载平衡器简化了它们的使用。传统的客户端语言(如 JavaScript)通常无法使用经典的数据库驱动程序,因为它们需要本机库或驱动程序。然而,NoSQL 的思想起源于使用文档数据存储。因此,它们中的大多数都支持 JSON 格式,这是 JavaScript 的固有格式。最后但并非最不重要的一点是,大多数 NoSQL 解决方案都是开源的,并且是免费提供的,并且具有开源项目提供的所有好处:社区、示例和自由!
在本章中,我们将了解 MongoDB NoSQL 数据库以及与之交互的 Mongoose 模块。我们将了解如何为数据库模型设计和实现自动化测试。最后,在本章的最后,我们将消除文件存储瓶颈,并将应用移动到几乎可以投入生产的状态。
MongoDB 是一个开源文档数据库,内置对 JSON 格式的支持。它基于文档中的任何可用属性提供完整的索引支持。由于其可扩展性特性,它非常适合于高可用性场景。MongoDB,可在获取 https://mms.mongodb.com 、云管理服务MongoDB 管理服务(MMS已准备就绪。它们利用并自动化了为保持云数据库良好状态而需要执行的大多数开发操作,包括升级、进一步扩展、备份、恢复、性能和安全警报。
让我们继续安装 MongoDB。Windows、Linux、macOS 和 Solaris 的安装程序可在上找到 http://www.mongodb.org/downloads 。Linux 用户可以在所有流行的分发存储库中找到 MongoDB,而 Windows 用户可以使用用户友好的向导来指导您完成安装步骤,对于典型的安装,您只需接受许可协议并提供安装路径。
成功安装后,执行以下命令启动 MongoDB。如果要为数据指定自定义位置,必须使用--dbpath参数。或者,您可以通过--rest参数启动 MongoDB HTTP 控制台:
mongod --dbpath ./data --rest与 MongoDB 通信的默认端口为27017,其 HTTP 控制台隐式配置为使用比数据端口高 1000 的端口。因此,控制台的默认端口为28017。HTTP 控制台提供有关数据库的有用信息,如日志、运行状况、可用数据库等。我强烈建议你花点时间在这上面。控制台还可以用作数据库的 RESTful 运行状况检查服务,因为它提供有关正在运行的数据库服务和上次发生的错误的 JSON 编码信息:
GET /replSetGetStatus?text=1 HTTP/1.1
Host: localhost:28017
Connection: Keep-Alive
User-Agent: RestClient-Tool

HTTP/1.0 200 OK
Content-Length: 56
Connection: close
Content-Type: text/plain;charset=utf-8

{
"ok": 0,
"errmsg": "not running with --replSet"
}
此 REST 接口可用于脚本或应用中,以自动更改通知,提供数据库引擎的当前状态等。
控制台的日志部分显示服务器正在成功运行(如果是)。现在我们准备进一步了解如何将 Node.js 连接到 MongoDB。
Mongoose是一个以对象文档映射器(ODM样式)将 Node.js 连接到 MongoDB 的模块。它为存储在数据库中的文档提供了创建、读取、更新和删除(也称为CRUD功能。Mongoose 使用模式定义所用文档的结构。模式是 Mongoose 中最小的数据定义单元。模型是根据模式定义构建的。它是一个类似构造函数的函数,可用于创建或查询文档。文档是模型的实例,表示到 MongoDB 中存储的文档的一对一映射。模式模型文档层次结构提供了定义对象的自描述方式,并允许轻松的数据验证。
让我们从安装带有npm的猫鼬开始:
npm install mongoose现在我们已经安装了 Mongoose 模块,我们的第一步将是定义一个表示目录中的项目的模式:
var mongoose = require('mongoose');
var Schema = mongoose.Schema;
var itemSchema = new Schema ({
    "itemId" : {type: String, index: {unique: true}},
    "itemName": String,
    "price": Number,
    "currency" : String,
    "categories": [String]
});
前面的代码段创建项的架构定义。定义模式非常简单,与 JSON 模式定义非常相似;您必须使用其类型描述和属性,并且可以选择为每个键提供附加属性。在 catalog 应用中,我们需要使用itemId作为唯一索引,以避免具有相同 ID 的两个不同项目。因此,除了将其类型定义为String之外,我们还使用index属性来描述itemId字段的值对于每个单独的项目必须是唯一的。
猫鼬引入了术语模型。模型是由模式定义编译而成的类似构造函数的函数。模型实例表示可以保存到数据库或从数据库中读取的文档。创建模型实例是通过调用mongoose实例的model函数并传递模型应该使用的模式来完成的:
var CatalogItem = mongoose.model('Item', itemSchema);模型还公开了用于查询和数据操作的函数。假设我们已经初始化了一个模式并创建了一个模型,那么将一个新项存储到 MongoDB 就像创建一个新的model实例并调用其save函数一样简单:
var mongoose = require('mongoose');

mongoose.connect('mongodb://localhost/catalog');
var db = mongoose.connection;

db.on('error', console.error.bind(console, 'connection error:'));
db.once('open', function() {
  var watch = new CatalogItem({
    itemId: 9 ,
    itemName: "Sports Watch1",
    brand: 'А1',
    price: 100,
    currency: "EUR",
    categories: ["Watches", "Sports Watches"]
  });

  watch.save((error, item, affectedNo)=> {
    if (!error) {
      console.log('Item added successfully to the catalog');
    } else {
      console.log('Cannot add item to the catlog');
    }
  });
});

db.once('open', function() {
  var filter = {
    'itemName' : 'Sports Watch1',
    'price': 100
  }

  CatalogItem.find(filter, (error, result) => {
    if (error) {
      consoloe.log('Error occured');
    } else {
      console.log('Results found:'+ result.length);
      console.log(result);
    }
  });
});
下面是如何使用该模型来查询表示属于名为Sports Watches的Watches组的运动手表的文档:
db.once('open', function() {
  var filter = {
    'itemName' : 'Sports Watch1',
    'price': 100
  }
  CatalogItem.findOne(filter, (error, result) => {
    if (error) {
      consoloe.log('Error occurred');
    } else {
      console.log(result);
    }
  });
});该模型还公开了一个findOne函数,这是一种通过其唯一索引查找对象,然后对其执行一些数据操作的便捷方法,即删除或更新操作。以下示例删除一个项目:
CatalogItem.findOne({itemId: 1 }, (error, data) => {
  if (error) {
    console.log(error);
    return;
  } else {
    if (!data) {
    console.log('not found');
      return;
    } else {
      data.remove(function(error){
        if (!error) { data.remove();}
        else { console.log(error);}
        });
      }
    }
 });
Mocha 是最流行的 JavaScript 测试框架之一;它的主要目标是提供一种简单的方法来测试异步 JavaScript 代码。让我们在全球范围内安装 Mocha,以便我们可以将其提供给将来可能开发的任何 Node.js 应用:
npm install -g mocha我们还需要一个可以与 Mocha 一起使用的断言库。断言库提供了验证实际值与预期值的函数,当实际值与预期值不相等时,断言库将导致测试失败。Should.js断言库模块易于使用,这将是我们的选择,因此让我们也全局安装它:
npm install -g should现在我们已经安装了测试模块,我们需要在package.json文件中指定testcase文件路径。让我们通过在脚本节点中添加指向 Mocha 的test元素和testcase文件来修改它:
{
"name": "chapter4",
"version": "0.0.0",
"private": true,
"scripts": {
"start": "node ./bin/www",
"test": "mocha test/model-test.js"
 },
"dependencies": {
"body-parser": "~1.13.2",
"cookie-parser": "~1.3.5",
"debug": "~2.2.0",
"express": "~4.16.0",
"jade": "~1.11.0",
"morgan": "~1.6.1",
"serve-favicon": "~2.3.0"
 }
}
这将告诉 npm 包管理器在执行npm测试时触发 Mocha。
Mongoose 测试的自动化不得受数据库当前状态的影响。为了确保每次测试运行的结果都是可预测的,我们需要确保数据库状态与我们预期的完全一致。我们将在test目录中实现一个名为prepare.js的模块。它将在每次测试运行之前清除数据库:
var mongoose = require('mongoose');
beforeEach(function (done) {
  function clearDatabase() {
    for (var i in mongoose.connection.collections) {
      mongoose.connection.collections[i].remove(function()
      {});
    }
    return done();
  }
  if (mongoose.connection.readyState === 0) {
    mongoose.connect(config.db.test, function (err) {
      if (err) {
        throw err;
      }
      return clearDatabase();
    });
  } else {
    return clearDatabase();
  }
});
afterEach(function (done) {
  mongoose.disconnect();
  return done();
});
接下来,我们将实施摩卡测试,该测试将创建一个新项目:
var mongoose = require('mongoose');
var should = require('should');
var prepare = require('./prepare');

const model = require('../model/item.js');
const CatalogItem = model.CatalogItem;

mongoose.createConnection('mongodb://localhost/catalog');

describe('CatalogItem: models', function () {
  describe('#create()', function () {
    it('Should create a new CatalogItem', function (done) {

      var item = {
        "itemId": "1",
        "itemName": "Sports Watch",
        "price": 100,
        "currency": "EUR",
        "categories": [
          "Watches",
          "Sports Watches"
        ]

      };

      CatalogItem.create(item, function (err, createdItem) {
        // Check that no error occured
        should.not.exist(err);
        // Assert that the returned item has is what we expect

        createdItem.itemId.should.equal('1');
        createdItem.itemName.should.equal('Sports Watch');
        createdItem.price.should.equal(100);
        createdItem.currency.should.equal('EUR');
        createdItem.categories[0].should.equal('Watches');
        createdItem.categories[1].should.equal('Sports Watches');
        //Notify mocha that the test has completed
        done();
      });
    });
  });
});现在,执行npm test会导致对 MongoDB 数据库的调用,从传递的 JSON 对象中创建一个项。插入后,将执行断言回调,以确保 Mongoose 传递给的值与从数据库返回的值相同。尝试一下并中断测试,只需将断言中的预期值更改为无效值,您就会看到测试失败。
在了解了模型的工作原理之后,是时候创建一个用户定义的模块来包装目录的所有 CRUD 操作了。由于我们打算在 RESTful web 应用中使用该模块,因此将模式定义和模型创建放在模块之外并将其作为每个模块函数的参数提供似乎是合乎逻辑的。单元测试中使用了相同的模式定义,确保了模块的稳定性。现在,让我们为每个 CRUD 函数添加一个实现,从一个remove()函数开始。它根据项目的id查找项目,并将其从数据库中删除(如果存在):
exports.remove = function (request, response) {
  console.log('Deleting item with id: '    + request.body.itemId);
  CatalogItem.findOne({itemId: request.params.itemId}, function(error, data) {
      if (error) {
          console.log(error);
          if (response != null) {
              response.writeHead(500, contentTypePlainText);
              response.end('Internal server error');
          }
          return;
      } else {
          if (!data) {
              console.log('Item not found');
              if (response != null) {
                  response.writeHead(404, contentTypePlainText);
                  response.end('Not Found');
              }
              return;
          } else {
              data.remove(function(error){
                  if (!error) {
                      data.remove();
                      response.json({'Status': 'Successfully deleted'});
                  }
                  else {
                      console.log(error);
                      response.writeHead(500, contentTypePlainText);
                      response.end('Internal Server Error');
                  }
              });
          }
      }
  });
}saveItem()函数将请求正文有效负载作为参数。有效的更新请求将包含以 JSON 格式表示的item对象的新状态。首先,从 JSON 对象中解析出itemId。接下来,完成查找。如果某个项目存在,则会对其进行更新。否则,将创建一个新的:
exports.saveItem = function(request, response)
{
  var item = toItem(request.body);
  item.save((error) => {
    if (!error) {
      item.save();
      response.writeHead(201, contentTypeJson);
      response.end(JSON.stringify(request.body));
    } else {
      console.log(error);
      CatalogItem.findOne({itemId : item.itemId    },
      (error, result) => {
        console.log('Check if such an item exists');
            if (error) {
                console.log(error);
                response.writeHead(500, contentTypePlainText);
                response.end('Internal Server Error');
            } else {
                if (!result) {
                    console.log('Item does not exist. Creating a new one');
                    item.save();
                    response.writeHead(201, contentTypeJson);
                    response.
                    response.end(JSON.stringify(request.body));
                } else {
                    console.log('Updating existing item');
                    result.itemId = item.itemId;
                    result.itemName = item.itemName;
                    result.price = item.price;
                    result.currency = item.currency;
                    result.categories = item.categories;
                    result.save();
                    response.json(JSON.stringify(result));
                }
           }
      });
    }
  });
};toItem()函数将 JSON 负载转换为CatalogItem模型实例,即项目文档:
function toItem(body) {
    return new CatalogItem({
        itemId: body.itemId,
        itemName: body.itemName,
        price: body.price,
        currency: body.currency,
        categories: body.categories
    });
}
我们还需要提供一种查询数据的方法,因此让我们实现一个查询类别中所有项目的函数:
exports.findItemsByCategory = function (category, response) {
    CatalogItem.find({categories: category}, function(error, result) {
        if (error) {
            console.error(error);
            response.writeHead(500, { 'Content-Type': 'text/plain' });
            return;
        } else {
            if (!result) {
                if (response != null) {
                    response.writeHead(404, contentTypePlainText);
                    response.end('Not Found');
                }
                return;
            }

            if (response != null){
                response.setHeader('Content-Type', 'application/json');
                response.send(result);
            }
            console.log(result);
        }
    });
}与findItemsByCategory类似,下面是一个通过项目 ID 查找项目的函数:
exports.findItemById = function (itemId, response) {
    CatalogItem.findOne({itemId: itemId}, function(error, result) {
        if (error) {
            console.error(error);
            response.writeHead(500, contentTypePlainText);
            return;
        } else {
            if (!result) {
                if (response != null) {
                    response.writeHead(404, contentTypePlainText);
                    response.end('Not Found');
                }
                return;
            }

            if (response != null){
                response.setHeader('Content-Type', 'application/json');
                response.send(result);
            }
            console.log(result);
        }
    });
}
最后,还有一个函数列出数据库中存储的所有目录项。它使用 Mongoose modelfind函数查找模型的所有文档,并使用其第一个参数作为过滤器。我们需要一个返回所有现有文档的函数;这就是我们提供空对象的原因。这将返回所有可用的项目。结果可在callback函数中获得,该函数是模型find函数的第二个参数:
exports.findAllItems = function (response) {
    CatalogItem.find({}, (error, result) => {
        if (error) {
            console.error(error);
            return null;
        }
        if (result != null) {
            response.json(result);
        } else {
      response.json({});
    }
    });
};
该模块将是我们 REST 服务的基础。它负责所有的数据操作,以及不同类型的查询。它以可重用的方式封装所有操作。
现在我们有了模型的自动化测试和一个用户定义的模块,该模块利用了这些测试。这确保了模块的稳定性,并为广泛采用做好了准备。
是时候构建一个新的基于 Express 的应用并添加路由,从而向其公开新模块了:
const express = require('express');
const router = express.Router();

const catalog = require('../modules/catalog');
const model = require('../model/item.js');

router.get('/', function(request, response, next) {
  catalog.findAllItems(response);
});

router.get('/item/:itemId', function(request, response, next) {
  console.log(request.url + ' : querying for ' + request.params.itemId);
  catalog.findItemById(request.params.itemId, response);
});

router.get('/:categoryId', function(request, response, next) {
  console.log(request.url + ' : querying for ' + request.params.categoryId);
  catalog.findItemsByCategory(request.params.categoryId, response);
});

router.post('/', function(request, response, next) {
  console.log('Saving item using POST method);
  catalog.saveItem(request, response);
});

router.put('/', function(request, response, next) {
  console.log('Saving item using PUT method');
  catalog.saveItem(request, response);
});

router.delete('/item/:itemId', function(request, response, next) {
  console.log('Deleting item with id: request.params.itemId);
  catalog.remove(request, response);
});

module.exports = router;
总之,我们将 catalog data service 模块的每个功能路由到 RESTful 服务的一个操作:
-
GET /catalog/item/:itemId:此调用catalog.findItemById() -
POST /catalog:此调用catalog.saveItem() -
PUT /catalog:此调用catalog.saveItem() -
DELETE / catalog/item/:id:此调用catalog.remove() -
GET /catalog/:category:此调用catalog.findItemsByCategory() -
GET /catalog/:此调用catalog.findAllItems()
随着我们的操作暴露出来,我们准备执行一些更为严肃的 REST 测试。让我们启动 Postman 并测试新暴露的端点:
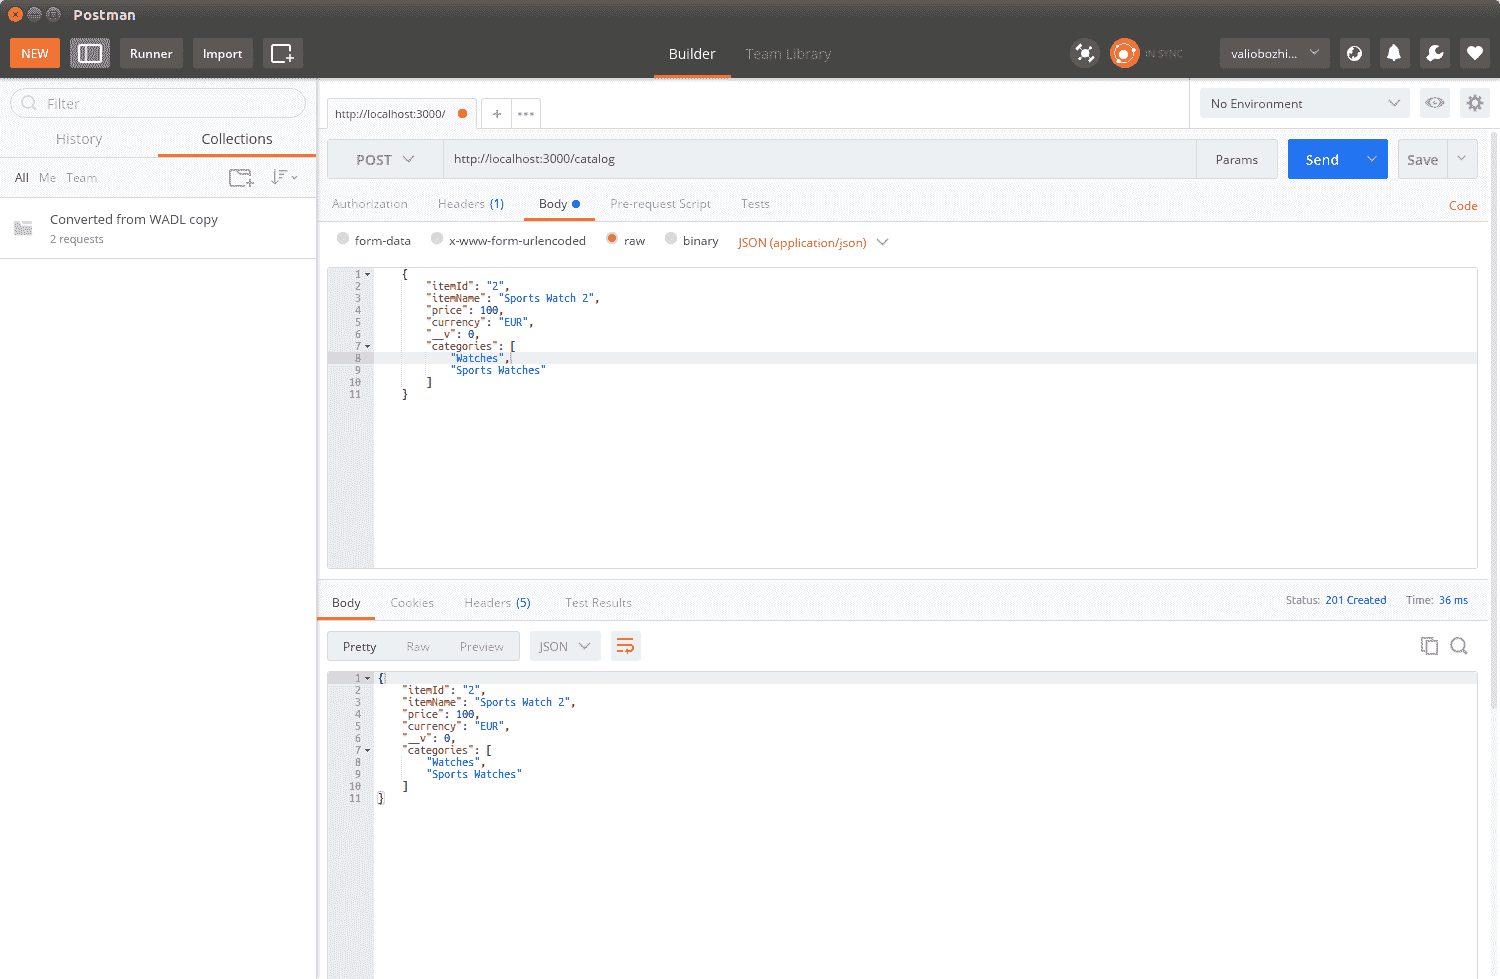
花一些时间彻底测试每个操作。这将帮助您确信 catalog data service 模块确实可以工作,并使您更熟悉 HTTP 响应的服务和读取方式。作为 RESTfulAPI 开发人员,您应该能够流畅地读取 HTTP 转储,这些转储显示不同的请求有效负载和状态代码。
完成以下问题:
- 如何使用 Mongoose 对多值属性的单个值执行查询?
- 定义用于测试 Node.js 模块操作 NoSQL 数据库的策略。
在本章中,我们介绍了 MongoDB,一个强大的面向文档的数据库。我们利用它并利用 Mocha 实现了数据库层的自动化测试。现在是构建一个成熟的 RESTful web 服务的时候了。在下一章中,我们将扩展用户定义的模块,包括通过文档属性进行搜索的支持,并添加过滤和分页功能,这些功能最终将演变为成熟的 RESTful 服务实现。