- Go Web 开发秘籍
 PDF电子书集合
Go 编写和使用 RESTful Web 服务详解
在本章中,我们将介绍以下配方:
每当我们构建一个封装了对其他相关应用有帮助的逻辑的 web 应用时,我们通常也会编写和使用 web 服务。这是因为它们通过网络公开功能,而网络可以通过 HTTP 协议访问,从而使应用成为唯一的真实来源。
在本章中,我们将编写一个支持GET、POST、PUT和DELETEHTTP 方法的 REST 式 API,然后我们将学习如何对 REST API 进行版本化,这在我们创建公开使用的 API 时非常有用。最后,我们将编写 REST 客户机来使用它们。
在编写 web 应用时,我们通常必须向客户机或 UI 公开我们的服务,以便他们能够使用在不同系统上运行的代码。可以使用 HTTP 协议方法公开服务。在众多 HTTP 方法中,我们将学习在本配方中实现 HTTPGET方法。
- 使用
go get命令安装github.com/gorilla/mux包,如下所示:
$ go get github.com/gorilla/mux- 创建
http-rest-get.go,我们将在其中定义两条路由-/employees和/employee/{id}以及它们的处理程序。前者写入员工的静态数组,后者将所提供 ID 的员工详细信息写入 HTTP 响应流,如下所示:
package main
import
(
  "encoding/json"
  "log"
  "net/http"
  "github.com/gorilla/mux"
)
const
(
  CONN_HOST = "localhost"
  CONN_PORT = "8080"
)
type Route struct
{
  Name string
  Method string
  Pattern string
  HandlerFunc http.HandlerFunc
}
type Routes []Route
var routes = Routes
{
  Route
  {
    "getEmployees",
    "GET",
    "/employees",
    getEmployees,
  },
  Route
  {
    "getEmployee",
    "GET",
    "/employee/{id}",
    getEmployee,
  },
}
type Employee struct
{
  Id string `json:"id"`
  FirstName string `json:"firstName"`
  LastName string `json:"lastName"`
}
type Employees []Employee
var employees []Employee
func init()
{
  employees = Employees
  {
    Employee{Id: "1", FirstName: "Foo", LastName: "Bar"},
    Employee{Id: "2", FirstName: "Baz", LastName: "Qux"},
  }
}
func getEmployees(w http.ResponseWriter, r *http.Request)
{
  json.NewEncoder(w).Encode(employees)
}
func getEmployee(w http.ResponseWriter, r *http.Request)
{
  vars := mux.Vars(r)
  id := vars["id"]
  for _, employee := range employees
  {
    if employee.Id == id
    {
      if err := json.NewEncoder(w).Encode(employee); err != nil
      {
        log.Print("error getting requested employee :: ", err)
      }
    }
  }
}
func AddRoutes(router *mux.Router) *mux.Router
{
  for _, route := range routes
  {
    router.
    Methods(route.Method).
    Path(route.Pattern).
    Name(route.Name).
    Handler(route.HandlerFunc)
  }
  return router
}
func main()
{
  muxRouter := mux.NewRouter().StrictSlash(true)
  router := AddRoutes(muxRouter)
  err := http.ListenAndServe(CONN_HOST+":"+CONN_PORT, router)
  if err != nil
  {
    log.Fatal("error starting http server :: ", err)
    return
  }
}- 使用以下命令运行程序:
$ go run http-rest-get.go一旦我们运行程序,HTTP 服务器将在端口8080上开始本地侦听。
接下来,从命令行执行一个GET请求,如下所示,将为您提供所有员工的列表:
$ curl -X GET http://localhost:8080/employees
[{"id":"1","firstName":"Foo","lastName":"Bar"},{"id":"2","firstName":"Baz","lastName":"Qux"}]
在这里,从命令行执行对特定员工 ID 的GET请求,如下所示,将为您提供相应 ID 的员工详细信息:
$ curl -X GET http://localhost:8080/employee/1
 {"id":"1","firstName":"Foo","lastName":"Bar"}
让我们了解一下我们编写的程序:
- 我们使用了
import ("encoding/json" "log" "net/http" "strconv" "github.com/gorilla/mux")。在这里,我们导入了github.com/gorilla/mux来创建一个Gorilla Mux Router。 - 接下来,我们声明了具有四个字段的
Route结构类型—Name、Method、Pattern和HandlerFunc,其中Name表示 HTTP 方法的名称,Method表示 HTTP 方法类型,可以是GET、POST、PUT、DELETE等等,Pattern表示 URL 路径,HandlerFunc表示 HTTP 处理程序。 - 接下来,我们为
GET请求定义了两条路由,如下所示:
var routes = Routes
{
  Route
  {
    "getEmployees",
    "GET",
    "/employees",
    getEmployees,
  },
  Route
  {
    "getEmployee",
    "GET",
    "/employee/{id}",
    getEmployee,
  },
}- 接下来,我们定义了一个静态
Employees数组,如下所示:
func init()
{
  employees = Employees
  {
    Employee{Id: "1", FirstName: "Foo", LastName: "Bar"},
    Employee{Id: "2", FirstName: "Baz", LastName: "Qux"},
  }
}- 然后,我们定义了两个处理程序-
getEmployees和getEmployee,前者只是封送一个静态员工数组并将其写入 HTTP 响应流,后者从 HTTP 请求变量中获取员工 ID,从数组中获取对应 ID 的员工,封送对象,并将其写入 HTTP 响应流。 - 在处理程序之后,我们定义了一个
AddRoutes函数,该函数迭代我们定义的 routes 数组,将其添加到gorilla/mux路由器,并返回Router对象。 - 最后,我们定义了
main(),其中我们使用NewRouter()处理程序创建了一个gorilla/mux路由器实例,新路由的尾部斜杠行为为 true,这意味着应用将始终看到路由中指定的路径。例如,如果路由路径为/path/,则访问/path将重定向到前者,反之亦然。
每当我们必须通过异步调用或 HTML 表单向服务器发送数据时,我们都会使用 HTTPPOST方法实现,我们将在本配方中介绍。
- 使用
go get命令安装github.com/gorilla/mux包,如下所示:
$ go get github.com/gorilla/mux- 创建
http-rest-post.go,其中我们将定义一个支持 HTTPPOST方法的额外路由和一个处理程序,该处理程序将员工添加到初始静态员工数组中,并将更新后的列表写入 HTTP 响应流,如下所示:
package main
import
(
  "encoding/json"
  "log"
  "net/http"
  "github.com/gorilla/mux"
)
const
(
  CONN_HOST = "localhost"
  CONN_PORT = "8080"
)
type Route struct
{
  Name string
  Method string
  Pattern string
  HandlerFunc http.HandlerFunc
}
type Routes []Route
var routes = Routes
{
  Route
  {
    "getEmployees",
    "GET",
    "/employees",
    getEmployees,
  },
  Route
  {
    "addEmployee",
    "POST",
    "/employee/add",
    addEmployee,
  },
}
type Employee struct
{
  Id string `json:"id"`
  FirstName string `json:"firstName"`
  LastName string `json:"lastName"`
}
type Employees []Employee
var employees []Employee
func init()
{
  employees = Employees
  {
    Employee{Id: "1", FirstName: "Foo", LastName: "Bar"},
    Employee{Id: "2", FirstName: "Baz", LastName: "Qux"},
  }
}
func getEmployees(w http.ResponseWriter, r *http.Request)
{
  json.NewEncoder(w).Encode(employees)
}
func addEmployee(w http.ResponseWriter, r *http.Request)
{
  employee := Employee{}
  err := json.NewDecoder(r.Body).Decode(&employee)
  if err != nil
  {
    log.Print("error occurred while decoding employee
    data :: ", err)
    return
  }
  log.Printf("adding employee id :: %s with firstName
  as :: %s and lastName as :: %s ", employee.Id,
  employee.FirstName, employee.LastName)
  employees = append(employees, Employee{Id: employee.Id,
  FirstName: employee.FirstName, LastName: employee.LastName})
  json.NewEncoder(w).Encode(employees)
}
func AddRoutes(router *mux.Router) *mux.Router
{
  for _, route := range routes
  {
    router.
    Methods(route.Method).
    Path(route.Pattern).
    Name(route.Name).
    Handler(route.HandlerFunc)
  }
  return router
}
func main()
{
  muxRouter := mux.NewRouter().StrictSlash(true)
  router := AddRoutes(muxRouter)
  err := http.ListenAndServe(CONN_HOST+":"+CONN_PORT, router)
  if err != nil
  {
    log.Fatal("error starting http server :: ", err)
    return
  }
}- 使用以下命令运行程序:
$ go run http-rest-post.go一旦我们运行程序,HTTP 服务器将在端口8080上开始本地侦听。
接下来,从命令行执行一个POST请求,如下所示,将员工添加到列表中ID为3,并返回员工列表作为响应:
$ curl -H "Content-Type: application/json" -X POST -d '{"Id":"3", "firstName":"Quux", "lastName":"Corge"}' http://localhost:8080/employee/add这显示在以下屏幕截图中:

让我们了解一下我们在这个配方中引入的变化:
- 首先,我们添加了另一个名为
addEmployee的路由,它对 URL 模式/employee/add的每个POST请求执行addEmployee处理程序。 - 然后,我们定义了一个
addEmployee处理程序,它基本上使用 Go 内置encoding/json包的NewDecoder处理程序解码POST请求中的员工数据,将其附加到员工的初始静态数组中,并将其写入 HTTP 响应流。
每当我们想要更新我们之前创建的记录,或者想要创建一个新的记录(如果它不存在的话),通常称为Upsert,,那么我们就使用 HTTPPUT方法实现,我们将在本配方中介绍。
- 使用
go get命令安装github.com/gorilla/mux包,如下所示:
$ go get github.com/gorilla/mux- 创建
http-rest-put.go,在这里我们将定义一个支持 HTTPPUT方法的额外路由和一个处理程序,该处理程序为提供的 ID 更新员工详细信息,或者将员工添加到初始静态员工数组中;如果 ID 不存在,则将其封送到 JSON,并将其写入 HTTP 响应流,如下所示:
package main
import
(
  "encoding/json"
  "log"
  "net/http"
  "github.com/gorilla/mux"
)
const
(
  CONN_HOST = "localhost"
  CONN_PORT = "8080"
)
type Route struct
{
  Name string
  Method string
  Pattern string
  HandlerFunc http.HandlerFunc
}
type Routes []Route
var routes = Routes
{
  Route
  {
    "getEmployees",
    "GET",
    "/employees",
    getEmployees,
  },
  Route
  {
    "addEmployee",
    "POST",
    "/employee/add",
    addEmployee,
  },
  Route
  {
    "updateEmployee",
    "PUT",
    "/employee/update",
    updateEmployee,
  },
}
type Employee struct
{
  Id string `json:"id"`
  FirstName string `json:"firstName"`
  LastName string `json:"lastName"`
}
type Employees []Employee
var employees []Employee
func init()
{
  employees = Employees
  {
    Employee{Id: "1", FirstName: "Foo", LastName: "Bar"},
    Employee{Id: "2", FirstName: "Baz", LastName: "Qux"},
  }
}
func getEmployees(w http.ResponseWriter, r *http.Request)
{
  json.NewEncoder(w).Encode(employees)
}
func updateEmployee(w http.ResponseWriter, r *http.Request)
{
  employee := Employee{}
  err := json.NewDecoder(r.Body).Decode(&employee)
  if err != nil
  {
    log.Print("error occurred while decoding employee
    data :: ", err)
    return
  }
  var isUpsert = true
  for idx, emp := range employees
  {
    if emp.Id == employee.Id
    {
      isUpsert = false
      log.Printf("updating employee id :: %s with
      firstName as :: %s and lastName as:: %s ",
      employee.Id, employee.FirstName, employee.LastName)
      employees[idx].FirstName = employee.FirstName
      employees[idx].LastName = employee.LastName
      break
    }
  }
  if isUpsert
  {
    log.Printf("upserting employee id :: %s with
    firstName as :: %s and lastName as:: %s ",
    employee.Id, employee.FirstName, employee.LastName)
    employees = append(employees, Employee{Id: employee.Id,
    FirstName: employee.FirstName, LastName: employee.LastName})
  }
  json.NewEncoder(w).Encode(employees)
}
func addEmployee(w http.ResponseWriter, r *http.Request)
{
  employee := Employee{}
  err := json.NewDecoder(r.Body).Decode(&employee)
  if err != nil
  {
    log.Print("error occurred while decoding employee
    data :: ", err)
    return
  }
  log.Printf("adding employee id :: %s with firstName
  as :: %s and lastName as :: %s ", employee.Id,
  employee.FirstName, employee.LastName)
  employees = append(employees, Employee{Id: employee.Id,
  FirstName: employee.FirstName, LastName: employee.LastName})
  json.NewEncoder(w).Encode(employees)
}
func AddRoutes(router *mux.Router) *mux.Router
{
  for _, route := range routes
  {
    router.
    Methods(route.Method).
    Path(route.Pattern).
    Name(route.Name).
    Handler(route.HandlerFunc)
  }
  return router
}
func main()
{
  muxRouter := mux.NewRouter().StrictSlash(true)
  router := AddRoutes(muxRouter)
  err := http.ListenAndServe(CONN_HOST+":"+CONN_PORT, router)
  if err != nil
  {
    log.Fatal("error starting http server :: ", err)
    return
  }
}- 使用以下命令运行程序:
$ go run http-rest-put.go一旦我们运行程序,HTTP 服务器将在端口8080上开始本地侦听。
接下来,从命令行执行如下的PUT请求,将更新 ID 为1的员工的firstName和lastName:
$ curl -H "Content-Type: application/json" -X PUT -d '{"Id":"1", "firstName":"Grault", "lastName":"Garply"}' http://localhost:8080/employee/update这可以在以下屏幕截图中看到:

如果我们从下面的命令行对 ID 为3的员工执行PUT请求,它会将另一名员工添加到数组中,因为没有 ID 为 3 的员工,这说明了 upsert 场景:
$ curl -H "Content-Type: application/json" -X PUT -d '{"Id":"3", "firstName":"Quux", "lastName":"Corge"}' http://localhost:8080/employee/update这可以在以下屏幕截图中看到:

让我们了解一下我们在这个配方中引入的变化:
- 首先,我们添加了另一个名为
updateEmployee的路由,它对 URL 模式/employee/update的每个PUT请求执行updateEmployee处理程序。 - 然后,我们定义了一个
updateEmployee处理程序,它基本上使用 Go 内置encoding/json包的NewDecoder处理程序对PUT请求中的员工数据进行解码,迭代员工数组,以了解请求的员工 ID 是否存在于员工的初始静态数组中,我们也可以将其称为更新或升级场景,执行所需的操作,并将响应写入 HTTP 响应流。
每当我们想要删除不再需要的记录时,我们就使用 HTTPDELETE方法实现,我们将在本配方中介绍。
- 使用
go get命令安装github.com/gorilla/mux包,如下所示:
$ go get github.com/gorilla/mux- 创建
http-rest-delete.go,其中我们将定义一个支持 HTTPDELETE方法的路由和一个处理程序,该处理程序从员工的静态数组中删除所提供 ID 的员工详细信息,将该数组封送到 JSON,并将其写入 HTTP 响应流,如下所示:
package main
import
(
  "encoding/json"
  "log"
  "net/http"
  "github.com/gorilla/mux"
)
const
(
  CONN_HOST = "localhost"
  CONN_PORT = "8080"
)
type Route struct
{
  Name string
  Method string
  Pattern string
  HandlerFunc http.HandlerFunc
}
type Routes []Route
var routes = Routes
{
  Route
  {
    "getEmployees",
    "GET",
    "/employees",
    getEmployees,
  },
  Route
  {
    "addEmployee",
    "POST",
    "/employee/add/",
    addEmployee,
  },
  Route
  {
    "deleteEmployee",
    "DELETE",
    "/employee/delete",
    deleteEmployee,
  },
}
type Employee struct
{
  Id string `json:"id"`
  FirstName string `json:"firstName"`
  LastName string `json:"lastName"`
}
type Employees []Employee
var employees []Employee
func init()
{
  employees = Employees
  {
    Employee{Id: "1", FirstName: "Foo", LastName: "Bar"},
    Employee{Id: "2", FirstName: "Baz", LastName: "Qux"},
  }
}
func getEmployees(w http.ResponseWriter, r *http.Request)
{
  json.NewEncoder(w).Encode(employees)
}
func deleteEmployee(w http.ResponseWriter, r *http.Request)
{
  employee := Employee{}
  err := json.NewDecoder(r.Body).Decode(&employee)
  if err != nil
  {
    log.Print("error occurred while decoding employee
    data :: ", err)
    return
  }
  log.Printf("deleting employee id :: %s with firstName
  as :: %s and lastName as :: %s ", employee.Id,
  employee.FirstName, employee.LastName)
  index := GetIndex(employee.Id)
  employees = append(employees[:index], employees[index+1:]...)
  json.NewEncoder(w).Encode(employees)
}
func GetIndex(id string) int
{
  for i := 0; i < len(employees); i++
  {
    if employees[i].Id == id
    {
      return i
    }
  }
  return -1
}
func addEmployee(w http.ResponseWriter, r *http.Request)
{
  employee := Employee{}
  err := json.NewDecoder(r.Body).Decode(&employee)
  if err != nil
  {
    log.Print("error occurred while decoding employee
    data :: ", err)
    return
  }
  log.Printf("adding employee id :: %s with firstName
  as :: %s and lastName as :: %s ", employee.Id,
  employee.FirstName, employee.LastName)
  employees = append(employees, Employee{Id: employee.Id,
  FirstName: employee.FirstName, LastName: employee.LastName})
  json.NewEncoder(w).Encode(employees)
}
func AddRoutes(router *mux.Router) *mux.Router
{
  for _, route := range routes
  {
    router.
    Methods(route.Method).
    Path(route.Pattern).
    Name(route.Name).
    Handler(route.HandlerFunc)
  }
  return router
}
func main()
{
  muxRouter := mux.NewRouter().StrictSlash(true)
  router := AddRoutes(muxRouter)
  err := http.ListenAndServe(CONN_HOST+":"+CONN_PORT, router)
  if err != nil
  {
    log.Fatal("error starting http server :: ", err)
    return
  }
}- 使用以下命令运行程序:
$ go run http-rest-delete.go一旦我们运行程序,HTTP 服务器将在端口8080上开始本地侦听
接下来,从命令行执行一个DELETE请求,如下所示,将删除 ID 为 1 的员工,并向我们提供更新后的员工列表:
$ curl -H "Content-Type: application/json" -X DELETE -d '{"Id":"1", "firstName": "Foo", "lastName": "Bar"}' http://localhost:8080/employee/delete这可以在以下屏幕截图中看到:

让我们了解一下我们在这个配方中引入的变化:
- 首先,我们添加了另一个名为
deleteEmployee的路由,它对 URL 模式/employee/delete的每个DELETE请求执行deleteEmployee处理程序。 - 然后,我们定义了一个
deleteEmployee处理程序,它基本上使用 Go 内置encoding/json包的NewDecoder处理程序对DELETE请求中的员工数据进行解码,使用GetIndex助手函数获取被请求员工的索引,删除员工,并将更新后的数组作为 JSON 写入 HTTP 响应流。
当您创建一个 RESTful API 来为内部客户机服务时,您可能不必担心 API 的版本控制问题。更进一步说,如果您可以控制访问您的 API 的所有客户端,那么情况可能也是如此。
但是,如果您有一个公共 API,或者您无法控制使用它的每个客户机,则可能需要对您的 API 进行版本控制,因为业务需要发展,我们将在本配方中介绍这一点。
- 使用
go get命令安装github.com/gorilla/mux包,如下所示:
$ go get github.com/gorilla/mux- 创建
http-rest-versioning.go,我们将定义两个版本的相同 URL 路径,支持 HTTPGET方法,其中一个以v1为前缀,另一个以v2为前缀,在路由中,如下所示:
package main
import
(
  "encoding/json"
  "log"
  "net/http"
  "strings"
  "github.com/gorilla/mux"
)
const
(
  CONN_HOST = "localhost"
  CONN_PORT = "8080"
)
type Route struct
{
  Name string
  Method string
  Pattern string
  HandlerFunc http.HandlerFunc
}
type Routes []Route
var routes = Routes
{
  Route
  {
    "getEmployees",
    "GET",
    "/employees",
    getEmployees,
  },
}
type Employee struct
{
  Id string `json:"id"`
  FirstName string `json:"firstName"`
  LastName string `json:"lastName"`
}
type Employees []Employee
var employees []Employee
var employeesV1 []Employee
var employeesV2 []Employee
func init()
{
  employees = Employees
  {
    Employee{Id: "1", FirstName: "Foo", LastName: "Bar"},
  }
  employeesV1 = Employees
  {
    Employee{Id: "1", FirstName: "Foo", LastName: "Bar"},
    Employee{Id: "2", FirstName: "Baz", LastName: "Qux"},
  }
  employeesV2 = Employees
  {
    Employee{Id: "1", FirstName: "Baz", LastName: "Qux"},
    Employee{Id: "2", FirstName: "Quux", LastName: "Quuz"},
  }
}
func getEmployees(w http.ResponseWriter, r *http.Request)
{
  if strings.HasPrefix(r.URL.Path, "/v1")
  {
    json.NewEncoder(w).Encode(employeesV1)
  }
  else if strings.HasPrefix(r.URL.Path, "/v2")
  {
    json.NewEncoder(w).Encode(employeesV2)
  }
  else
  {
    json.NewEncoder(w).Encode(employees)
  }
}
func AddRoutes(router *mux.Router) *mux.Router
{
  for _, route := range routes
  {
    router.
    Methods(route.Method).
    Path(route.Pattern).
    Name(route.Name).
    Handler(route.HandlerFunc)
  }
  return router
}
func main()
{
  muxRouter := mux.NewRouter().StrictSlash(true)
  router := AddRoutes(muxRouter)
  // v1
  AddRoutes(muxRouter.PathPrefix("/v1").Subrouter())
  // v2
  AddRoutes(muxRouter.PathPrefix("/v2").Subrouter())
  err := http.ListenAndServe(CONN_HOST+":"+CONN_PORT, router)
  if err != nil
  {
    log.Fatal("error starting http server :: ", err)
    return
  }
}- 使用以下命令运行程序:
$ go run http-rest-versioning.go一旦我们运行程序,HTTP 服务器将在端口8080上开始本地侦听。
接下来,从命令行执行路径前缀为/v1的GET请求,如下所示,将为您提供一组员工的列表:
$ curl -X GET http://localhost:8080/v1/employees
[{"id":"1","firstName":"Foo","lastName":"Bar"},{"id":"2","firstName":"Baz","lastName":"Qux"}]在这里,执行路径前缀为/v2的GET请求将为您提供另一组员工的列表,如下所示:
$ curl -X GET http://localhost:8080/v2/employees
 [{"id":"1","firstName":"Baz","lastName":"Qux"},{"id":"2","firstName":"Quux","lastName":"Quuz"}]
有时,在设计 RESTURL 时,如果客户端查询端点而不在 URL 路径中指定版本,我们更愿意返回默认数据。为了合并它,我们修改了getEmployees处理程序,以检查 URL 中的前缀,并采取相应的行动。因此,从命令行执行不带路径前缀的GET请求,如下所示,将为您提供一个包含单个记录的列表,我们可以将其称为 REST 端点的默认或初始响应:
$ curl -X GET http://localhost:8080/employees
 [{"id":"1","firstName":"Foo","lastName":"Bar"}]
让我们了解一下我们在这个配方中引入的变化:
- 首先,我们定义了一个名为
getEmployees的单一路由,它对 URL 模式/employees的每个GET请求执行一个getEmployees处理程序。 - 然后,我们创建了三个数组,即
employees、employeesV1和employeesV2,它们分别作为对 URL 模式/employees、/v1/employees和/v2/employees的 HTTPGET调用的响应返回。 - 接下来,我们定义了一个
getEmployees处理程序,在这里我们检查 URL 路径中的前缀,并基于它执行操作。 - 然后,我们定义了一个
AddRoutes帮助函数,它迭代我们定义的 routes 数组,将其添加到gorilla/mux路由器,并返回Router对象。 - 最后,我们定义了
main(),其中我们使用NewRouter()处理程序创建了一个gorilla/mux路由器实例,新路由的尾随斜杠行为为 true,并通过调用AddRoutes助手函数将路由添加到该实例中,该函数传递默认路由器和两个子程序,一个前缀为v1,另一个前缀为v2。
今天,大多数与服务器通信的应用都使用 RESTful 服务。根据我们的需要,我们通过 JavaScript、jQuery 或 REST 客户机使用这些服务。
在这个配方中,我们将使用https://gopkg.in/resty.v1包编写一个 REST 客户机,它本身就是受 Ruby REST 客户机启发来使用 RESTful 服务的。
在单独的终端上运行http-rest-get.go,执行以下命令,这是我们在之前的一个配方中创建的:
$ go run http-rest-get.go请参见创建您的第一个 HTTP GET 方法配方。
通过执行以下命令验证/employees服务是否在端口8080上本地运行:
$ curl -X GET http://localhost:8080/employees这将返回以下响应:
[{"id":"1","firstName":"Foo","lastName":"Bar"},{"id":"2","firstName":"Baz","lastName":"Qux"}]- 使用
go get命令安装github.com/gorilla/mux和gopkg.in/resty.v1包,如下所示:
$ go get github.com/gorilla/mux
$ go get -u gopkg.in/resty.v1- 创建
http-rest-client.go,我们将在其中定义调用resty处理程序的处理程序,如GET、POST、PUT、DELETE,从 REST 服务获取响应,并将其写入 HTTP 响应流,如下所示:
package main
import
(
  "encoding/json"
  "fmt"
  "log"
  "net/http"
  "github.com/gorilla/mux"
  resty "gopkg.in/resty.v1"
)
const
(
  CONN_HOST = "localhost"
  CONN_PORT = "8090"
)
const WEB_SERVICE_HOST string = "http://localhost:8080"
type Employee struct
{
  Id string `json:"id"`
  FirstName string `json:"firstName"`
  LastName string `json:"lastName"`
}
func getEmployees(w http.ResponseWriter, r *http.Request)
{
  response, err := resty.R().Get(WEB_SERVICE_HOST +
  "/employees")
  if err != nil
  {
    log.Print("error getting data from the web service :: ", err)
    return
  }
  printOutput(response, err)
  fmt.Fprintf(w, response.String())
}
func addEmployee(w http.ResponseWriter, r *http.Request)
{
  employee := Employee{}
  decodingErr := json.NewDecoder(r.Body).Decode(&employee)
  if decodingErr != nil
  {
    log.Print("error occurred while decoding employee
    data :: ", decodingErr)
    return
  }
  log.Printf("adding employee id :: %s with firstName
  as :: %s and lastName as :: %s ", employee.Id,
  employee.FirstName, employee.LastName)
  response, err := resty.R().
  SetHeader("Content-Type", "application/json").
  SetBody(Employee{Id: employee.Id, FirstName:
  employee.FirstName, LastName: employee.LastName}).
  Post(WEB_SERVICE_HOST + "/employee/add")
  if err != nil
  {
    log.Print("error occurred while adding employee :: ", err)
    return
  }
  printOutput(response, err)
  fmt.Fprintf(w, response.String())
}
func updateEmployee(w http.ResponseWriter, r *http.Request)
{
  employee := Employee{}
  decodingErr := json.NewDecoder(r.Body).Decode(&employee)
  if decodingErr != nil
  {
    log.Print("error occurred while decoding employee
    data :: ", decodingErr)
    return
  }
  log.Printf("updating employee id :: %s with firstName
  as :: %s and lastName as :: %s ", employee.Id,
  employee.FirstName, employee.LastName)
  response, err := resty.R().
  SetBody(Employee{Id: employee.Id, FirstName:
  employee.FirstName, LastName: employee.LastName}).
  Put(WEB_SERVICE_HOST + "/employee/update")
  if err != nil
  {
    log.Print("error occurred while updating employee :: ", err)
    return
  }
  printOutput(response, err)
  fmt.Fprintf(w, response.String())
}
func deleteEmployee(w http.ResponseWriter, r *http.Request)
{
  employee := Employee{}
  decodingErr := json.NewDecoder(r.Body).Decode(&employee)
  if decodingErr != nil
  {
    log.Print("error occurred while decoding employee
    data :: ", decodingErr)
    return
  }
  log.Printf("deleting employee id :: %s with firstName
  as :: %s and lastName as :: %s ", employee.Id,
  employee.FirstName, employee.LastName)
  response, err := resty.R().
  SetBody(Employee{Id: employee.Id, FirstName:
  employee.FirstName, LastName: employee.LastName}).
  Delete(WEB_SERVICE_HOST + "/employee/delete")
  if err != nil
  {
    log.Print("error occurred while deleting employee :: ", err)
    return
  }
  printOutput(response, err)
  fmt.Fprintf(w, response.String())
}
func printOutput(resp *resty.Response, err error)
{
  log.Println(resp, err)
}
func main()
{
  router := mux.NewRouter().StrictSlash(false)
  router.HandleFunc("/employees", getEmployees).Methods("GET")
  employee := router.PathPrefix("/employee").Subrouter()
  employee.HandleFunc("/add", addEmployee).Methods("POST")
  employee.HandleFunc("/update", updateEmployee).Methods("PUT")
  employee.HandleFunc("/delete", deleteEmployee).Methods("DELETE")
  err := http.ListenAndServe(CONN_HOST+":"+CONN_PORT, router)
  if err != nil
  {
    log.Fatal("error starting http server : ", err)
    return
  }
}- 使用以下命令运行程序:
$ go run http-rest-client.go一旦我们运行程序,HTTP 服务器将在端口8090上开始本地侦听。
接下来,从命令行向 REST 客户端执行一个GET请求,如下所示,将为您提供服务中所有员工的列表:
$ curl -X GET http://localhost:8090/employees
[{"id":"1","firstName":"Foo","lastName":"Bar"},{"id":"2","firstName":"Baz","lastName":"Qux"}]类似地,通过执行以下命令,在单独的终端中运行http-rest-post.go,这是我们在之前的一个配方中创建的:
$ go run http-rest-post.go从命令行向 REST 客户端执行POST请求,如下所示:
$ curl -H "Content-Type: application/json" -X POST -d '{"Id":"3", "firstName":"Quux", "lastName":"Corge"}' http://localhost:8090/employee/add [{"id":"1","firstName":"Foo","lastName":"Bar"},{"id":"2","firstName":"Baz","lastName":"Qux"},{"id":"3","firstName":"Quux","lastName":"Corge"}]这将向初始静态列表中添加一名员工,并返回更新后的员工列表,如以下屏幕截图所示:

让我们了解一下我们编写的程序:
- 我们使用
import ("encoding/json" "fmt" "log" "net/http" "github.com/gorilla/mux" resty “gopkg.in/resty.v1")导入github.com/gorilla/mux创建了一个Gorilla Mux Router和gopkg.in/resty.v1,包别名为resty,是 Go 的 REST 客户端,有各种处理程序使用 RESTful web 服务。 - 使用
const WEB_SERVICE_HOST string = "http://localhost:8080",我们声明了 RESTful web 服务主机的完整 URL。
根据项目大小,您可以将WEB_SERVICE_HOST字符串移动到常量文件或属性文件,以帮助您在运行时覆盖其值。
- 接下来,我们定义了一个
getEmployees处理程序,其中我们创建了一个新的resty请求对象,调用其R()处理程序,调用Get方法,该方法执行 HTTPGET请求,获取响应,并将其写入 HTTP 响应。 - 类似地,我们定义了另外三个处理程序,分别对 RESTful 服务执行
POST、PUT和DELETE请求,并在main()中创建gorilla/mux路由器实例,并将/employeesURL 路径注册到getEmployees处理程序和/employee/add、/employee/update、/employee/delete以及addEmployee、updateEmployee和deleteEmployee处理程序。
AngularJS 是一个开源 JavaScript 模型视图(MVW)框架,它允许我们构建结构良好、易于测试和维护的基于浏览器的应用。
在此配方中,我们将学习使用 TypeScript 2 客户端创建 AngularJS,以向本地运行的 HTTP 服务器发送POST请求。
由于我们已经创建了一个 HTTP 服务器,它在我们之前的一个方法中同时接受GET和POST请求,因此我们将使用与 HTTP 服务器相同的代码库。
此外,此配方假定您的计算机上安装了 Angular2 CLI。如果没有,请执行以下命令进行安装:
$ npm install -g @angular/cli请参见创建您的第一个 HTTP POST 方法配方。
- 通过执行以下命令创建新的项目和框架应用:
$ ng new angularjs-client- 移动到
angularjs-client目录,执行以下命令创建server.go:
$ cd angularjs-client && touch server.go- 将以下代码复制到
server.go:
package main
import
(
  "encoding/json"
  "log"
  "net/http"
  "github.com/gorilla/mux"
)
const
(
  CONN_HOST = "localhost"
  CONN_PORT = "8080"
)
type Route struct
{
  Name string
  Method string
  Pattern string
  HandlerFunc http.HandlerFunc
}
type Routes []Route
var routes = Routes
{
  Route
  {
    "getEmployees",
    "GET",
    "/employees",
    getEmployees,
  },
  Route
  {
    "addEmployee",
    "POST",
    "/employee/add",
    addEmployee,
  },
}
type Employee struct
{
  Id string `json:"id"`
  FirstName string `json:"firstName"`
  LastName string `json:"lastName"`
}
type Employees []Employee
var employees []Employee
func init()
{
  employees = Employees
  {
    Employee{Id: "1", FirstName: "Foo", LastName: "Bar"},
    Employee{Id: "2", FirstName: "Baz", LastName: "Qux"},
  }
}
func getEmployees(w http.ResponseWriter, r *http.Request)
{
  json.NewEncoder(w).Encode(employees)
}
func addEmployee(w http.ResponseWriter, r *http.Request)
{
  employee := Employee{}
  err := json.NewDecoder(r.Body).Decode(&employee)
  if err != nil
  {
    log.Print("error occurred while decoding employee
    data :: ", err)
    return
  }
  log.Printf("adding employee id :: %s with firstName
  as :: %s and lastName as :: %s ", employee.Id,
  employee.FirstName, employee.LastName)
  employees = append(employees, Employee{Id: employee.Id,
  FirstName: employee.FirstName, LastName: employee.LastName})
  json.NewEncoder(w).Encode(employees)
}
func AddRoutes(router *mux.Router) *mux.Router
{
  for _, route := range routes
  {
    router.
    Methods(route.Method).
    Path(route.Pattern).
    Name(route.Name).
    Handler(route.HandlerFunc)
  }
  return router
}
func main()
{
  muxRouter := mux.NewRouter().StrictSlash(true)
  router := AddRoutes(muxRouter)
  router.PathPrefix("/").Handler(http.FileServer
  (http.Dir("./dist/")))
  err := http.ListenAndServe(CONN_HOST+":"+CONN_PORT, router)
  if err != nil
  {
    log.Fatal("error starting http server :: ", err)
    return
  }
}- 移动到
angularjs-client目录,通过执行以下命令创建models/employee.ts和service/employee.service.ts:
$ cd src/app/ && mkdir models && mkdir services && cd models && touch employee.ts && cd ../services && touch employee.service.ts- 将以下代码复制到
angularjs-client/src/app/models/employee.ts:
export class Employee
{
  constructor
  (
    public id: string,
    public firstName: string,
    public lastName: string
  ) {}
}- 将以下代码复制到
angularjs-client/src/app/services /employee.service.ts:
import { Injectable } from '@angular/core';
import { Http, Response, Headers, RequestOptions } from '@angular/http';
import { Observable } from 'rxjs/Rx';
import { Employee } from "app/models/employee";

@Injectable()
export class EmployeeService
{
  constructor(private http: Http) { }
  getEmployees(): Observable<Employee[]>
  {
    return this.http.get("http://localhost:8080/employees")
    .map((res: Response) => res.json())
    .catch((error: any) => Observable.throw(error.json().
    error || 'Server error'));
  }
  addEmployee(employee: Employee): Observable<Employee>
  {
    let headers = new Headers({ 'Content-Type':
    'application/json' });
    let options = new RequestOptions({ headers: headers });
    return this.http.post("http://localhost:8080/employee
    /add", employee, options)
    .map(this.extractData)
    .catch(this.handleErrorObservable);
  }
  private extractData(res: Response)
  {
    let body = res.json();
    return body || {};
  }
  private handleErrorObservable(error: Response | any)
  {
    console.error(error.message || error);
    return Observable.throw(error.message || error);
  }
}- 将
angularjs-client/src/app/app.component.html代码替换为以下代码:
<div class = "container" style="padding:5px">
  <form>
    <div class = "form-group">
      <label for = "id">ID</label>
      <input type = "text" class = "form-control" id = "id"
      required [(ngModel)] = "employee.id" name = "id">
    </div>
    <div class = "form-group">
      <label for = "firstName">FirstName</label>
      <input type = "text" class = "form-control" id =
      "firstName" [(ngModel)] = "employee.firstName" name =
      "firstName">
    </div>
    <div class = "form-group">
      <label for = "lastName">LastName</label>
      <input type = "text" class = "form-control" id =
      "lastName" [(ngModel)] = "employee.lastName" name =
      "lastName">
    </div>
    <div>
      <button (click)="addEmployee()">Add</button>
    </div>
  </form>
</div>
<table>
  <thead>
    <th>ID</th>
    <th>FirstName</th>
    <th>LastName</th>
  </thead>
  <tbody>
    <tr *ngFor="let employee of employees">
      <td>{{employee.id}}</td>
      <td>{{employee.firstName}}</td>
      <td>{{employee.lastName}}</td>
    </tr>
  </tbody>
</table>- 将
angularjs-client/src/app/app.component.ts代码替换为以下代码:
import { Component, OnInit } from '@angular/core';
import { EmployeeService } from "app/services/employee.service";
import { Employee } from './models/employee';

@Component
({
  selector: 'app-root',
  templateUrl: './app.component.html',
  styleUrls: ['./app.component.css'],
})
export class AppComponent implements OnInit
{
  title = 'app';
  employee = new Employee('', '', '');
  employees;
  constructor(private employeeService: EmployeeService) { }
  ngOnInit(): void
  {
    this.getEmployees();
  }
  getEmployees(): void
  {
    this.employeeService.getEmployees()
    .subscribe(employees => this.employees = employees);
  }
  addEmployee(): void
  {
    this.employeeService.addEmployee(this.employee)
    .subscribe
    (
      employee =>
      {
        this.getEmployees();
        this.reset();
      }
    );
  }
  private reset()
  {
    this.employee.id = null;
    this.employee.firstName = null;
    this.employee.lastName = null;
  }
}- 将
angularjs-client/src/app/app.module.ts代码替换为以下代码:
import { BrowserModule } from '@angular/platform-browser';
import { NgModule } from '@angular/core';
import { HttpModule } from '@angular/http';
import { AppComponent } from './app.component';
import { EmployeeService } from "app/services/employee.service";
import { FormsModule } from '@angular/forms';

@NgModule
({
 declarations:
 [
   AppComponent
 ],
 imports:
 [
   BrowserModule, HttpModule, FormsModule
 ],
 providers: [EmployeeService],
 bootstrap: [AppComponent]
})
export class AppModule { }
一切就绪后,目录结构应如下所示:
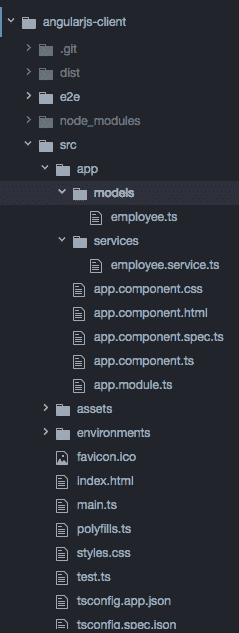
- 移动到
angularjs-client目录并执行以下命令以构建项目工件并运行程序:
$ ng build
$ go run server.go
一旦我们运行程序,HTTP 服务器将在端口8080上开始本地侦听。
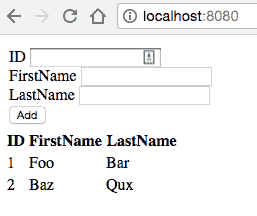
浏览http://localhost:8080将显示 AngularJS 客户端页面,该页面包含一个带有 Id、FirstName 和 LastName 字段的 HTML 表单,如以下屏幕截图所示:
填写表单后点击 Add 按钮将向运行在端口8080上的 HTTP 服务器发送POST请求。服务器处理请求后,将返回所有静态员工的列表以及新添加的员工,并将其显示在浏览器中,如以下屏幕截图所示:
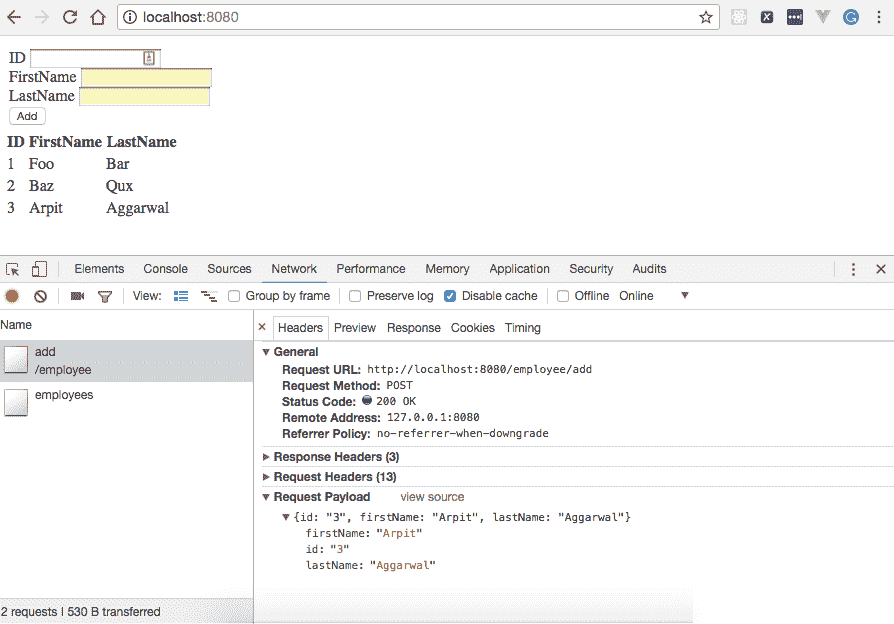
所有静态员工的列表以及新添加的员工
ReactJS 是一个声明式 JavaScript 库,有助于高效地构建用户界面。因为它基于虚拟 DOM 的概念,所以可以提高应用的性能,因为 JavaScript 虚拟 DOM 比常规 DOM 更快。
在这个配方中,我们将学习创建一个 ReactJS 客户端,向本地运行的 HTTP 服务器发送一个POST请求。
由于我们已经创建了一个 HTTP 服务器,它在前面的方法中同时接受GET和POSTHTTP 请求,因此我们将使用与 HTTP 服务器相同的代码库
此外,本配方假设您的机器上安装了npm,并且您具备npm和webpack的基本知识,这是一个 JavaScript 模块绑定器。
请参见创建您的第一个 HTTP POST 方法配方。
- 创建一个
reactjs-client目录,我们将在其中保存所有 ReactJS 源文件和 HTTP 服务器,如下所示:
$ mkdir reactjs-client && cd reactjs-client && touch server.go- 将以下代码复制到
server.go:
package main
import
(
  "encoding/json"
  "log"
  "net/http"
  "github.com/gorilla/mux"
)
const
(
  CONN_HOST = "localhost"
  CONN_PORT = "8080"
)
type Route struct
{
  Name string
  Method string
  Pattern string
  HandlerFunc http.HandlerFunc
}
type Routes []Route
var routes = Routes
{
  Route
  {
    "getEmployees",
    "GET",
    "/employees",
    getEmployees,
  },
  Route
  {
    "addEmployee",
    "POST",
    "/employee/add",
    addEmployee,
  },
}
type Employee struct
{
  Id string `json:"id"`
  FirstName string `json:"firstName"`
  LastName string `json:"lastName"`
}
type Employees []Employee
var employees []Employee
func init()
{
  employees = Employees
  {
    Employee{Id: "1", FirstName: "Foo", LastName: "Bar"},
    Employee{Id: "2", FirstName: "Baz", LastName: "Qux"},
  }
}
func getEmployees(w http.ResponseWriter, r *http.Request)
{
  json.NewEncoder(w).Encode(employees)
}
func addEmployee(w http.ResponseWriter, r *http.Request)
{
  employee := Employee{}
  err := json.NewDecoder(r.Body).Decode(&employee)
  if err != nil
  {
    log.Print("error occurred while decoding employee
    data :: ", err)
    return
  }
  log.Printf("adding employee id :: %s with firstName
  as :: %s and lastName as :: %s ", employee.Id,
  employee.FirstName, employee.LastName)
  employees = append(employees, Employee{Id: employee.Id,
  FirstName: employee.FirstName, LastName: employee.LastName})
  json.NewEncoder(w).Encode(employees)
}
func AddRoutes(router *mux.Router) *mux.Router
{
  for _, route := range routes
  {
    router.
    Methods(route.Method).
    Path(route.Pattern).
    Name(route.Name).
    Handler(route.HandlerFunc)
  }
  return router
}
func main()
{
  muxRouter := mux.NewRouter().StrictSlash(true)
  router := AddRoutes(muxRouter)
  router.PathPrefix("/").Handler(http.FileServer
  (http.Dir(".//github/go/web/img/")))
  err := http.ListenAndServe(CONN_HOST+":"+CONN_PORT, router)
  if err != nil
  {
    log.Fatal("error starting http server :: ", err)
    return
  }
}- 创建另一个名为
assets的目录,保存我们所有的前端代码文件,如.html、.js、.css、images,如下所示:
$ mkdir assets && cd assets && touch index.html- 将以下内容复制到
index.html:
<html>
  <head lang="en">
    <meta charset="UTF-8" />
    <title>ReactJS Client</title>
  </head>
  <body>
    <div id="react"></div>
    <script src="/script.js"></script>
</body>
</html>- 移动到
reactjs-client目录,执行npm init创建package.json,我们在其中指定构建 react 客户端所需的所有依赖项,如React、React DOM、Webpack、Babel Loader、Babel Core、Babel Preset: ES2015和Babel Preset: React,如下所示:
$ cd reactjs-client && touch npm init将package.json的内容替换为以下内容:
{
"name": "reactjs-client",
"version": "1.0.0",
"description": "ReactJs Client",
"keywords":
[
"react"
],
"author": "Arpit Aggarwal",
"dependencies":
{
"axios": "^0.18.0",
"react": "^16.2.0",
"react-dom": "^16.2.0",
"react-router-dom": "^4.2.2",
"webpack": "^4.2.0",
"webpack-cli": "^2.0.9",
"lodash": "^4.17.5"
},
"scripts":
{
"build": "webpack",
"watch": "webpack --watch -d"
},
"devDependencies":
{
"babel-core": "^6.18.2",
"babel-loader": "^7.1.4",
"babel-polyfill": "^6.16.0",
"babel-preset-es2015": "^6.18.0",
"babel-preset-react": "^6.16.0"
}
}- 创建
webpack.config.js,我们将在其中配置webpack,如下所示:
$ cd reactjs-client && touch webpack.config.js将以下内容复制到webpack.config.js:
var path = require('path');
module.exports =
{
resolve:
{
extensions: ['.js', '.jsx']
},
mode: 'development',
entry: './app/main.js',
cache: true,
output:
{
path: __dirname,
filename: './/github/go/web/img/script.js'
},
module:
{
rules:
[
{
test: path.join(__dirname, '.'),
exclude: /(node_modules)/,
loader: 'babel-loader',
query:
{
cacheDirectory: true,
presets: ['es2015', 'react']
}
}
]
}
};- 通过执行以下命令,为
webpack创建一个入口点,即reactjs-client/app/main.js:
$ cd reactjs-client && mkdir app && cd app && touch main.js将以下内容复制到main.js:
'use strict';
const React = require('react');
const ReactDOM = require('react-dom')
import EmployeeApp from './components/employee-app.jsx'
ReactDOM.render
(
<EmployeeApp />,
document.getElementById('react')
)- 通过执行以下命令定义
ReactApp及其子组件:
$ cd reactjs-client && mkdir components && cd components && touch react-app.jsx employee-list.jsx employee.jsx add-employee.jsx将以下内容复制到reactjs-client/app/components/employee-app.jsx:
'use strict';
const React = require('react');
var axios = require('axios');
import EmployeeList from './employee-list.jsx'
import AddEmployee from './add-employee.jsx'
export default class EmployeeApp extends React.Component
{
constructor(props)
{
super(props);
this.state = {employees: []};
this.addEmployee = this.addEmployee.bind(this);
this.Axios = axios.create
(
{
headers: {'content-type': 'application/json'}
}
);
}
componentDidMount()
{
let _this = this;
this.Axios.get('/employees')
.then
(
function (response)
{
_this.setState({employees: response.data});
}
)
.catch(function (error) { });
}
addEmployee(employeeName)
{
let _this = this;
this.Axios.post
(
'/employee/add',
{
firstName: employeeName
}
)
.then
(
function (response)
{
_this.setState({employees: response.data});
}
)
.catch(function (error) { });
}
render()
{
return
(
<div>
<AddEmployee addEmployee={this.addEmployee}/>
<EmployeeList employees={this.state.employees}/>
</div>
)
}
}将以下内容复制到reactjs-client/app/components/employee.jsx:
const React = require('react');
export default class Employee extends React.Component
{
render()
{
return
(
<tr>
<td>{this.props.employee.firstName}</td>
</tr>
)
}
}
将以下内容复制到reactjs-client/app/components/employee-list.jsx:
const React = require('react');
import Employee from './employee.jsx'
export default class EmployeeList extends React.Component
{
render()
{
var employees = this.props.employees.map
(
(employee, i) =>
<Employee key={i} employee={employee}/>
);
return
(
<table>
<tbody>
<tr>
<th>FirstName</th>
</tr>
{employees}
</tbody>
</table>
)
}
}将以下内容复制到reactjs-client/app/components/add-employee.jsx:
import React, { Component, PropTypes } from 'react'
export default class AddEmployee extends React.Component
{
render()
{
return
(
<div>
<input type = 'text' ref = 'input' />
<button onClick = {(e) => this.handleClick(e)}>
Add
</button>
</div>
)
}
handleClick(e)
{
const node = this.refs.input
const text = node.value.trim()
this.props.addEmployee(text)
node.value = ''
}
}一切就绪后,目录结构应如下所示:
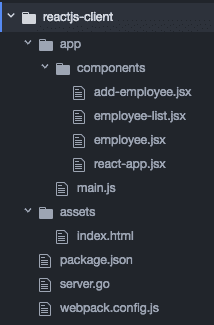
目录结构
- 移动到
reactjs-client目录,执行以下命令安装node modules并构建webpack:
$ npm install
$ npm run build- 使用以下命令运行程序:
$ go run server.go一旦我们运行程序,HTTP 服务器将在端口8080上开始本地侦听。
浏览http://localhost:8080将显示 ReactJS 客户端页面,如下图所示:
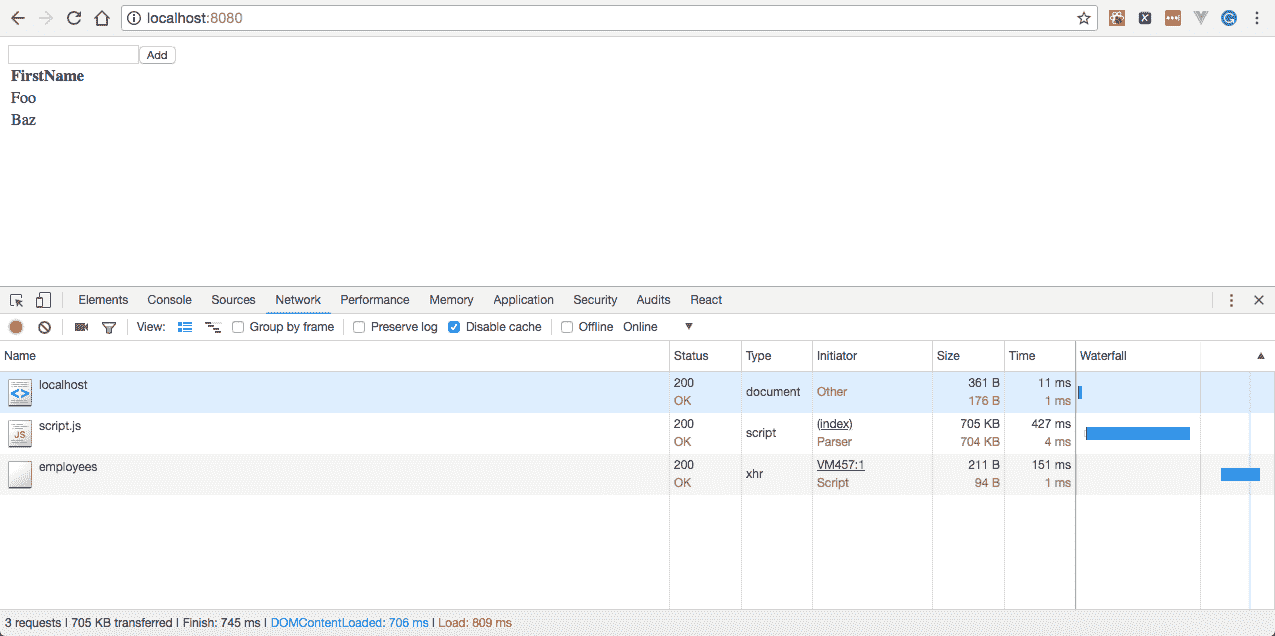
ReactJS 客户端页面
填写文本框后点击 Add 按钮将向运行在端口8080上的 HTTP 服务器发送POST请求:
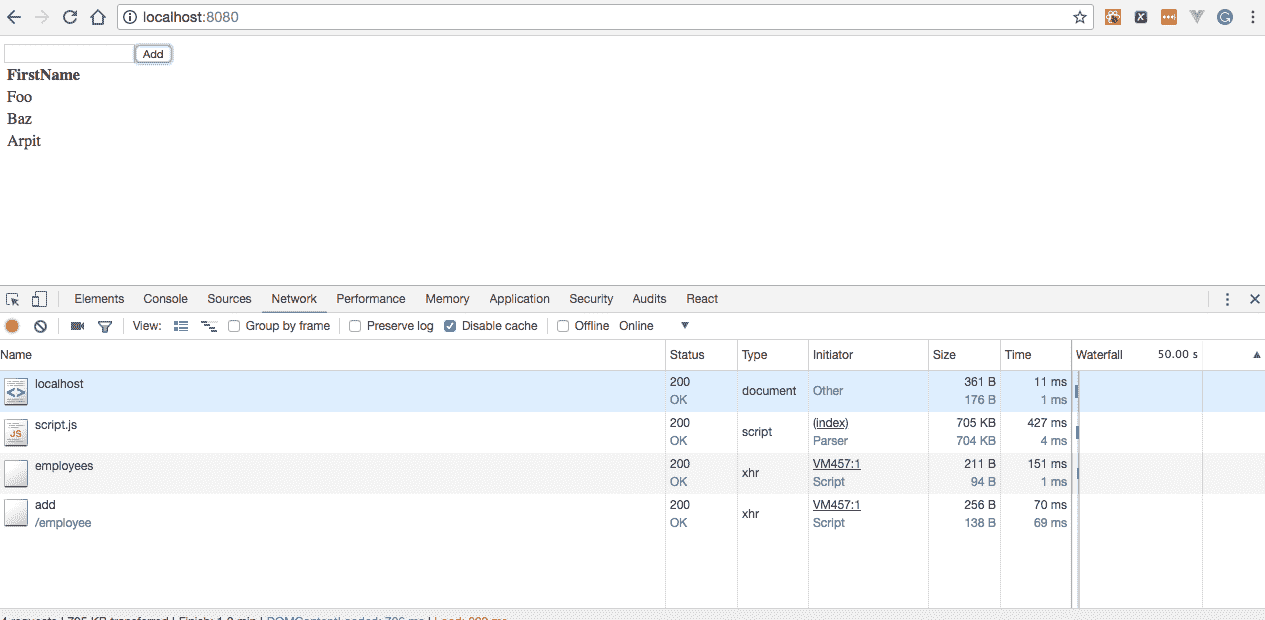
填写文本框后,单击添加按钮
接下来,从命令行执行一个GET请求,如下所示,将为您提供所有静态员工的列表:
$ curl -X GET http://localhost:8080/employees这将与新添加的一个一起,如下所示:
[{"id":"1","firstName":"Foo","lastName":"Bar"},{"id":"2","firstName":"Baz","lastName":"Qux"},{"id":"","firstName":"Arpit","lastName":""}]VueJS 是一种开源的、渐进式的 JavaScript 框架,公司正在采用这种框架为 web 构建前端或面向客户端的用户界面。
在这个方法中,我们将学习在 VueJS 中创建一个客户机,它添加了一个向本地运行的 HTTP 服务器发送 HTTPPOST请求的员工。
由于我们已经创建了一个 HTTP 服务器,它在我们之前的一个方法中同时接受GET和POST请求,因此我们将使用与 HTTP 服务器相同的代码库。
请参见创建您的第一个 HTTP POST 方法配方。
- 创建一个
vuejs-client目录,我们将在其中保存所有 VueJS 源文件和 HTTP 服务器,如下所示:
$ mkdir vuejs-client && cd vuejs-client && touch server.go- 将以下代码复制到
server.go:
package main
import
(
"encoding/json"
"log"
"net/http"
"github.com/gorilla/mux"
)
const
(
CONN_HOST = "localhost"
CONN_PORT = "8080"
)
type Route struct
{
Name string
Method string
Pattern string
HandlerFunc http.HandlerFunc
}
type Routes []Route
var routes = Routes
{
Route
{
"getEmployees",
"GET",
"/employees",
getEmployees,
},
Route
{
"addEmployee",
"POST",
"/employee/add",
addEmployee,
},
}
type Employee struct
{
Id string `json:"id"`
FirstName string `json:"firstName"`
LastName string `json:"lastName"`
}
type Employees []Employee
var employees []Employee
func init()
{
employees = Employees
{
Employee{Id: "1", FirstName: "Foo", LastName: "Bar"},
Employee{Id: "2", FirstName: "Baz", LastName: "Qux"},
}
}
func getEmployees(w http.ResponseWriter, r *http.Request)
{
json.NewEncoder(w).Encode(employees)
}
func addEmployee(w http.ResponseWriter, r *http.Request)
{
employee := Employee{}
err := json.NewDecoder(r.Body).Decode(&employee)
if err != nil
{
log.Print("error occurred while decoding employee
data :: ", err)
return
}
log.Printf("adding employee id :: %s with firstName
as :: %s and lastName as :: %s ", employee.Id,
employee.FirstName, employee.LastName)
employees = append(employees, Employee{Id: employee.Id,
FirstName: employee.FirstName, LastName: employee.LastName})
json.NewEncoder(w).Encode(employees)
}
func AddRoutes(router *mux.Router) *mux.Router
{
for _, route := range routes
{
router.
Methods(route.Method).
Path(route.Pattern).
Name(route.Name).
Handler(route.HandlerFunc)
}
return router
}
func main()
{
muxRouter := mux.NewRouter().StrictSlash(true)
router := AddRoutes(muxRouter)
router.PathPrefix("/").Handler(http.FileServer
(http.Dir(".//github/go/web/img/")))
err := http.ListenAndServe(CONN_HOST+":"+CONN_PORT, router)
if err != nil
{
log.Fatal("error starting http server :: ", err)
return
}
}- 创建另一个名为
assets的目录,保存我们所有的前端代码文件,如.html、.js、.css、images,如下所示:
$ mkdir assets && cd assets && touch index.html && touch main.js- 将以下内容复制到
index.html:
<html>
<head>
<title>VueJs Client</title>
<script type = "text/javascript" src = "https://cdnjs.
cloudflare.com/ajax/libs/vue/2.4.0/vue.js"></script>
<script type = "text/javascript" src="https://cdn.
jsdelivr.net/npm/vue-resource@1.5.0"></script>
</head>
<body>
<div id = "form">
<h1>{{ message }}</h1>
<table>
<tr>
<td><label for="id">Id</label></td>
<td><input type="text" value="" v-model="id"/></td>
</tr>
<tr>
<td><label for="firstName">FirstName</label></td>
<td><input type="text" value="" v-model="firstName"/>
<td>
</tr>
<tr>
<td><label for="lastName">LastName</label></td>
<td> <input type="text" value="" v-model="lastName" />
</td>
</tr>
<tr>
<td><a href="#" class="btn" @click="addEmployee">Add
</a></td>
</tr>
</table>
</div>
<script type = "text/javascript" src = "main.js"></script>
  </body>
</html>- 将以下内容复制到
main.js:
var vue_det = new Vue
({
 el: '#form',
 data:
 {
   message: 'Employee Dashboard',
   id: '',
   firstName:'',
   lastName:''
 },
 methods:
 {
   addEmployee: function()
   {
     this.$http.post
     (
       '/employee/add',
       {
         id: this.id,
         firstName:this.firstName,
         lastName:this.lastName
       }
     )
     .then
     (
       response =>
       {
         console.log(response);
       },
       error =>
       {
         console.error(error);
       }
     );
   }
 }
});
一切就绪后,目录结构应如下所示:
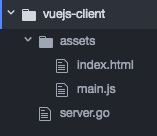
目录结构
- 使用以下命令运行程序:
$ go run server.go一旦我们运行程序,HTTP 服务器将在端口8080上开始本地侦听。
浏览到http://localhost:8080将向我们显示 VueJS 客户端页面,该页面具有一个带有 Id、FirstName 和 LastName 字段的 HTML 表单,如以下屏幕截图所示:
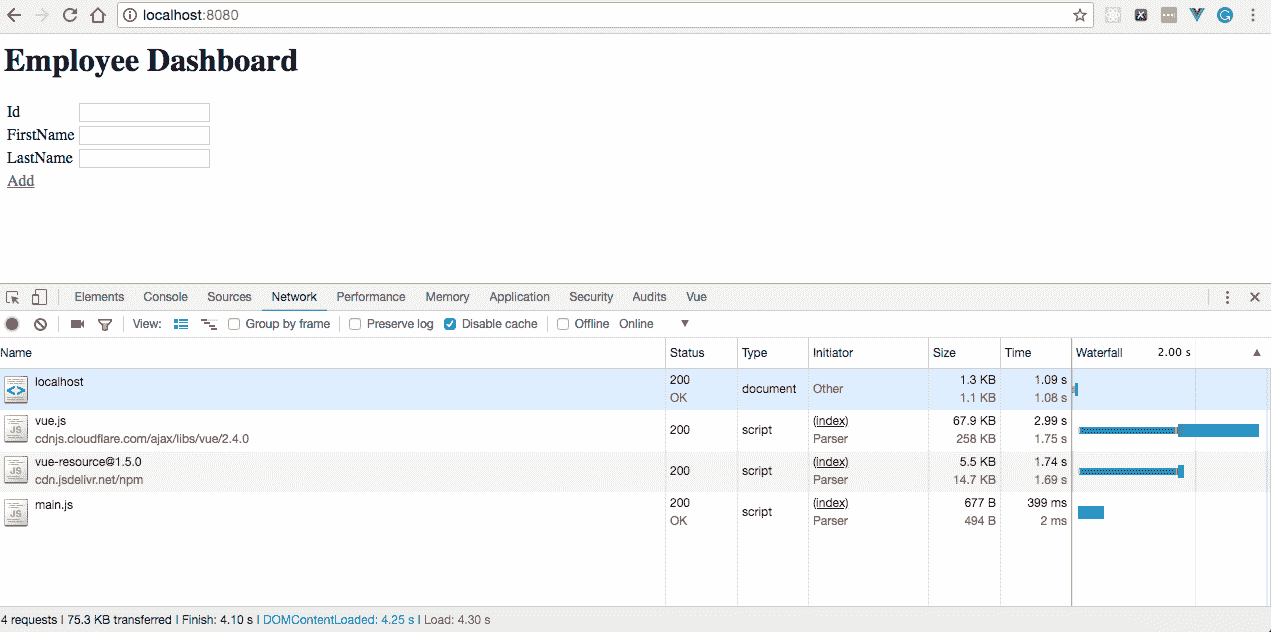
VueJS 客户端页面
填写表单后点击 Add 按钮,会向8080端口上运行的 HTTP 服务器发送POST请求,如下图所示:
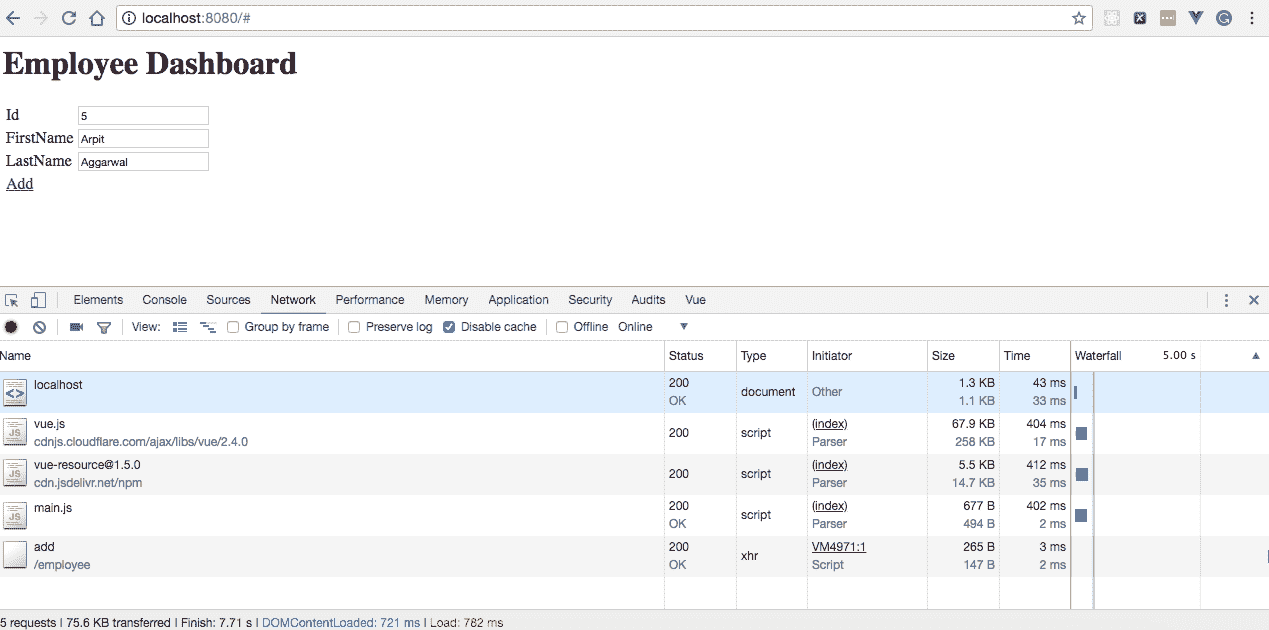
填写表单后,单击“添加”按钮
接下来,从命令行执行一个GET请求,如下所示,将为您提供所有静态员工的列表:
$ curl -X GET http://localhost:8080/employees这将与新添加的一项并列,如下所示:
[{"id":"1","firstName":"Foo","lastName":"Bar"},{"id":"2","firstName":"Baz","lastName":"Qux"},{"id":"5","firstName":"Arpit","lastName":"Aggarwal"}]