- 入门教程
- AOP教程
- 数据库教程
- 缓存教程
 《Spring Boot入门教程》
Spring Boot - Rest模板

Rest模板用于创建使用RESTful Web服务的应用程序,您可以使用 exchange()方法为所有HTTP方法使用Web服务。
package com.learnfk.demo;

import org.springframework.boot.SpringApplication;
import org.springframework.boot.autoconfigure.SpringBootApplication;
import org.springframework.context.annotation.Bean;
import org.springframework.web.client.RestTemplate;

@SpringBootApplication
public class DemoApplication {
   public static void main(String[] args) {
      SpringApplication.run(DemoApplication.class, args);
   }
   @Bean
   public RestTemplate getRestTemplate() {
      return new RestTemplate();
   }
}
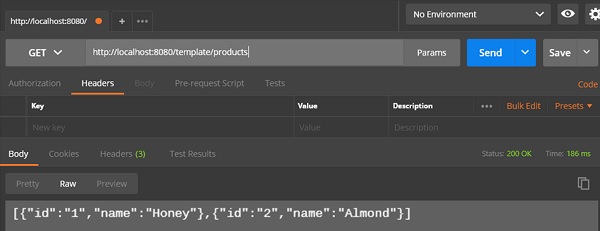
GET 请求
使用RestTemplate消耗GET API-exchange()方法
假设此URL http:// localhost:8080/products 返回以下JSON,无涯教程将通过使用Rest Template使用以下代码来使用此API响应-
[
   {
      "id": "1",
      "name": "Honey"
   },
   {
      "id": "2",
      "name": "Almond"
   }
]
您将必须遵循给定的点来使用API-
- Autowired - Rest模板对象。
- HttpHeaders - 设置请求标头。
- HttpEntity - 包装请求对象。
- 为Exchange()方法提供URL,HttpMethod和返回类型。
@RestController
public class ConsumeWebService {
   @Autowired
   RestTemplate restTemplate;

   @RequestMapping(value = "/template/products")
   public String getProductList() {
      HttpHeaders headers = new HttpHeaders();
      headers.setAccept(Arrays.asList(MediaType.APPLICATION_JSON));
      HttpEntity <String> entity = new HttpEntity<String>(headers);

      return restTemplate.exchange("
         http://localhost:8080/products", HttpMethod.GET, entity, String.class).getBody();
   }
}
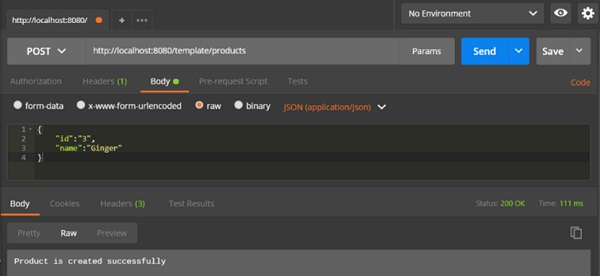
POST 请求
使用RestTemplate使用POST API-exchange()方法
假设此URL http://localhost:8080/products 返回以下所示的响应,无涯教程将通过使用Rest模板使用此API响应。
下面给出的代码是Request主体-
{
   "id":"3",
   "name":"Ginger"
}
下面给出的代码是Response主体-
Product is created successfully
您必须遵循以下要点才能使用API-
Autowired - Rest模板对象。
HttpHeaders - 设置请求标头。
HttpEntity - 包装请求对象,在这里包装了Product对象,以将其发送到请求正文。
为exchange()方法提供URL,HttpMethod和Return类型。
@RestController
public class ConsumeWebService {
   @Autowired
   RestTemplate restTemplate;

   @RequestMapping(value = "/template/products", method = RequestMethod.POST)
   public String createProducts(@RequestBody Product product) {
      HttpHeaders headers = new HttpHeaders();
      headers.setAccept(Arrays.asList(MediaType.APPLICATION_JSON));
      HttpEntity<Product> entity = new HttpEntity<Product>(product,headers);

      return restTemplate.exchange(
         "http://localhost:8080/products", HttpMethod.POST, entity, String.class).getBody();
   }
}
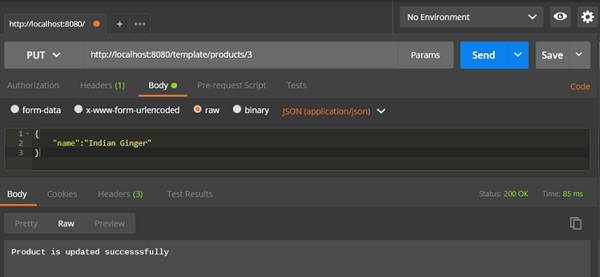
PUT 请求
使用RestTemplate消费PUT API-exchange()方法
链接:https://www.learnfk.comhttps://www.learnfk.com/spring-boot/spring-boot-rest-template.html
来源:LearnFk无涯教程网
假定此URL http:// localhost:8080/products/3 返回以下响应,将通过使用Rest Template使用此API响应。
下面给出的代码是Request body-
{
   "name":"Indian Ginger"
}
下面给出的代码是Response主体-
Product is updated successfully
您必须遵循以下要点才能使用API-
Autowired - Rest模板对象。
HttpHeaders - 设置请求标头。
HttpEntity - 包装请求对象。在这里,无涯教程包装了Product对象,以将其发送到请求正文。
为exchange()方法提供URL,HttpMethod和Return类型。
@RestController
public class ConsumeWebService {
   @Autowired
   RestTemplate restTemplate;

   @RequestMapping(value = "/template/products/{id}", method = RequestMethod.PUT)
   public String updateProduct(@PathVariable("id") String id, @RequestBody Product product) {
      HttpHeaders headers = new HttpHeaders();
      headers.setAccept(Arrays.asList(MediaType.APPLICATION_JSON));
      HttpEntity<Product> entity = new HttpEntity<Product>(product,headers);

      return restTemplate.exchange(
         "http://localhost:8080/products/"+id, HttpMethod.PUT, entity, String.class).getBody();
   }
}
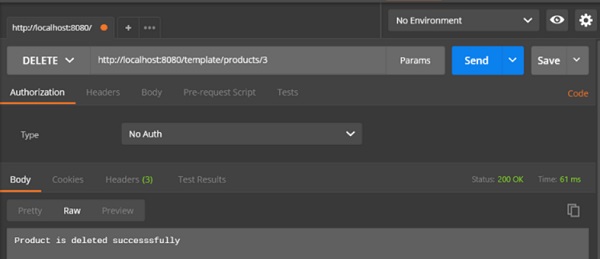
DELETE 请求
使用RestTemplate消耗DELETE API-exchange()方法
假设此URL http:// localhost:8080/products/3 返回以下给出的响应,将通过使用Rest Template使用此API响应。
下面显示的这一行代码是Response主体-
Product is deleted successfully
您将必须遵循以下要使用API的要点-
Autowired - Rest模板对象。
HttpHeaders - 设置请求标头。
HttpEntity - 包装请求对象。
为exchange()方法提供URL,HttpMethod和Return类型。
@RestController
public class ConsumeWebService {
   @Autowired
   RestTemplate restTemplate;

   @RequestMapping(value = "/template/products/{id}", method = RequestMethod.DELETE)
   public String deleteProduct(@PathVariable("id") String id) {
      HttpHeaders headers = new HttpHeaders();
      headers.setAccept(Arrays.asList(MediaType.APPLICATION_JSON));
      HttpEntity<Product> entity = new HttpEntity<Product>(headers);

      return restTemplate.exchange(
         "http://localhost:8080/products/"+id, HttpMethod.DELETE, entity, String.class).getBody();
   }
}
完整的Rest Template Controller类文件在下面给出-
package com.learnfk.demo.controller;

import java.util.Arrays;

import org.springframework.beans.factory.annotation.Autowired;
import org.springframework.http.HttpEntity;
import org.springframework.http.HttpHeaders;
import org.springframework.http.HttpMethod;
import org.springframework.http.MediaType;

import org.springframework.web.bind.annotation.PathVariable;
import org.springframework.web.bind.annotation.RequestBody;
import org.springframework.web.bind.annotation.RequestMapping;
import org.springframework.web.bind.annotation.RequestMethod;
import org.springframework.web.bind.annotation.RestController;
import org.springframework.web.client.RestTemplate;

import com.learnfk.demo.model.Product;

@RestController
public class ConsumeWebService {
   @Autowired
   RestTemplate restTemplate;

   @RequestMapping(value = "/template/products")
   public String getProductList() {
      HttpHeaders headers = new HttpHeaders();
      headers.setAccept(Arrays.asList(MediaType.APPLICATION_JSON));
      HttpEntity<String> entity = new HttpEntity<String>(headers);

      return restTemplate.exchange(
         "http://localhost:8080/products", HttpMethod.GET, entity, String.class).getBody();
   }
   @RequestMapping(value = "/template/products", method = RequestMethod.POST)
   public String createProducts(@RequestBody Product product) {
      HttpHeaders headers = new HttpHeaders();
      headers.setAccept(Arrays.asList(MediaType.APPLICATION_JSON));
      HttpEntity<Product> entity = new HttpEntity<Product>(product,headers);

      return restTemplate.exchange(
         "http://localhost:8080/products", HttpMethod.POST, entity, String.class).getBody();
   }
   @RequestMapping(value = "/template/products/{id}", method = RequestMethod.PUT)
   public String updateProduct(@PathVariable("id") String id, @RequestBody Product product) {
      HttpHeaders headers = new HttpHeaders();
      headers.setAccept(Arrays.asList(MediaType.APPLICATION_JSON));
      HttpEntity<Product> entity = new HttpEntity<Product>(product,headers);

      return restTemplate.exchange(
         "http://localhost:8080/products/"+id, HttpMethod.PUT, entity, String.class).getBody();
   }
   @RequestMapping(value = "/template/products/{id}", method = RequestMethod.DELETE)
   public String deleteProduct(@PathVariable("id") String id) {
      HttpHeaders headers = new HttpHeaders();
      headers.setAccept(Arrays.asList(MediaType.APPLICATION_JSON));
      HttpEntity<Product> entity = new HttpEntity<Product>(headers);

      return restTemplate.exchange(
         "http://localhost:8080/products/"+id, HttpMethod.DELETE, entity, String.class).getBody();
   }
}
下面给出了Spring Boot应用程序类– DemoApplication.java的代码-
package com.learnfk.demo;

import org.springframework.boot.SpringApplication;
import org.springframework.boot.autoconfigure.SpringBootApplication;

@SpringBootApplication
public class DemoApplication {
   public static void main(String[] args) {
      SpringApplication.run(DemoApplication.class, args);
   }
}
下面给出了Maven构建的代码– pom.xml-
<?xml version = "1.0" encoding = "UTF-8"?>
<project xmlns = "http://maven.apache.org/POM/4.0.0"
   xmlns:xsi = "http://www.w3.org/2001/XMLSchema-instance"
   xsi:schemaLocation = "http://maven.apache.org/POM/4.0.0
   http://maven.apache.org/xsd/maven-4.0.0.xsd">

   <modelVersion>4.0.0</modelVersion>
   <groupId>com.learnfk</groupId>
   <artifactId>demo</artifactId>
   <version>0.0.1-SNAPSHOT</version>
   <packaging>jar</packaging>
   <name>demo</name>
   <description>Demo project for Spring Boot</description>

   <parent>
      <groupId>org.springframework.boot</groupId>
      <artifactId>spring-boot-starter-parent</artifactId>
      <version>1.5.8.RELEASE</version>
      <relativePath/>
   </parent>

   <properties>
      <project.build.sourceEncoding>UTF-8</project.build.sourceEncoding>
      <project.reporting.outputEncoding>UTF-8</project.reporting.outputEncoding>
      <java.version>1.8</java.version>
   </properties>

   <dependencies>
      <dependency>
         <groupId>org.springframework.boot</groupId>
         <artifactId>spring-boot-starter-web</artifactId>
      </dependency>

      <dependency>
         <groupId>org.springframework.boot</groupId>
         <artifactId>spring-boot-starter-test</artifactId>
         <scope>test</scope>
      </dependency>
   </dependencies>

   <build>
      <plugins>
         <plugin>
            <groupId>org.springframework.boot</groupId>
            <artifactId>spring-boot-maven-plugin</artifactId>
         </plugin>
      </plugins>
   </build>

</project>
下面给出了Gradle Build – build.gradle的代码-
buildscript {
   ext {
      springBootVersion = '1.5.8.RELEASE'
   }
   repositories {
      mavenCentral()
   }
   dependencies {
      classpath("org.springframework.boot:spring-boot-gradle-plugin:${springBootVersion}")
   }
}

apply plugin: 'java'
apply plugin: 'eclipse'
apply plugin: 'org.springframework.boot'

group = 'com.learnfk'
version = '0.0.1-SNAPSHOT'
sourceCompatibility = 1.8

repositories {
   mavenCentral()
}
dependencies {
   compile('org.springframework.boot:spring-boot-starter-web')
   testCompile('org.springframework.boot:spring-boot-starter-test')
}
您可以创建一个可执行的JAR文件,并使用以下Maven或Gradle命令运行Spring Boot应用程序-
对于Maven,您可以使用下面给出的命令-
mvn clean install在" BUILD SUCCESS"之后,您可以在目标目录下找到JAR文件。
对于Gradle,您可以使用下面显示的命令-
gradle clean build在" BUILD SUCCESSFUL"之后,您可以在build/libs目录下找到JAR文件。
现在,使用以下命令运行JAR文件:
java –jar <JARFILE>
现在,该应用程序已在Tomcat端口8080上启动。

现在,在POSTMAN应用程序中单击下面的URL,您可以看到输出。
按其余模板获取产品- http:// localhost:8080/template/products
创建产品POST- http:// localhost:8080/template/products
更新产品PUT- http:// localhost:8080/template/products/3
删除产品- http:// localhost:8080/template/products/3
祝学习愉快!(内容编辑有误?请选中要编辑内容 -> 右键 -> 修改 -> 提交!)