- 入门教程
- AOP教程
- 数据库教程
- 缓存教程
 《Spring Boot入门教程》
Spring Boot - OAuth2 JWT

在本章中,您将详细了解Spring Boot Security机制和带有JWT的OAuth2。
JWT令牌
JWT令牌是JSON Web令牌,用于表示两方之间获得担保的索赔。您可以在www.jwt.io/上了解有关JWT令牌的更多信息。
现在,无涯教程将构建一个OAuth2应用程序,该应用程序可以借助JWT令牌来使用授权服务器,资源服务器。
您可以使用以下步骤通过访问数据库来使用JWT令牌实现Spring Boot Security。
首先,需要在构建配置文件中添加以下依赖项。
Maven用户可以在pom.xml文件中添加以下依赖项。
<dependency>
   <groupId>org.springframework.boot</groupId>
   <artifactId>spring-boot-starter-jdbc</artifactId>
</dependency>

<dependency>
   <groupId>org.springframework.boot</groupId>
   <artifactId>spring-boot-starter-security</artifactId>
</dependency>

<dependency>
   <groupId>org.springframework.boot</groupId>
   <artifactId>spring-boot-starter-web</artifactId>
</dependency>

<dependency>
   <groupId>org.springframework.security.oauth</groupId>
   <artifactId>spring-security-oauth2</artifactId>
</dependency>

<dependency>
   <groupId>org.springframework.security</groupId>
   <artifactId>spring-security-jwt</artifactId>
</dependency>

<dependency>
   <groupId>com.h2database</groupId>
   <artifactId>h2</artifactId>
</dependency>

<dependency>
   <groupId>org.springframework.boot</groupId>
   <artifactId>spring-boot-starter-test</artifactId>
   <scope>test</scope>
</dependency>

<dependency>
   <groupId>org.springframework.security</groupId>
   <artifactId>spring-security-test</artifactId>
   <scope>test</scope>
</dependency>
Gradle用户可以在build.gradle文件中添加以下依赖项。
compile('org.springframework.boot:spring-boot-starter-security')
compile('org.springframework.boot:spring-boot-starter-web')
testCompile('org.springframework.boot:spring-boot-starter-test')
testCompile('org.springframework.security:spring-security-test')

compile("org.springframework.security.oauth:spring-security-oauth2")
compile('org.springframework.security:spring-security-jwt')
compile("org.springframework.boot:spring-boot-starter-jdbc")
compile("com.h2database:h2:1.4.191")
Spring Boot Starter Security - 实现Spring Security
Spring Security OAuth2 - 实现OAUTH2结构以启用授权服务器和资源服务器。
Spring Security JWT - 生成用于Web安全的JWT令牌
Spring Boot Starter JDBC - 访问数据库以确保用户可用或不可用。
Spring Boot Starter Web - 编写HTTP端点。
H2 Database - 存储用于身份验证和授权的用户信息。
完整的构建配置文件如下所示。
<?xml version="1.0" encoding="UTF-8"?>
<project xmlns="http://maven.apache.org/POM/4.0.0"
   xmlns:xsi="http://www.w3.org/2001/XMLSchema-instance"
   xsi:schemaLocation="http://maven.apache.org/POM/4.0.0
   http://maven.apache.org/xsd/maven-4.0.0.xsd">

   <modelVersion>4.0.0</modelVersion>
   <groupId>com.learnfk</groupId>
   <artifactId>websecurityapp</artifactId>
   <version>0.0.1-SNAPSHOT</version>
   <packaging>jar</packaging>
   <name>websecurityapp</name>
   <description>Demo project for Spring Boot</description>

   <parent>
      <groupId>org.springframework.boot</groupId>
      <artifactId>spring-boot-starter-parent</artifactId>
      <version>1.5.9.RELEASE</version>
      <relativePath /> <!-- lookup parent from repository -->
   </parent>

   <properties>
      <project.build.sourceEncoding>UTF-8</project.build.sourceEncoding>
      <project.reporting.outputEncoding>UTF-8</project.reporting.outputEncoding>
      <java.version>1.8</java.version>
   </properties>

   <dependencies>
      <dependency>
         <groupId>org.springframework.boot</groupId>
         <artifactId>spring-boot-starter-jdbc</artifactId>
      </dependency>

      <dependency>
         <groupId>org.springframework.boot</groupId>
         <artifactId>spring-boot-starter-security</artifactId>
      </dependency>

      <dependency>
         <groupId>org.springframework.boot</groupId>
         <artifactId>spring-boot-starter-web</artifactId>
      </dependency>

      <dependency>
         <groupId>org.springframework.security.oauth</groupId>
         <artifactId>spring-security-oauth2</artifactId>
      </dependency>

      <dependency>
         <groupId>org.springframework.security</groupId>
         <artifactId>spring-security-jwt</artifactId>
      </dependency>

      <dependency>
         <groupId>com.h2database</groupId>
         <artifactId>h2</artifactId>
      </dependency>

      <dependency>
         <groupId>org.springframework.boot</groupId>
         <artifactId>spring-boot-starter-test</artifactId>
         <scope>test</scope>
      </dependency>

      <dependency>
         <groupId>org.springframework.security</groupId>
         <artifactId>spring-security-test</artifactId>
         <scope>test</scope>
      </dependency>
   </dependencies>

   <build>
      <plugins>
         <plugin>
            <groupId>org.springframework.boot</groupId>
            <artifactId>spring-boot-maven-plugin</artifactId>
         </plugin>
      </plugins>
   </build>

</project>
Gradle – build.gradle
buildscript {
   ext {
      springBootVersion='1.5.9.RELEASE'
   }
   repositories {
      mavenCentral()
   }
   dependencies {
      classpath("org.springframework.boot:spring-boot-gradle-plugin:${springBootVersion}")
   }
}
apply plugin: 'java'
apply plugin: 'eclipse'
apply plugin: 'org.springframework.boot'

group='com.learnfk'
version='0.0.1-SNAPSHOT'
sourceCompatibility=1.8

repositories {
   mavenCentral()
}

dependencies {
   compile('org.springframework.boot:spring-boot-starter-security')
   compile('org.springframework.boot:spring-boot-starter-web')
   testCompile('org.springframework.boot:spring-boot-starter-test')
   testCompile('org.springframework.security:spring-security-test')
   compile("org.springframework.security.oauth:spring-security-oauth2")
   compile('org.springframework.security:spring-security-jwt')
   compile("org.springframework.boot:spring-boot-starter-jdbc")
   compile("com.h2database:h2:1.4.191")
}
现在,在主Spring Boot应用程序中,添加@EnableAuthorizationServer和@EnableResourceServer批注,以在同一应用程序中充当Auth服务器和Resource Server。
另外,您可以使用以下代码编写简单的HTTP端点,以使用JWT令牌通过Spring Security访问API。
package com.learnfk.websecurityapp;

import org.springframework.boot.SpringApplication;
import org.springframework.boot.autoconfigure.SpringBootApplication;
import org.springframework.security.oauth2.config.annotation.web.configuration.EnableAuthorizationServer;
import org.springframework.security.oauth2.config.annotation.web.configuration.EnableResourceServer;
import org.springframework.web.bind.annotation.RequestMapping;
import org.springframework.web.bind.annotation.RestController;

@SpringBootApplication
@EnableAuthorizationServer
@EnableResourceServer
@RestController
public class WebsecurityappApplication {
   public static void main(String[] args) {
      SpringApplication.run(WebsecurityappApplication.class, args);
   }
   @RequestMapping(value="/products")
   public String getProductName() {
      return "Honey";
   }
}
使用以下代码定义POJO类以存储用于身份验证的用户信息。
package com.learnfk.websecurityapp;

import java.util.ArrayList;
import java.util.Collection;
import org.springframework.security.core.GrantedAuthority;

public class UserEntity {
   private String username;
   private String password;
   private Collection<GrantedAuthority> grantedAuthoritiesList=new ArrayList<>();

   public String getPassword() {
      return password;
   }
   public void setPassword(String password) {
      this.password=password;
   }
   public Collection<GrantedAuthority> getGrantedAuthoritiesList() {
      return grantedAuthoritiesList;
   }
   public void setGrantedAuthoritiesList(Collection<GrantedAuthority> grantedAuthoritiesList) {
      this.grantedAuthoritiesList=grantedAuthoritiesList;
   }
   public String getUsername() {
      return username;
   }
   public void setUsername(String username) {
      this.username=username;
   }
}
现在,使用以下代码并定义CustomUser类,该类扩展了org.springframework.security.core.userdetails.User类以用于Spring Boot身份验证。
package com.learnfk.websecurityapp;

import org.springframework.security.core.userdetails.User;

public class CustomUser extends User {
   private static final long serialVersionUID=1L;
   public CustomUser(UserEntity user) {
      super(user.getUsername(), user.getPassword(), user.getGrantedAuthoritiesList());
   }
}
您可以创建@Repository类以从数据库中读取用户信息,并将其发送到自定义用户服务,还可以添加授予的权限" ROLE_SYSTEMADMIN"。
package com.learnfk.websecurityapp;

import java.sql.ResultSet;
import java.util.ArrayList;
import java.util.Collection;
import java.util.List;

import org.springframework.beans.factory.annotation.Autowired;
import org.springframework.jdbc.core.JdbcTemplate;
import org.springframework.security.core.GrantedAuthority;
import org.springframework.security.core.authority.SimpleGrantedAuthority;
import org.springframework.stereotype.Repository;

@Repository
public class OAuthDao {
   @Autowired
   private JdbcTemplate jdbcTemplate;

   public UserEntity getUserDetails(String username) {
      Collection<GrantedAuthority> grantedAuthoritiesList=new ArrayList<>();
      String userSQLQuery="SELECT * FROM USERS WHERE USERNAME=?";
      List<UserEntity> list=jdbcTemplate.query(userSQLQuery, new String[] { username },
         (ResultSet rs, int rowNum) -> {

         UserEntity user=new UserEntity();
         user.setUsername(username);
         user.setPassword(rs.getString("PASSWORD"));
         return user;
      });
      if (list.size() > 0) {
         GrantedAuthority grantedAuthority=new SimpleGrantedAuthority("ROLE_SYSTEMADMIN");
         grantedAuthoritiesList.add(grantedAuthority);
         list.get(0).setGrantedAuthoritiesList(grantedAuthoritiesList);
         return list.get(0);
      }
      return null;
   }
}
您可以创建一个自定义用户详细信息服务类,该类扩展了org.springframework.security.core.userdetails.UserDetailsService来调用DAO存储库类,如图所示。
package com.learnfk.websecurityapp;

import org.springframework.beans.factory.annotation.Autowired;
import org.springframework.security.core.userdetails.UserDetailsService;
import org.springframework.security.core.userdetails.UsernameNotFoundException;
import org.springframework.stereotype.Service;

@Service
public class CustomDetailsService implements UserDetailsService {
   @Autowired
   OAuthDao oauthDao;

   @Override
   public CustomUser loadUserByUsername(final String username) throws UsernameNotFoundException {
      UserEntity userEntity=null;
      try {
         userEntity=oauthDao.getUserDetails(username);
         CustomUser customUser=new CustomUser(userEntity);
         return customUser;
      } catch (Exception e) {
         e.printStackTrace();
         throw new UsernameNotFoundException("User " + username + " was not found in the database");
      }
   }
}
接下来,创建一个@configuration类以启用Web安全性,定义密码编码器(BCryptPasswordEncoder),并定义AuthenticationManager bean。安全配置类应扩展WebSecurityConfigurerAdapter类。
package com.learnfk.websecurityapp;

import org.springframework.beans.factory.annotation.Autowired;
import org.springframework.context.annotation.Bean;
import org.springframework.context.annotation.Configuration;

import org.springframework.security.authentication.AuthenticationManager;
import org.springframework.security.config.annotation.authentication.builders.AuthenticationManagerBuilder;
import org.springframework.security.config.annotation.method.configuration.EnableGlobalMethodSecurity;
import org.springframework.security.config.annotation.web.builders.HttpSecurity;
import org.springframework.security.config.annotation.web.builders.WebSecurity;
import org.springframework.security.config.annotation.web.configuration.EnableWebSecurity;
import org.springframework.security.config.annotation.web.configuration.WebSecurityConfigurerAdapter;
import org.springframework.security.config.http.SessionCreationPolicy;
import org.springframework.security.crypto.bcrypt.BCryptPasswordEncoder;
import org.springframework.security.crypto.password.PasswordEncoder;

@Configuration
@EnableWebSecurity
@EnableGlobalMethodSecurity(prePostEnabled=true)
public class SecurityConfiguration extends WebSecurityConfigurerAdapter {
   @Autowired
   private CustomDetailsService customDetailsService;

   @Bean
   public PasswordEncoder encoder() {
      return new BCryptPasswordEncoder();
   }
   @Override
   @Autowired
   protected void configure(AuthenticationManagerBuilder auth) throws Exception {
      auth.userDetailsService(customDetailsService).passwordEncoder(encoder());
   }
   @Override
   protected void configure(HttpSecurity http) throws Exception {
      http.authorizeRequests().anyRequest().authenticated().and().sessionManagement()
         .sessionCreationPolicy(SessionCreationPolicy.NEVER);
   }
   @Override
   public void configure(WebSecurity web) throws Exception {
      web.ignoring();
   }
   @Override
   @Bean
   public AuthenticationManager authenticationManagerBean() throws Exception {
      return super.authenticationManagerBean();
   }
}
现在,定义OAuth2配置类以添加客户端ID,客户端机密,为令牌签名者密钥和验证者密钥定义JwtAccessTokenConverter,私钥和公钥,并使用范围为令牌有效性配置ClientDetailsServiceConfigurer。
package com.learnfk.websecurityapp;

import org.springframework.beans.factory.annotation.Autowired;
import org.springframework.beans.factory.annotation.Qualifier;
import org.springframework.context.annotation.Bean;
import org.springframework.context.annotation.Configuration;

import org.springframework.security.authentication.AuthenticationManager;
import org.springframework.security.oauth2.config.annotation.configurers.ClientDetailsServiceConfigurer;
import org.springframework.security.oauth2.config.annotation.web.configuration.AuthorizationServerConfigurerAdapter;
import org.springframework.security.oauth2.config.annotation.web.configurers.AuthorizationServerEndpointsConfigurer;
import org.springframework.security.oauth2.config.annotation.web.configurers.AuthorizationServerSecurityConfigurer;
import org.springframework.security.oauth2.provider.token.store.JwtAccessTokenConverter;
import org.springframework.security.oauth2.provider.token.store.JwtTokenStore;

@Configuration
public class OAuth2Config extends AuthorizationServerConfigurerAdapter {
   private String clientid="learnfk";
   private String clientSecret="my-secret-key";
   private String privateKey="private key";
   private String publicKey="public key";

   @Autowired
   @Qualifier("authenticationManagerBean")
   private AuthenticationManager authenticationManager;

   @Bean
   public JwtAccessTokenConverter tokenEnhancer() {
      JwtAccessTokenConverter converter=new JwtAccessTokenConverter();
      converter.setSigningKey(privateKey);
      converter.setVerifierKey(publicKey);
      return converter;
   }
   @Bean
   public JwtTokenStore tokenStore() {
      return new JwtTokenStore(tokenEnhancer());
   }
   @Override
   public void configure(AuthorizationServerEndpointsConfigurer endpoints) throws Exception {
      endpoints.authenticationManager(authenticationManager).tokenStore(tokenStore())
      .accessTokenConverter(tokenEnhancer());
   }
   @Override
   public void configure(AuthorizationServerSecurityConfigurer security) throws Exception {
      security.tokenKeyAccess("permitAll()").checkTokenAccess("isAuthenticated()");
   }
   @Override
   public void configure(ClientDetailsServiceConfigurer clients) throws Exception {
      clients.inMemory().withClient(clientid).secret(clientSecret).scopes("read", "write")
         .authorizedGrantTypes("password", "refresh_token").accessTokenValiditySeconds(20000)
         .refreshTokenValiditySeconds(20000);

   }
}
现在,使用openssl创建私钥和公钥。
您可以使用以下命令来生成私钥。
openssl genrsa -out jwt.pem 2048
openssl rsa -in jwt.pem
您可以使用要生成公共密钥,请使用以下命令。
openssl rsa -in jwt.pem -pubout
对于1.5版以上的Spring Boot版本,在application.properties文件中添加以下属性,以定义OAuth2资源过滤器顺序。
security.oauth2.resource.filter-order=3
YAML文件用户可以在YAML文件中添加以下属性。
security:
   oauth2:
      resource:
         filter-order: 3
现在,在类路径资源 src/main/resources/directory 下创建schema.sql和data.sql文件,以将应用程序连接到H2数据库。
schema.sql文件如下所示:
CREATE TABLE USERS (ID INT PRIMARY KEY, USERNAME VARCHAR(45), PASSWORD VARCHAR(60));
data.sql文件如下所示:
INSERT INTO USERS (ID, USERNAME,PASSWORD) VALUES (
   1, 'learnfk@gmail.com','$2a$08$fL7u5xcvsZl78su29x1ti.dxI.9rYO8t0q5wk2ROJ.1cdR53bmaVG');

INSERT INTO USERS (ID, USERNAME,PASSWORD) VALUES (
   2, 'myemail@gmail.com','$2a$08$fL7u5xcvsZl78su29x1ti.dxI.9rYO8t0q5wk2ROJ.1cdR53bmaVG');
注意-密码应以Bcrypt编码器的格式存储在数据库表中。
您可以创建一个可执行的JAR文件,并使用以下Maven或Gradle命令运行Spring Boot应用程序。
对于Maven,您可以使用下面给出的命令-
mvn clean install在" BUILD SUCCESS"之后,您可以在目标目录下找到JAR文件。
对于Gradle,您可以使用如下所示的命令-
gradle clean build在" BUILD SUCCESSFUL"之后,您可以在build/libs目录下找到JAR文件。
现在,使用此处显示的命令运行JAR文件-
java –jar <JARFILE>
该应用程序在Tomcat端口8080上启动。

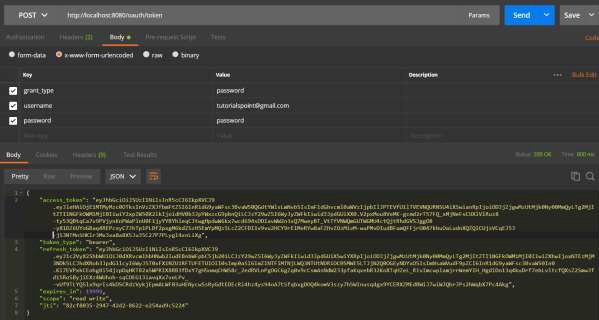
现在,通过POSTMAN命中POST方法的URL以获取OAUTH2令牌。
http:// localhost:8080/oauth/token
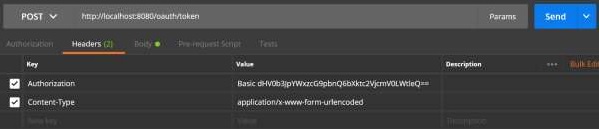
现在,添加请求标头,如下所示:
Authorization - 使用您的客户ID和客户机密的基本身份验证。
Content-type - application/x-www-form-urlencoded
现在,添加请求参数,如下所示:
- grant_type = 密码
- username = 您的用户名
- password = 您的密码

现在,点击API并获得access_token,如下所示:
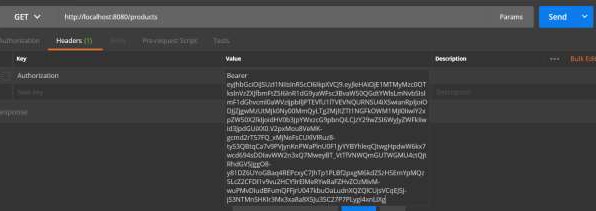
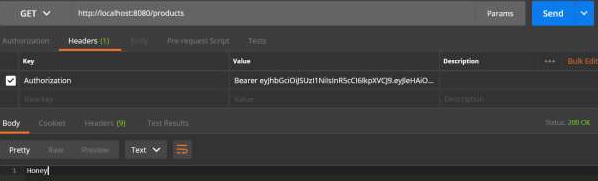
现在,如图所示,在Request Header中单击带有Bearer访问令牌的Resource Server API。
然后您可以看到如下所示的输出-
祝学习愉快!(内容编辑有误?请选中要编辑内容 -> 右键 -> 修改 -> 提交!)