- 基础教程
- 脚本教程
- 进阶教程
- Linux 安装教程
- Linux 命令列表
 PDF电子书集合
Linux Nginx 安装详解
Nginx 说明
来自网络上的一个好介绍
- 传统上基于进程或线程模型架构的 Web 服务通过每进程或每线程处理并发连接请求,这势必会在网络和 I/O 操作时产生阻塞,其另一个必然结果则是对内存或 CPU 的利用率低下。生成一个新的进程/线程需要事先备好其运行时环境,这包括为其分配堆内存和栈内存,以及为其创建新的执行上下文等。这些操作都需要占用 CPU,而且过多的进程/线程还会带来线程抖动或频繁的上下文切换,系统性能也会由此进一步下降。
- 在设计的最初阶段,Nginx 的主要着眼点就是其高性能以及对物理计算资源的高密度利用,因此其采用了不同的架构模型。受启发于多种操作系统设计中基于“事件”的高级处理机制,nginx采用了模块化、事件驱动、异步、单线程及非阻塞的架构,并大量采用了多路复用及事件通知机制。在 Nginx 中,连接请求由为数不多的几个仅包含一个线程的进程 Worker 以高效的回环(run-loop)机制进行处理,而每个 Worker 可以并行处理数千个的并发连接及请求。
- 如果负载以 CPU 密集型应用为主,如 SSL 或压缩应用,则 Worker 数应与 CPU 数相同;如果负载以 IO 密集型为主,如响应大量内容给客户端,则 Worker 数应该为 CPU 个数的 1.5 或 2 倍。
- Nginx会按需同时运行多个进程:一个主进程(Master)和几个工作进程(Worker),配置了缓存时还会有缓存加载器进程(Cache Loader)和缓存管理器进程(Cache Manager)等。所有进程均是仅含有一个线程,并主要通过“共享内存”的机制实现进程间通信。主进程以root用户身份运行,而 Worker、Cache Loader 和 Cache manager 均应以非特权用户身份运行。
- 主进程主要完成如下工作:
- 1.读取并验正配置信息;
- 2.创建、绑定及关闭套接字;
- 3.启动、终止及维护worker进程的个数;
- 4.无须中止服务而重新配置工作特性;
- 5.控制非中断式程序升级,启用新的二进制程序并在需要时回滚至老版本;
- 6.重新打开日志文件,实现日志滚动;
- 7.编译嵌入式perl脚本;
- Worker 进程主要完成的任务包括:
- 1.接收、传入并处理来自客户端的连接;
- 2.提供反向代理及过滤功能;
- 3.nginx任何能完成的其它任务;
- Cache Loader 进程主要完成的任务包括:
- 1.检查缓存存储中的缓存对象;
- 2.使用缓存元数据建立内存数据库;
- Cache Manager 进程的主要任务:
- 1.缓存的失效及过期检验;
Nginx 的 Docker 部署
- 预设好目录,在宿主机上创建下面目录:
mkdir -p /data/docker/nginx/logs /data/docker/nginx/conf -
重点:先准备好你的 nginx.conf 文件,存放在宿主机的:
vim /data/docker/nginx/conf/nginx.conf目录下,等下需要映射。
worker_processes      1;

events {
  worker_connections  1024;
}

http {
  include             mime.types;
  default_type        application/octet-stream;

  sendfile on;

  keepalive_timeout   65;

  server {
    listen            80;
    server_name       localhost 127.0.0.1 193.112.221.203 youmeek.com;

    location / {
      root            /usr/share/nginx/html;
      index           index.html index.htm;
    }
  }
}- 官网镜像:https://hub.docker.com/_/nginx/
- 下载镜像:
docker pull nginx:1.12.2 - 运行容器:
docker run --name youmeek-nginx -p 80:80 -v /data/docker/nginx/logs:/var/log/nginx -v /data/docker/nginx/conf/nginx.conf:/etc/nginx/nginx.conf:ro -d nginx:1.12.2 - 重新加载配置(目前测试无效,只能重启服务):
docker exec -it youmeek-nginx nginx -s reload - 停止服务:
docker exec -it youmeek-nginx nginx -s stop或者:docker stop youmeek-nginx - 重新启动服务:
docker restart youmeek-nginx
YUM 安装(版本一般滞后半年左右)
- 安装:
yum install -y nginx,同时增加了一个 nginx 用户组和用户 - 默认配置文件位置:
vim /etc/nginx/nginx.conf - 其他配置文件位置:
cd /etc/nginx/conf.d/ - 模块配置文件位置:
cd /usr/share/nginx/modules/ - 默认 HTML 静态文件位置:
cd /usr/share/nginx/html - log 存放目录:
cd /var/log/nginx/ - 状态:
systemctl status nginx - 启动:
systemctl start nginx - 启动:
systemctl stop nginx - 刷新配置:
nginx -s reload - 查看版本和 YUM 自带的模块:
nginx -V
Nginx 源码编译安装(带 Prometheus 模块)
./configure \
--prefix=/usr/local/nginx \
--pid-path=/var/local/nginx/nginx.pid \
--lock-path=/var/lock/nginx/nginx.lock \
--error-log-path=/var/log/nginx/error.log \
--http-log-path=/var/log/nginx/access.log \
--with-http_gzip_static_module \
--http-client-body-temp-path=/var/temp/nginx/client \
--http-proxy-temp-path=/var/temp/nginx/proxy \
--http-fastcgi-temp-path=/var/temp/nginx/fastcgi \
--http-uwsgi-temp-path=/var/temp/nginx/uwsgi \
--with-http_ssl_module \
--with-http_stub_status_module \
--http-scgi-temp-path=/var/temp/nginx/scgi \
--add-module=/usr/local/nginx-module-vts
Nginx 源码编译安装(带监控模块)
- 官网下载最新稳定版本 1.8.1,大小:814K
- 官网安装说明:https://www.nginx.com/resources/wiki/start/topics/tutorials/install/
- 源码编译配置参数说明:
- 开始安装:
- 安装依赖包:
yum install -y gcc gcc-c++ pcre pcre-devel zlib zlib-devel openssl openssl-devel - 预设几个文件夹,方便等下安装的时候有些文件可以进行存放:
mkdir -p /usr/local/nginx /var/log/nginx /var/temp/nginx /var/lock/nginx
- 下载源码包:
wget http://nginx.org/download/nginx-1.8.1.tar.gz - 解压:
tar zxvf nginx-1.8.1.tar.gz - 进入解压后目录:
cd nginx-1.8.1/ - 编译配置:
- 安装依赖包:
./configure \
--prefix=/usr/local/nginx \
--pid-path=/var/local/nginx/nginx.pid \
--lock-path=/var/lock/nginx/nginx.lock \
--error-log-path=/var/log/nginx/error.log \
--http-log-path=/var/log/nginx/access.log \
--with-http_gzip_static_module \
--http-client-body-temp-path=/var/temp/nginx/client \
--http-proxy-temp-path=/var/temp/nginx/proxy \
--http-fastcgi-temp-path=/var/temp/nginx/fastcgi \
--http-uwsgi-temp-path=/var/temp/nginx/uwsgi \
--with-http_ssl_module \
--with-http_stub_status_module \
--http-scgi-temp-path=/var/temp/nginx/scgi- 编译:
make - 安装:
make install - 启动 Nginx
- 先检查是否在 /usr/local 目录下生成了 Nginx 等相关文件:
cd /usr/local/nginx;ll,正常的效果应该是显示这样的:
- 先检查是否在 /usr/local 目录下生成了 Nginx 等相关文件:
drwxr-xr-x. 2 root root 4096 3月  22 16:21 conf
drwxr-xr-x. 2 root root 4096 3月  22 16:21 html
drwxr-xr-x. 2 root root 4096 3月 22 16:21 sbin- 如果要检查刚刚编译的哪些模块,可以:
nginx -V
nginx version: nginx/1.8.0
built by gcc 4.4.7 20120313 (Red Hat 4.4.7-18) (GCC)
built with OpenSSL 1.0.1e-fips 11 Feb 2013
TLS SNI support enabled
configure arguments: --user=nginx --group=nginx --prefix=/usr/local/nginx --pid-path=/usr/local/nginx/run/nginx.pid --lock-path=/usr/local/nginx/lock/nginx.lock --with-http_ssl_module --with-http_dav_module --with-http_flv_module --with-http_gzip_static_module --with-http_stub_status_module- 停止防火墙:
service iptables stop- 或是把 80 端口加入到的排除列表:
sudo iptables -A INPUT -p tcp -m tcp --dport 80 -j ACCEPTsudo service iptables savesudo service iptables restart
- 启动:
/usr/local/nginx/sbin/nginx,启动完成 shell 是不会有输出的 - 检查 时候有 Nginx 进程:
ps aux | grep nginx,正常是显示 3 个结果出来 - 检查 Nginx 是否启动并监听了 80 端口:
netstat -ntulp | grep 80 - 访问:
192.168.1.114,如果能看到:Welcome to nginx!,即可表示安装成功 - 检查 Nginx 启用的配置文件是哪个:
/usr/local/nginx/sbin/nginx -t - 刷新 Nginx 配置后重启:
/usr/local/nginx/sbin/nginx -s reload - 停止 Nginx:
/usr/local/nginx/sbin/nginx -s stop - 如果访问不了,或是出现其他信息看下错误立即:
vim /var/log/nginx/error.log
把 Nginx 添加到系统服务中
- 新建文件:
vim /etc/init.d/nginx - 添加如下内容:
#!/bin/bash


#nginx执行程序路径需要修改
nginxd=/usr/local/nginx/sbin/nginx

# nginx配置文件路径需要修改
nginx_config=/usr/local/nginx/conf/nginx.conf

# pid 地址需要修改
nginx_pid=/var/local/nginx/nginx.pid


RETVAL=0
prog="nginx"

# Source function library.
. /etc/rc.d/init.d/functions
# Source networking configuration.
. /etc/sysconfig/network
# Check that networking is up.
[ ${NETWORKING} = "no" ] && exit 0
[ -x $nginxd ] || exit 0

# Start nginx daemons functions.
start() {
if [ -e $nginx_pid ];then
   echo "nginx already running...."
   exit 1
fi

echo -n $"Starting $prog: "
daemon $nginxd -c ${nginx_config}
RETVAL=$?
echo
[ $RETVAL = 0 ] && touch /var/lock/subsys/nginx
return $RETVAL
}

# Stop nginx daemons functions.
# pid 地址需要修改
stop() {
    echo -n $"Stopping $prog: "
    killproc $nginxd
    RETVAL=$?
    echo
    [ $RETVAL = 0 ] && rm -f /var/lock/subsys/nginx /var/local/nginx/nginx.pid
}

# reload nginx service functions.
reload() {
    echo -n $"Reloading $prog: "
    #kill -HUP `cat ${nginx_pid}`
    killproc $nginxd -HUP
    RETVAL=$?
    echo
}

# See how we were called.
case "$1" in
    start)
        start
        ;;
    stop)
        stop
        ;;
    reload)
        reload
        ;;
    restart)
        stop
        start
        ;;
    status)
        status $prog
        RETVAL=$?
        ;;
    *)

    echo $"Usage: $prog {start|stop|restart|reload|status|help}"
    exit 1

esac
exit $RETVAL- 修改权限:
chmod 755 /etc/init.d/nginx - 启动服务:
service nginx start - 停止服务:
service nginx stop - 重启服务:
service nginx restart
Nginx 无缝升级
-
使用新的参数
configure后执行make重新编译,注意之后不要执行make install.新构建的Nginx会在objs目录下 -
备份旧的Nginx
cp 老的nginx目录/sbin/nginx 老的nginx目录/sbin/nginx.old -
复制新的Nginx
cp ./objs/nginx 老的nginx目录/sbin/,可能提示Nginx被占用,如果是则强制覆盖即可. -
检查下Makefile的更新指令
cat Makefile,检查下路径是否匹配,一般没什么问题毕竟是根据你的参数生成的文件.upgrade: /usr/local/nginx/sbin/nginx -t kill -USR2 `cat /var/local/nginx/nginx.pid` sleep 1 test -f /var/local/nginx/nginx.pid.oldbin kill -QUIT `cat /var/local/nginx/nginx.pid.oldbin` -
更新
make upgrade
为 Nginx 添加 basic_auth
yum install httpd-tools

htpasswd -c /opt/nginx-auth/passwd.db myusername,回车之后输入两次密码


server {
    ...

    location / {
        auth_basic   "please input you user name and password";
        auth_basic_user_file    /opt/nginx-auth/passwd.db;
        ....
    }
}
Nginx 全局变量
- $arg_PARAMETER #这个变量包含GET请求中,如果有变量PARAMETER时的值。
- $args #这个变量等于请求行中(GET请求)的参数,例如foo=123&bar=blahblah;
- $binary_remote_addr #二进制的客户地址。
- $body_bytes_sent #响应时送出的body字节数数量。即使连接中断,这个数据也是精确的。
- $content_length #请求头中的Content-length字段。
- $content_type #请求头中的Content-Type字段。
- $cookie_COOKIE #cookie COOKIE变量的值
- $document_root #当前请求在root指令中指定的值。
- $document_uri #与$uri相同。
- $host #请求主机头字段,否则为服务器名称。
- $hostname #Set to the machine’s hostname as returned by gethostname
- $http_HEADER
- $is_args #如果有$args参数,这个变量等于”?”,否则等于”",空值。
- $http_user_agent #客户端agent信息
- $http_cookie #客户端cookie信息
- $limit_rate #这个变量可以限制连接速率。
- $query_string #与$args相同。
- $request_body_file #客户端请求主体信息的临时文件名。
- $request_method #客户端请求的动作,通常为GET或POST。
- $remote_addr #客户端的IP地址。
- $remote_port #客户端的端口。
- $remote_user #已经经过Auth Basic Module验证的用户名。
- $request_completion #如果请求结束,设置为OK. 当请求未结束或如果该请求不是请求链串的最后一个时,为空(Empty)。
- $request_method #GET或POST
- $request_filename #当前请求的文件路径,由root或alias指令与URI请求生成。
- $request_uri #包含请求参数的原始URI,不包含主机名,如:”/foo/bar.php?arg=baz”。不能修改。
- $scheme #HTTP方法(如http,https)。
- $server_protocol #请求使用的协议,通常是HTTP/1.0或HTTP/1.1。
- $server_addr #服务器地址,在完成一次系统调用后可以确定这个值。
- $server_name #服务器名称。
- $server_port #请求到达服务器的端口号。
- $uri #不带请求参数的当前URI,$uri不包含主机名,如”/foo/bar.html”。该值有可能和$request_uri 不一致。
- $request_uri是浏览器发过来的值。该值是rewrite后的值。例如做了internal redirects后。
Nginx 配置
- Nginx 默认配置文件:
vim /usr/local/nginx/conf/nginx.conf
Nginx 在 1.8.1 版本下的默认配置(去掉注释)
user root;#我这里习惯使用 root,所以这里需要这样设置。如果你有为你的 nginx 专门配置一个用户,这里需要改为你的用户
worker_processes  1;

events {
    worker_connections  1024;
}

http {
    include       mime.types;
    default_type  application/octet-stream;

    sendfile        on;
    keepalive_timeout  65;

    server {
        listen       80;
        server_name  localhost;

        location / {
            root   html;
            index  index.html index.htm;
        }

        error_page   500 502 503 504  /50x.html;
        location = /50x.html {
            root   html;
        }
    }
}
HTTP 服务,虚拟主机
- 停止防火墙:
service iptables stop,防止出现特别干扰 - 编辑默认的配置文件:
vim /usr/local/nginx/conf/nginx.conf - 设置两个虚拟主机(通过端口来区分开)
user root;#我这里习惯使用 root,所以这里需要这样设置。如果你有为你的 nginx 专门配置一个用户,这里需要改为你的用户
worker_processes  1;

events {
    worker_connections  1024;
}

http {
    include       mime.types;
    default_type  application/octet-stream;

    sendfile        on;
    keepalive_timeout  65;

    # 一个 server 代表一个虚拟主机
    server {
        listen       80;
        server_name  localhost;

        location / {
            # 虚拟机根目录是 /usr/local/nginx/html 目录
            root   html;
            # 虚拟机首页是 /usr/local/nginx/html 目录下这两个文件
            index  index.html index.htm;
        }

        error_page   500 502 503 504  /50x.html;
        location = /50x.html {
            root   html;
        }
    }

    server {
        # 第二个虚拟机的端口是 90,服务地址还是本地
        listen       90;
        server_name  localhost;

        location / {
            root   html90;
            index  index.html index.htm;
        }

        error_page   500 502 503 504  /50x.html;
        location = /50x.html {
            root   html;
        }
    }
}- 设置两个虚拟主机(通过域名来区分开)
user root;#我这里习惯使用 root,所以这里需要这样设置。如果你有为你的 nginx 专门配置一个用户,这里需要改为你的用户
worker_processes  1;

events {
    worker_connections  1024;
}

http {
    include       mime.types;
    default_type  application/octet-stream;

    sendfile        on;
    keepalive_timeout  65;

    # 一个 server 代表一个虚拟主机
    server {
        listen       80;
        # 两个虚拟主机都使用 80 端口,设置不同域名
        server_name  code.youmeek.com;

        location / {
            # 虚拟机根目录是 /usr/local/nginx/html 目录
            root   html;
            # 虚拟机首页是 /usr/local/nginx/html 目录下这两个文件
            index  index.html index.htm;
        }

        error_page   500 502 503 504  /50x.html;
        location = /50x.html {
            root   html;
        }
    }

    server {
        listen       80;
        # 两个虚拟主机都使用 80 端口,设置不同域名
        server_name  i.youmeek.com;

        location / {
            root   html-i;
            index  index.html index.htm;
        }

        error_page   500 502 503 504  /50x.html;
        location = /50x.html {
            root   html;
        }
    }
}
反向代理和负载均衡
-
最精简的环境:一台虚拟机
- 1 个 JDK
- 1 个 Nginx
- 2 个 Tomcat
-
Nginx 配置:
user root;#我这里习惯使用 root,所以这里需要这样设置。如果你有为你的 nginx 专门配置一个用户,这里需要改为你的用户
worker_processes  1;

events {
    worker_connections  1024;
}

http {
    include       mime.types;
    default_type  application/octet-stream;

    sendfile        on;
    keepalive_timeout  65;

    # 自己定义的两个 tomcat 请求地址和端口
    # 也就是当浏览器请求:tomcat.youmeek.com 的时候从下面这两个 tomcat 中去找一个进行转发
    upstream tomcatCluster {
        server 192.168.1.114:8080;
        server 192.168.1.114:8081;

        # 添加 weight 字段可以表示权重,值越高权重越大,默认值是 1,最大值官网没说,一般如果设置也就设置 3,5,7 这样的数
        # 官网:https://www.nginx.com/resources/admin-guide/load-balancer/#weight
        # server 192.168.1.114:8080 weight=2;
        # server 192.168.1.114:8081 weight=1;
    }

    server {
        listen       80;
        server_name  tomcat.youmeek.com;

        location / {
            proxy_pass   http://tomcatCluster;
            index  index.html index.htm;
        }
    }
}
配置 HTTPS 服务(SSL 证书配置)
- 免费申请 SSL 证书渠道
- 教程:https://www.wn789.com/4394.html
- SSL For Free:https://www.sslforfree.com
- 配置要点其实就是下面该图:
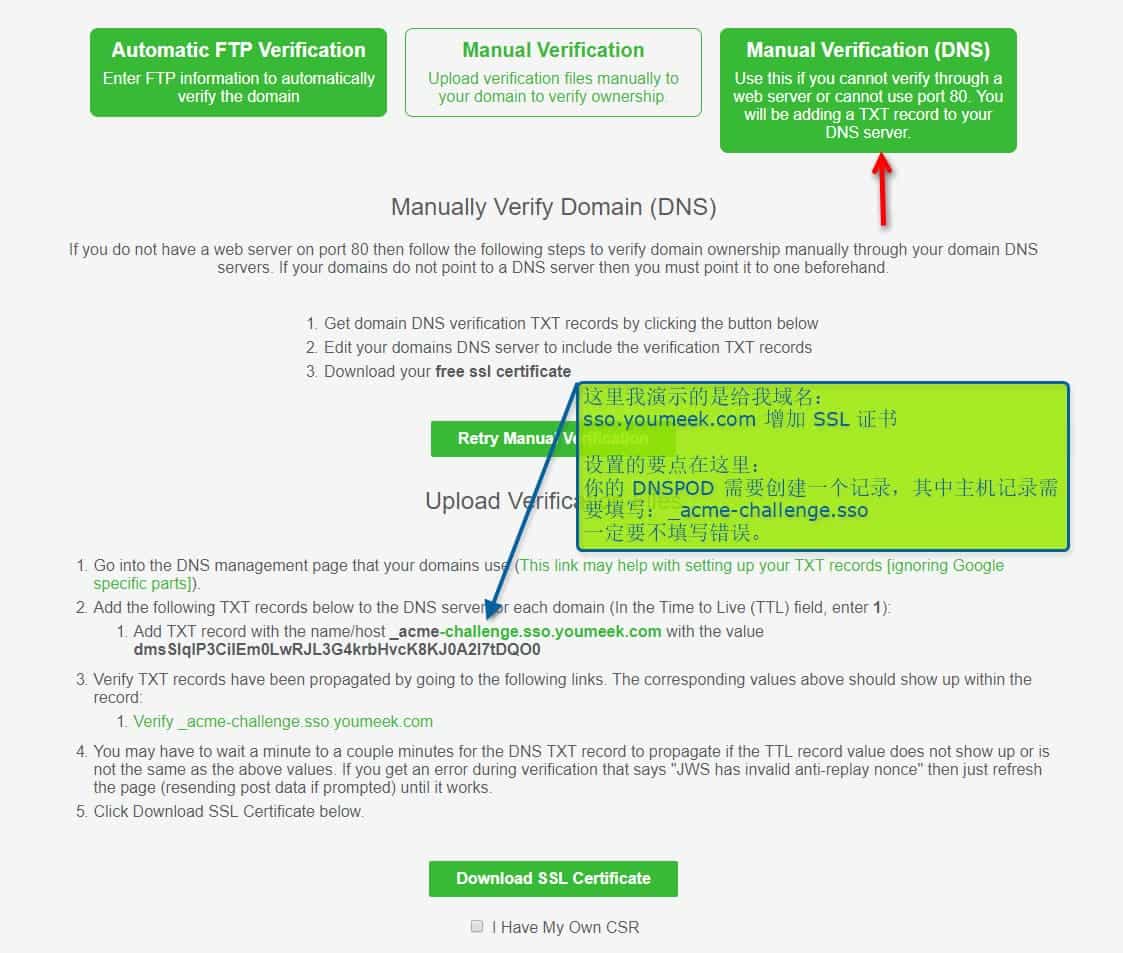
- 一般你会下载下面两个文件:
certificate.crt,private.key - 如果你需要把 crt 和 key 的证书转换成 keystore(如果你有这个需求的话)
- 从 key 和 crt 生成 pkcs12 格式的 keystore,生成过程会让人你输入密码,这个密码下面会用到,我这里假设输入 123456
openssl pkcs12 -export -in certificate.crt -inkey private.key -out youmeek.p12 -name youmeek -CAfile certificate.crt -caname -chain-
keytool -importkeystore -v -srckeystore youmeek.p12 -srcstoretype pkcs12 -srcstorepass 123456 -destkeystore youmeek.keystore -deststoretype jks -deststorepass 123456
- 修改 nginx 配置文件,增加对 HTTPS 支持(下面的配置是基于默认安装 nginx 后的配置)
vim /usr/local/nginx/conf/nginx.conf
worker_processes  1;
events {
    worker_connections  1024;
}
http {
    include       mime.types;
    default_type  application/octet-stream;
    sendfile        on;
    keepalive_timeout  65;

    # 如果访问 http 也直接跳转到 https
    server {
        listen       80;
        server_name sso.youmeek.com;
        return 301 https://$server_name$request_uri;
    }

    # crt 和 key 文件的存放位置根据你自己存放位置进行修改
    server {
        listen       443;
        server_name  sso.youmeek.com;
        ssl  on;
        ssl_certificate     /opt/ssl/certificate.crt;
        ssl_certificate_key /opt/ssl/private.key;
        location / {
            root   html;
            index  index.html index.htm;
        }
        error_page   500 502 503 504  /50x.html;
        location = /50x.html {
            root   html;
        }
    }
}
- 最新版本的 Nginx SSL 配置
listen 443 ssl;

ssl_certificate     /opt/jar/ssl/server.crt;
ssl_certificate_key /opt/jar/ssl/server.key;

ssl_session_timeout 5m;
ssl_protocols TLSv1 TLSv1.1 TLSv1.2;
ssl_ciphers ECDHE-RSA-AES128-GCM-SHA256:HIGH:!aNULL:!MD5:!RC4:!DHE;
ssl_prefer_server_ciphers on;
Nginx 压力测试
- AB 测试工具安装:
yum install -y httpd-tools - 使用:
ab -n 1000 -c 100 http://www.baidu.com/

-n  总的请求数
-c 单个时刻并发数- 压测结果:
This is ApacheBench, Version 2.3 <$Revision: 1430300 $>
Copyright 1996 Adam Twiss, Zeus Technology Ltd, http://www.zeustech.net/
Licensed to The Apache Software Foundation, http://www.apache.org/

Benchmarking juejin.im (be patient)
Completed 100 requests
Completed 200 requests
Completed 300 requests
Completed 400 requests
Completed 500 requests
Completed 600 requests
Completed 700 requests
Completed 800 requests
Completed 900 requests
Completed 1000 requests
Finished 1000 requests


Server Software:        nginx
Server Hostname:        juejin.im
Server Port:            443
SSL/TLS Protocol:       TLSv1.2,ECDHE-RSA-AES256-GCM-SHA384,2048,256

Document Path:          /
Document Length:        271405 bytes

Concurrency Level:      100(并发数:100)
Time taken for tests:   120.042 seconds(一共用了 120 秒)
Complete requests:      1000(总的请求数:1000)
Failed requests:        0(失败的请求次数)
Write errors:           0
Total transferred:      271948000 bytes
HTML transferred:       271405000 bytes
Requests per second:    8.33 [#/sec] (mean)(QPS 系统吞吐量,平均每秒请求数,计算公式 = 总请求数 / 总时间数)
Time per request:       12004.215 [ms] (mean)(毫秒,平均每次并发 100 个请求的处理时间)
Time per request:       120.042 [ms] (mean, across all concurrent requests)(毫秒,并发 100 下,平均每个请求处理时间)
Transfer rate:          2212.34 [Kbytes/sec] received(平均每秒网络流量)

Connection Times (ms)
              min  mean[+/-sd] median   max
Connect:       57  159 253.6     77    1002
Processing:  1139 11570 2348.2  11199   36198
Waiting:      156 1398 959.4   1279   22698
Total:       1232 11730 2374.1  11300   36274

Percentage of the requests served within a certain time (ms)
  50%  11300
  66%  11562
  75%  11863
  80%  12159
  90%  13148
  95%  15814
  98%  18882
  99%  22255
 100%  36274 (longest request)
Nginx 常规优化
增加工作线程数和并发连接数
- 修改参数:
worker_processes 1; - 该参数是指:nginx 要开启的工作进程数(worker process),默认是 1,一把你不需要修改。(除了工作进程,还有一种 master process 的概念)
- 但是如果请求数比较多,一般推荐最大是修改成 CPU 的内核数等同的值,以增加能力。
- 修改 events 参数
events {
    # 每一个进程可以打开的最大连接数(这个参数是受限制于系统参数的,默认是 1024)(进程数是上面 worker_processes 决定的)
    worker_connections  1024;
    # 可以一次建立多个连接
    multi_accept on;
    # epoll 模式效率最高
    use epoll;
}
启动长连接
http {
  sendfile on; # 减少文件在应用和内核之间的拷贝
  tcp_nopush on; # 当数据包达到一定大小再发送

  keepalive_timeout   65;

  upstream tomcatCluster {
      server 192.168.1.114:8080;
      server 192.168.1.114:8081;
      keepalive 300; # 300 个长连接
  }

}
启用缓存和压缩
http {
    gzip on;
    gzip_buffers 8 16k; # 这个限制了nginx不能压缩大于128k的文件
    gzip_min_length 512; # 单位byte
    gzip_disable "MSIE [1-6]\.(?!.*SV1)";
    gzip_http_version 1.1; # 1.0 的版本可能会有问题
    gzip_types   text/plain text/css application/javascript application/x-javascript application/json application/xml;
}
操作系统优化(机器好点的时候)
修改 sysctl 参数
- 修改配置文件:
vim /etc/sysctl.conf
net.ipv4.tcp_fin_timeout = 10           #保持在FIN-WAIT-2状态的时间,使系统可以处理更多的连接。此参数值为整数,单位为秒。
net.ipv4.tcp_tw_reuse = 1              #开启重用,允许将TIME_WAIT socket用于新的TCP连接。默认为0,表示关闭。
net.ipv4.tcp_tw_recycle = 0            #开启TCP连接中TIME_WAIT socket的快速回收。默认值为0,表示关闭。
net.ipv4.tcp_syncookies = 1            #开启SYN cookie,出现SYN等待队列溢出时启用cookie处理,防范少量的SYN攻击。默认为0,表示关闭。
net.core.somaxconn = 1024 #定义了系统中每一个端口最大的监听队列的长度, 对于一个经常处理新连接的高负载 web服务环境来说,默认值为128,偏小。- 刷新 sysctl 配置:
sysctl -p
修改 limits 参数
- ElasticSearch 一般也是要修改该参数
- 修改配置文件:
vim /etc/security/limits.conf
* soft nofile 262144
* hard nofile 262144
* soft core unlimited
* soft stack 262144
Nginx 监控模块
- 如果你需要监控 nginx 情况可以安装的加入这个模块 http_stub_status_module:
./configure \
--prefix=/usr/local/nginx \
--pid-path=/var/local/nginx/nginx.pid \
--lock-path=/var/lock/nginx/nginx.lock \
--error-log-path=/var/log/nginx/error.log \
--http-log-path=/var/log/nginx/access.log \
--with-http_gzip_static_module \
--http-client-body-temp-path=/var/temp/nginx/client \
--http-proxy-temp-path=/var/temp/nginx/proxy \
--http-fastcgi-temp-path=/var/temp/nginx/fastcgi \
--http-uwsgi-temp-path=/var/temp/nginx/uwsgi \
--with-http_ssl_module \
--http-scgi-temp-path=/var/temp/nginx/scgi \
--with-http_stub_status_module- 然后在 nginx.conf 文件的 location 区域增加:stub_status on;
location /nginx_status {
    allow 127.0.0.1;
    deny all;
    stub_status on;
    access_log   off;
}- 当你访问:http://127.0.0.1/nginx_status,会得到类似下面的结果
- 其中配置的
allow 127.0.0.1;表示只允许本机访问:http://127.0.0.1/nginx_status 才能看到- 所以我们也可以通过 curl 访问本机看到结果,不一定要对外开放。
-
deny all;除了被允许的,其他所有人都不可以访问
Active connections: 1
server accepts handled requests
 3 6 9
Reading: 0 Writing: 5 Waiting: 0 - Active connections: 当前活动连接数,包含 waiting 的连接(最常需要看的就是这个参数)
- Server accepts handled requests: Nginx总共处理了 3 个连接,成功创建 6 次握手(证明中间没有失败的),总共处理了 9 个请求.
- Reading: Nginx 读取到客户端的 Header 信息数,如果很大,说明现在很多请求正在过来
- Writing: Nginx 返回给客户端的 Header 信息数,如果很大,说明现在又很多请求正在响应
- Waiting: 开启keep-alive的情况下,这个值等于 active – (reading + writing),意思就是 Nginx 已经处理完成,正在等候下一次请求指令的驻留连接.
- 所以,在访问效率高,请求很快被处理完毕的情况下,Waiting数比较多是正常的。如果reading + writing数较多,则说明并发访问量非常大,正在处理过程中
Nginx 配置文件常用配置积累
location 配置
= 开头表示精确匹配
^~ 开头表示uri以某个常规字符串开头,不是正则匹配
~ 开头表示区分大小写的正则匹配;
~* 开头表示不区分大小写的正则匹配
/ 通用匹配, 如果没有其它匹配,任何请求都会匹配到

location / {

}

location /user {

}

location = /user {

}

location /user/ {

}

location ^~ /user/ {

}

location /user/youmeek {

}

location ~ /user/youmeek {

}

location ~ ^(/cas/|/casclient1/|/casclient2/|/casclient3/) {

}

location ~ .*\.(gif|jpg|jpeg|png|bmp|swf|ico|woff|woff2|ttf|eot|txt)$ {

}

location ~ .*$ {

}
链接 aa 下,查询参数包含 bb
- 这里必须使用:IF,但是 IF 是不被推荐的:If Is Evil
location /aa/ {
    if ( $args ~* '(.*bb.*)' ) {
        return 601;
    }
}
location /aa/ {
if ($args ~ tag=bb){
return 601;
}
}HTTP 服务,绑定多个域名
安装第三方模块
生成规格图
启用 Gzip 压缩
防盗链
Nginx 禁止特定用户代理(User Agents)访问,静止指定 IP 访问
- https://www.ttlsa.com/nginx/how-to-block-user-agents-using-nginx/
- https://help.aliyun.com/knowledge_detail/5974693.html?spm=5176.788314853.2.18.s4z1ra
Nginx 缓存
Nginx 自动分割日志文件
- 在 Tomcat 安装和配置、优化 文章已经使用了 cronolog,这里也借用 cronolog 来实现分割。具体安装看文章。
- 创建目录:
mkdir -p /data/nginx/log/logs - 创建命名管道:
mkfifo /data/nginx/log/access_log.log - 配置 cronolog(按天):
nohup cat /data/nginx/log/access_log.log | /usr/sbin/cronolog /data/nginx/log/logs/access-%Y-%m-%d.log & - 配置 cronolog(按月):
nohup cat /data/nginx/log/access_log.log | /usr/sbin/cronolog /data/nginx/log/logs/access-%Y-%m.log & - 编辑 nginx 配置文件,配置 log 位置:
access_log /data/nginx/log/access_log.log; - 重启 nginx,最终可以在 /data/nginx/log/logs 目录下看到生成的 log
Nginx 处理跨域请求
安全相预防
在配置文件中设置自定义缓存以限制缓冲区溢出攻击的可能性 client_body_buffer_size 1K; client_header_buffer_size 1k; client_max_body_size 1k; large_client_header_buffers 2 1k;
-
将timeout设低来防止DOS攻击 所有这些声明都可以放到主配置文件中。 client_body_timeout 10; client_header_timeout 10; keepalive_timeout 5 5; send_timeout 10;
-
限制用户连接数来预防DOS攻击 limit_zone slimits $binary_remote_addr 5m; limit_conn slimits 5;
使用 logrotate 做 nginx 日志轮询分割
-
前提:
- 我 nginx 的成功日志路径:/var/log/nginx/access.log
- 我 nginx 的错误日志路径:/var/log/nginx/error.log
- pid 路径:/var/local/nginx/nginx.pid
-
一般情况 CentOS 是装有:logrotate,你可以检查下:
rpm -ql logrotate,如果有相应结果,则表示你也装了。 -
logrotate 配置文件一般在:
- 全局配置:/etc/logrotate.conf 通用配置文件,可以定义全局默认使用的选项。
- 自定义配置,放在这个目录下的都算是:/etc/logrotate.d/
-
针对 nginx 创建自定义的配置文件:
vim /etc/logrotate.d/nginx -
文件内容如下:
/var/log/nginx/access.log /var/log/nginx/error.log {
    create 644 root root
    notifempty
    daily
    rotate 15
    missingok
    dateext
    sharedscripts
    postrotate
        if [ -f /var/local/nginx/nginx.pid ]; then
            kill -USR1 `cat /var/local/nginx/nginx.pid`
        fi
    endscript
}
-
/var/log/nginx/access.log /var/log/nginx/error.log:多个文件用空格隔开,也可以用匹配符:/var/log/nginx/*.log
-
notifempty:如果是空文件的话,不转储
-
create 644 root root:create mode owner group 转储文件,使用指定的文件模式创建新的日志文件
-
调用频率,有:daily,weekly,monthly可选
-
rotate 15:一次将存储15个归档日志。对于第16个归档,时间最久的归档将被删除。
-
sharedscripts:所有的日志文件都轮转完毕后统一执行一次脚本
-
missingok:如果日志文件丢失,不报错继续执行下一个
-
dateext:文件后缀是日期格式,也就是切割后文件是:xxx.log-20131216.gz 这样,如果注释掉,切割出来是按数字递增,即前面说的 xxx.log-1 这种格式
-
postrotate:执行命令的开始标志
-
endscripthttp:执行命令的结束标志
-
if 判断的意思不是中止Nginx的进程,而是传递给它信号重新生成日志,如果nginx没启动不做操作
-
手动执行测试:
/usr/sbin/logrotate -vf /etc/logrotate.d/nginx -
参数:‘-f’选项来强制logrotate轮循日志文件,‘-v’参数提供了详细的输出。
-
验证是否手动执行成功,查看 cron 的日志即可:
grep logrotate /var/log/cron -
设置 crontab 定时任务:
vim /etc/crontab,添加下面内容:
//每天02点10分执行一次
10 02 * * *  /usr/sbin/logrotate -f /etc/logrotate.d/nginx