- JavaScript 物联网编程
- JavaScript 物联网实战

JavaScript 智能农业和语音人工智能详解
在第 4 章、智能农业中,我们看到了物联网能够产生影响的主流领域之一;农业部门。在这一章中,我们将把它提升到一个新的水平。使用亚马逊 Alexa 等语音 AI 引擎,我们将与我们已经建立的智能气象站进行对话。
例如,一个农民可以问 Alexa `Alexa,问 smarty app 我农场的湿度水平,Alexa 会说你农场的湿度水平是 20%。考虑现在浇水。然后,农夫会说,阿列克谢,让 smarty app 打开我的马达,阿列克谢就会打开它。很迷人,不是吗?
一般来说,基于语音 AI 的物联网在智能家居和智能办公的概念中更为常见。我想用智能农业来实现它。
在本章中,我们将进行以下工作:
曾经有一段时间,使用智能手机打开/关闭某些东西是令人兴奋的。在语音人工智能领域,时代变了,事情也发生了很大的变化。很多人用他们的声音做很多事情,从做笔记,建立他们的购物清单,到搜索互联网。我们不再用手进行世俗的活动。
"Look Ma, No hands!"
下一步是什么?想想就发生了?我很想活着看到这一点,因为我可以以思维的速度做事。
如果你是语音 AI 世界的新手,可以开始查找亚马逊 Alexa、Google Now/Google Assistant、苹果 Siri 或 Windows Cortana,看看我在说什么。因为我们将在本章中与亚马逊 Alexa 合作,所以我们将只探讨这一点。
亚马逊最近推出了几款名为亚马逊回声和亚马逊回声点(最近也在印度推出)的设备,它们是智能扬声器,由亚马逊的语音人工智能软件 Alexa 启用。如果你想自己体验 Alexa,不买 echo 产品,下载安卓混响 app:https://play.google.com/store/apps/details?id = agency . rain . Android . Alexa&HL = en还是 iOS:https://itunes . apple . com/us/app/reverb-for-Amazon-Alexa/id 1144695621?mt=8 并启动 app。
您应该会看到一个带有麦克风图标的界面。按住麦克风,您应该会看到文本“正在收听”...在顶部,如下图所示:

现在说, Alexa,给我讲个笑话然后被 Alexa 逗乐!
要测试我们将要构建的内容,请按下 reverb 应用中的麦克风图标,然后说: Alexa,向 smarty 应用询问天气报告,您应该会听到智能气象站数据库中保存的最新数据。然后你可以说, Alexa,让 smarty app 打开电机,或者 Alexa,让 smarty app 关闭电机;如果我的设备在线,它会关闭。
与智能气象站一起,我们将建造一个智能插座,它可以连接到农场的电机上。使用 Alexa,我们将打开/关闭电机。
现在,如果你有一个亚马逊回声或回声点,你可以测试我们将要建立的技能。或者,您也可以使用混响应用进行同样的操作。同样也可以使用https://reverb.ai/或者https://echosim.io/。
Till your Alexa skill is published, it will be only accessible on devices that are linked with your Amazon account only. If you have enabled beta testing, then you can allow multiple people to access this skill on their Amazon account linked Alexa powered devices.
如果您在探索演示时遇到问题,请查看这段视频:/videos/chapter5/alexa_smarty_app_demo.mov
所以,让我们开始吧!
在本节中,我们将构建一个智能插座。设置将与我们在第 4 章智能农业中的设置非常相似。创建一个名为chapter5的新文件夹,并将chapter4文件夹的内容复制到其中。chapter4文件夹有智能气象站的代码,现在,我们要添加智能插座所需的代码。
智能插座是一种简单的电气插座,可以通过互联网进行控制。也就是打开插座,关闭插座。我们将使用机械继电器来实现这一点。
我们将开始设置继电器和树莓派上的其他传感器。我将使用一个树莓派来演示智能气象站和智能插座。你也可以用两个覆盆子酱来做这个。
我们将向 API 引擎添加适当的 MQTT 客户端代码;接下来,更新 web、桌面和移动应用,使其有一个切换开关来打开/关闭中继。
我们将创建一个名为socket on 的新主题,我们将发送1或0来打开/关闭继电器,从而打开/关闭继电器另一端的负载。
请记住,我们正在探索可以通过物联网构建的各种解决方案,而不是构建最终产品本身。
到目前为止,树莓派已经安装了智能气象站传感器。现在,我们将在设置中添加一个继电器。
继电器是由电子信号驱动的电气开关。也就是说,用逻辑高1触发继电器将开启继电器,逻辑低0将关闭继电器。
有些继电器反过来工作,这取决于部件。要了解更多关于继电器类型及其工作原理的信息,请参考 https://www.phidgets.com/docs/Mechanical_Relay_Primer。
可以从亚马逊购买简单的 5V 驱动继电器:(https://www . Amazon . com/DAOKI % C2 % AE-Arduino-Indicator-Channel-Official/DP/b00xt 0 osuq/ref = Sr 1 3)。
Relays deal with AC current, and in our examples, we are not going to connect any AC power supply to the relay. We are going to power it using a 5V DC supply from Raspberry Pi and using the LED indicator on the relay identify if the relay has been turned on or off. In case you want to connect it to an actual power supply, please take adequate precaution before doing so. The results might be shocking if proper care is not taken.
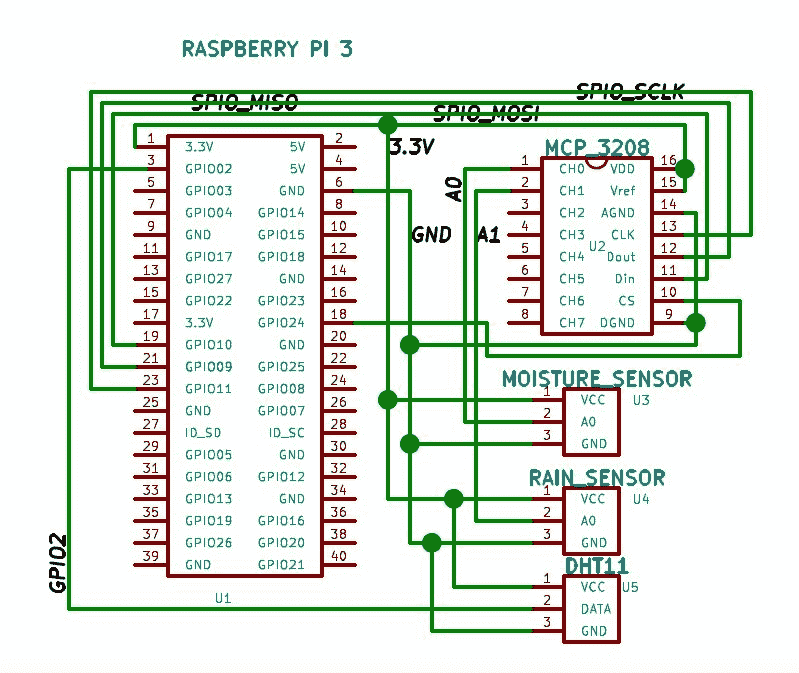
随着气象站,我们将连接继电器以及树莓派 3。如下图所示,连接继电器。
树莓码头与智能气象站的连接:
树莓派与relay的连接(模块):
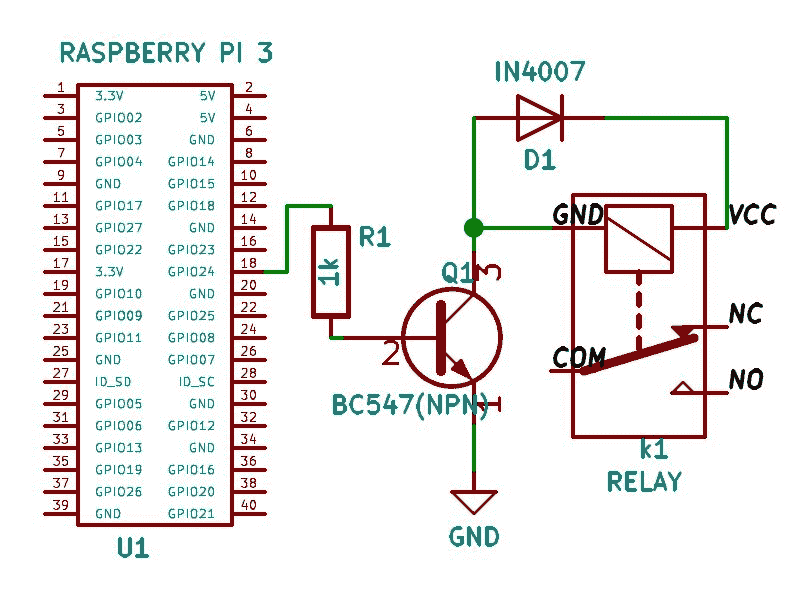
If you purchased a standalone relay, you need to set up the circuit, as shown previously. And, if you have purchased the relay module, you need to connect pin 18/GPIO24 to the trigger pin, after powering the relay.
要重申之前的联系,请参见下表:
- 树莓派和 MCP3208:
| 树莓派号-销名 | MCP 3208 引脚编号-引脚名称 | | 1 - 3.3V | 16 - VDD | | 1 - 3.3V | 15 - AREF | | 6 - GND | 2014 年夏季奥林匹克运动会 | | 23 - GPIO11,SPI0_SCLK | 13 - CLK | | S7-1200 可编程控制器 | 12 位 DOUT | | 19 - GPIO10,SPI0_MOSI | 11 - DIN | | 24 - GPIO08,首席执行官 | 10 - CS | | 6 - GND | 9 - DGND |
- 湿度传感器和 MCP3208:
| MCP 3208 引脚编号-引脚名称 | 传感器引脚 | | 1 - A0 | 雨量传感器- A0 | | 1 - A1 | 湿度传感器- A0 |
- 树莓派和 DHT11:
| 树莓派号-销名 | 传感器引脚 | | 3 - GPIO2 | DHT11 -数据 |
- 树莓派和继电器:
| 树莓派号-销名 | 传感器引脚 | | 12 - GPIO18 | 继电器触发引脚 |
所有接地和所有 3.3V 引脚都连接到一个公共点。继电器需要的只是一个来自树莓派的 5V 电源,也就是引脚 2。
如前所示,一旦我们连接了传感器,我们将编写与传感器接口所需的代码。
走向Raspberry Pi 3里面的pi-client文件夹,打开pi-client/index.js,更新如下:
var config = require('./config.js');
var mqtt = require('mqtt');
var GetMac = require('getmac');
var async = require('async');
var rpiDhtSensor = require('rpi-dht-sensor');
var McpAdc = require('mcp-adc');
var adc = new McpAdc.Mcp3208();
var rpio = require('rpio');

// Set pin 12 as output pin and to low
rpio.open(12, rpio.OUTPUT, rpio.LOW);

var dht11 = new rpiDhtSensor.DHT11(2);
var temp = 0,
    prevTemp = 0;
var humd = 0,
    prevHumd = 0;
var macAddress;
var state = 0;

var mositureVal = 0,
    prevMositureVal = 0;
var rainVal = 0,
    prevRainVal = 0;

var client = mqtt.connect({
    port: config.mqtt.port,
    protocol: 'mqtts',
    host: config.mqtt.host,
    clientId: config.mqtt.clientId,
    reconnectPeriod: 1000,
    username: config.mqtt.clientId,
    password: config.mqtt.clientId,
    keepalive: 300,
    rejectUnauthorized: false
});

client.on('connect', function() {
    client.subscribe('rpi');
    client.subscribe('socket');
    GetMac.getMac(function(err, mac) {
        if (err) throw err;
        macAddress = mac;
        client.publish('api-engine', mac);
    });
});

client.on('message', function(topic, message) {
    message = message.toString();
    if (topic === 'rpi') {
        console.log('API Engine Response >> ', message);
    } else if (topic === 'socket') {
        state = parseInt(message)
        console.log('Turning Relay', !state ? 'On' : 'Off');
        // Relays are almost always active low
        //console.log(!state ? rpio.HIGH : rpio.LOW);
        // If we get a 1 we turn on the relay, else off
        rpio.write(12, !state ? rpio.HIGH : rpio.LOW);
    } else {
        console.log('Unknown topic', topic);
    }
});

// infinite loop, with 3 seconds delay
setInterval(function() {
    readSensorValues(function(results) {
        console.log('Temperature: ' + temp + 'C, ' + 'humidity: ' + humd + '%, ' + ' Rain level (%):' + rainVal + ', ' + 'mositureVal (%): ' + mositureVal);
        // if the temperature and humidity values change
        // then only publish the values
        if (temp !== prevTemp || humd !== prevHumd || mositureVal !== prevMositureVal || rainVal != prevRainVal) {
            var data2Send = {
                data: {
                    t: temp,
                    h: humd,
                    r: rainVal,
                    m: mositureVal,
                    s: state
                },
                macAddress: macAddress
            };
            // console.log('Data Published');
            client.publish('weather-status', JSON.stringify(data2Send));
            // reset prev values to current
            // for next loop
            prevTemp = temp;
            prevHumd = humd;
            prevMositureVal = mositureVal;
            prevRainVal = rainVal;
        }
    });
}, 3000); // every three second

function readSensorValues(CB) {
    async.parallel({
        dht11Values: function(callback) {
            var readout = dht11.read();
            // update global variable
            temp = readout.temperature.toFixed(2);
            humd = readout.humidity.toFixed(2);
            callback(null, { temp: temp, humidity: humd });
        },
        rainLevel: function(callback) {
            // we are going to connect rain sensor
            // on channel 0, hence 0 is the first arg below
            adc.readRawValue(0, function(value) {
                // update global variable
                rainVal = value;
                rainVal = (100 - parseFloat((rainVal / 4096) * 100)).toFixed(2);
                callback(null, { rain: rainVal });
            });
        },
        moistureLevel: function(callback) {
            // we are going to connect mositure sensor
            // on channel 1, hence 1 is the first arg below
            adc.readRawValue(1, function(value) {
                // update global variable
                mositureVal = value;
                mositureVal = (100 - parseFloat((mositureVal / 4096) * 100)).toFixed(2);
                callback(null, { moisture: mositureVal });
            });
        }
    }, function done(err, results) {
        if (err) {
            throw err;
        }
        // console.log(results);
        if (CB) CB(results);
    });
} 对于Weather Station代码,我们增加了rpio模块,使用rpio.open(),我们将引脚 12 作为输出引脚。我们也在听名为 socket 的话题。并且,当我们从经纪人那里得到关于这个主题的回应时,我们根据数据将 pin 12 设置为高或低。
现在,我们将在树莓派pi-client文件夹中安装rpio模块,并运行以下命令:
npm install rpio -save 保存所有文件。现在,我们将从桌面/机器启动 Mosca 代理:
mosca -c index.js -v | pino Once you have started Mosca server, do check the IP address of the server on which Mosca is running. Update the same IP in your Raspberry Pi config.js file or else Raspberry Pi cannot post data to the broker.
一旦 Mosca 成功启动,并且我们已经在树莓 Pi 上验证了 IP,运行:
sudo node index.js 这将启动服务器,并继续向代理发送天气信息。
在下一节中,我们将编写 API 引擎处理中继所需的逻辑。
现在继电器已连接到树莓 Pi,我们将编写逻辑,向套接字主题发送开/关命令。打开api-engine/server/mqtt/index.js并更新,如下图:
var Data = require('../api/data/data.model');
var mqtt = require('mqtt');
var config = require('../config/environment');

var client = mqtt.connect({
    port: config.mqtt.port,
    protocol: 'mqtts',
    host: config.mqtt.host,
    clientId: config.mqtt.clientId,
    reconnectPeriod: 1000,
    username: config.mqtt.clientId,
    password: config.mqtt.clientId,
    keepalive: 300,
    rejectUnauthorized: false
});

client.on('connect', function() {
    console.log('Connected to Mosca at ' + config.mqtt.host + ' on port ' + config.mqtt.port);
    client.subscribe('api-engine');
    client.subscribe('weather-status');
});

client.on('message', function(topic, message) {
    // message is Buffer
    // console.log('Topic >> ', topic);
    // console.log('Message >> ', message.toString());
    if (topic === 'api-engine') {
        var macAddress = message.toString();
        console.log('Mac Address >> ', macAddress);
        client.publish('rpi', 'Got Mac Address: ' + macAddress);
    } else if (topic === 'weather-status') {
        var data = JSON.parse(message.toString());
        // create a new data record for the device
        Data.create(data, function(err, data) {
            if (err) return console.error(err);
            // if the record has been saved successfully,
            // websockets will trigger a message to the web-app
            console.log('Data Saved :', data.data);
        });
    } else {
        console.log('Unknown topic', topic);
    }
});

exports.sendSocketData = function(data) {
    console.log('Sending Data', data);
    client.publish('socket', JSON.stringify(data));
} 我们增加了一个名为sendSocketData的方法并导出。我们将在api-engine/server/api/data/data.controller.jscreate方法中调用这个方法,如下所示:
exports.create = function(req, res, next) {
    var data = req.body;
    data.createdBy = req.user._id;
    Data.create(data, function(err, _data) {
        if (err) return res.status(500).send(err);
        if (data.topic === 'socket') {
            require('../../mqtt/index.js').sendSocketData(_data.data.s); // send relay value
        }
        return res.json(_data);
    });
};
保存所有文件并运行:
npm start 您应该会在屏幕上看到以下内容:
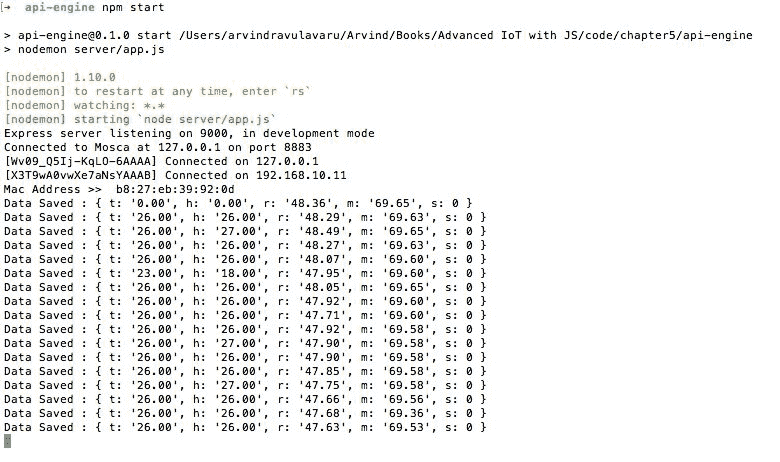
请注意,控制台中打印的数据字符串中的最后一个值;s,如果继电器开/关,我们也将继电器的状态发送到界面显示。
这样,我们就完成了开发应用编程接口引擎所需的代码。在下一节中,我们将研究 web 应用。
在这一部分中,我们将更新 web app 模板,使其具有一个切换按钮,与我们在第 2 章、 IoTFW.js - I 和第 3 章、 IoTFW.js - II 中的设置非常相似。使用切换按钮,我们将手动打开/关闭继电器。在后面的部分中,我们将自动化它们。
打开,web-app/src/app/device/device.component.html并更新,如下所示:
<div class="container">
    <br>
    <div *ngIf="!device">
        <h3 class="text-center">Loading!</h3>
    </div>
    <div class="row" *ngIf="lastRecord">
        <div class="col-md-12">
            <div class="panel panel-info">
                <div class="panel-heading">
                    <h3 class="panel-title">
                        {{device.name}}
                    </h3>
                    <span class="pull-right btn-click">
                        <i class="fa fa-chevron-circle-up"></i>
                    </span>
                </div>
                <div class="clearfix"></div>
                <div class="table-responsive">
                    <table class="table table-striped">
                        <tr>
                            <td>Toggle Socket</td>
                            <td>
                                <ui-switch [(ngModel)]="toggleState" (change)="toggleChange($event)"></ui-switch>
                            </td>
                        </tr>
                        <tr *ngIf="lastRecord">
                            <td>Temperature</td>
                            <td>{{lastRecord.data.t}}</td>
                        </tr>
                        <tr *ngIf="lastRecord">
                            <td>Humidity</td>
                            <td>{{lastRecord.data.h}} %</td>
                        </tr>
                        <tr *ngIf="lastRecord">
                            <td>Rain Level</td>
                            <td>{{lastRecord.data.r}} %</td>
                        </tr>
                        <tr *ngIf="lastRecord">
                            <td>Mositure Level</td>
                            <td>{{lastRecord.data.m}} %</td>
                        </tr>
                        <tr *ngIf="lastRecord">
                            <td>Received At</td>
                            <td>{{lastRecord.createdAt | date: 'medium'}}</td>
                        </tr>
                    </table>
                    <div class="col-md-6" *ngIf="tempHumdData.length > 0">
                        <canvas baseChart [datasets]="tempHumdData" [labels]="lineChartLabels" [options]="lineChartOptions" [legend]="lineChartLegend" [chartType]="lineChartType"></canvas>
                    </div>
                    <div class="col-md-6" *ngIf="rainMoisData.length > 0">
                        <canvas baseChart [datasets]="rainMoisData" [labels]="lineChartLabels" [options]="lineChartOptions" [legend]="lineChartLegend" [chartType]="lineChartType"></canvas>
                    </div>
                </div>
            </div>
        </div>
    </div>
</div>我们所做的只是添加了一个显示切换按钮的新行,并使用它来打开/关闭插座。接下来,管理切换按钮所需的逻辑,打开web-app/src/app/device/device.component.ts并更新,如下:
import { Component, OnInit, OnDestroy } from '@angular/core';
import { DevicesService } from '../services/devices.service';
import { Params, ActivatedRoute } from '@angular/router';
import { SocketService } from '../services/socket.service';
import { DataService } from '../services/data.service';
import { NotificationsService } from 'angular2-notifications';

@Component({
   selector: 'app-device',
   templateUrl: './device.component.html',
   styleUrls: ['./device.component.css']
})
export class DeviceComponent implements OnInit, OnDestroy {
   device: any;
   data: Array<any>;
   toggleState: boolean = false;
   private subDevice: any;
   private subData: any;
   lastRecord: any;

   // line chart config
   public lineChartOptions: any = {
         responsive: true,
         legend: {
               position: 'bottom',
         }, hover: {
               mode: 'label'
         }, scales: {
               xAxes: [{
                     display: true,
                     scaleLabel: {
                           display: true,
                           labelString: 'Time'
                     }
               }],
               yAxes: [{
                     display: true,
                     ticks: {
                           beginAtZero: true,
                           // steps: 10,
                           // stepValue: 5,
                           // max: 70
                     }
               }]
         },
         title: {
               display: true,
               text: 'Sensor Data vs. Time'
         }
   };
   public lineChartLegend: boolean = true;
   public lineChartType: string = 'line';
   public tempHumdData: Array<any> = [];
   public rainMoisData: Array<any> = [];
   public lineChartLabels: Array<any> = [];

   constructor(private deviceService: DevicesService,
         private socketService: SocketService,
         private dataService: DataService,
         private route: ActivatedRoute,
         private notificationsService: NotificationsService) { }

   ngOnInit() {
         this.subDevice = this.route.params.subscribe((params) => {
               this.deviceService.getOne(params['id']).subscribe((response) => {
                     this.device = response.json();
                     this.getData();
                     this.socketInit();
               });
         });
   }

   getData() {
         this.dataService.get(this.device.macAddress).subscribe((response) => {
               this.data = response.json();
               this.lastRecord = this.data[0]; // descending order data
               this.toggleState = this.lastRecord.data.s;
               this.genChart();
         });
   }

   socketInit() {
         this.subData = this.socketService.getData(this.device.macAddress).subscribe((data) => {
               if (this.data.length <= 0) return;
               this.data.splice(this.data.length - 1, 1); // remove the last record
               this.data.push(data); // add the new one
               this.lastRecord = data;
               this.toggleState = this.lastRecord.data.s;
               this.genChart();
         });
   }

   toggleChange(state) {
         let data = {
               macAddress: this.device.macAddress,
               data: {
                     t: this.lastRecord.data.t,
                     h: this.lastRecord.data.h,
                     m: this.lastRecord.data.m,
                     r: this.lastRecord.data.r,
                     s: state ? 1 : 0
               },
               topic: 'socket'
         }

         this.dataService.create(data).subscribe((resp) => {
               if (resp.json()._id) {
                     this.notificationsService.success('Device Notified!');
               }
         }, (err) => {
               console.log(err);
               this.notificationsService.error('Device Notification Failed. Check console for the error!');
         })
   }

   ngOnDestroy() {
         this.subDevice.unsubscribe();
         this.subData ? this.subData.unsubscribe() : '';
   }

   genChart() {
         let data = this.data;
         let _thArr: Array<any> = [];
         let _rmArr: Array<any> = [];
         let _lblArr: Array<any> = [];

         let tmpArr: Array<any> = [];
         let humArr: Array<any> = [];
         let raiArr: Array<any> = [];
         let moiArr: Array<any> = [];

         for (var i = 0; i < data.length; i++) {
               let _d = data[i];
               tmpArr.push(_d.data.t);
               humArr.push(_d.data.h);
               raiArr.push(_d.data.r);
               moiArr.push(_d.data.m);
               _lblArr.push(this.formatDate(_d.createdAt));
         }

         // reverse data to show the latest on the right side
         tmpArr.reverse();
         humArr.reverse();
         raiArr.reverse();
         moiArr.reverse();
         _lblArr.reverse();

         _thArr = [
               {
                     data: tmpArr,
                     label: 'Temperature'
               },
               {
                     data: humArr,
                     label: 'Humidity %'
               }
         ]

         _rmArr = [
               {
                     data: raiArr,
                     label: 'Rain Levels'
               },
               {
                     data: moiArr,
                     label: 'Moisture Levels'
               }
         ]

         this.tempHumdData = _thArr;
         this.rainMoisData = _rmArr;

         this.lineChartLabels = _lblArr;
   }

   private formatDate(originalTime) {
         var d = new Date(originalTime);
         var datestring = d.getDate() + "-" + (d.getMonth() + 1) + "-" + d.getFullYear() + " " +
               d.getHours() + ":" + d.getMinutes();
         return datestring;
   }

}
我们在这里所做的就是管理切换按钮状态。保存所有文件并运行以下命令:
ng serve导航至http://localhost:4200,然后导航至设备页面。现在,使用页面上的切换按钮,我们可以打开/关闭继电器,如下图所示:
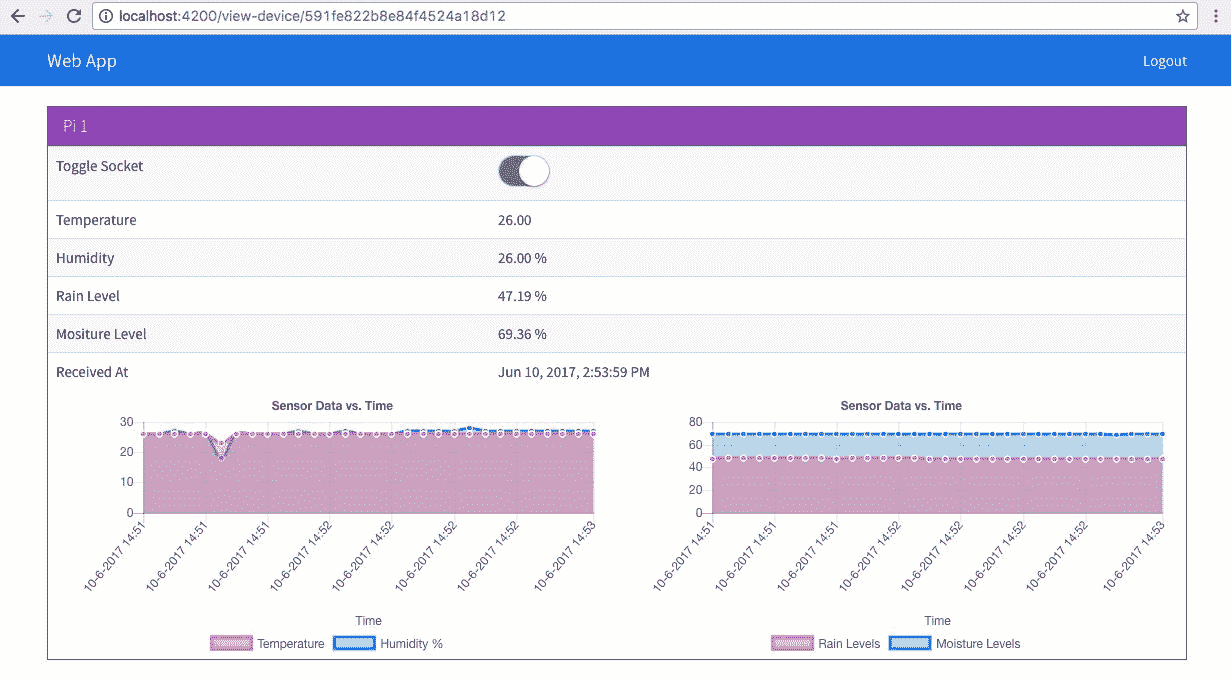
如果一切设置正确,您应该会看到继电器上的继电器指示灯亮起/熄灭,如下图所示:

电线!废话!
这样,我们就完成了网络应用。在下一节中,我们将构建相同的 web 应用,并将其部署到我们的桌面应用中。
现在 web 应用已经完成,我们将构建相同的应用,并将其部署到桌面应用中。
要开始,返回web-app文件夹的终端/提示符并运行:
ng build --env=prod 这将在名为dist的web-app文件夹内创建一个新文件夹。dist文件夹的内容应该是这样的:
.

├── favicon.ico

├── index.html

├── inline.bundle.js

├── inline.bundle.js.map

├── main.bundle.js

├── main.bundle.js.map

├── polyfills.bundle.js

├── polyfills.bundle.js.map

├── scripts.bundle.js

├── scripts.bundle.js.map

├── styles.bundle.js

├── styles.bundle.js.map

├── vendor.bundle.js

└── vendor.bundle.js.map所有,我们写的代码最终被捆绑到前面的文件中。我们将抓取dist文件夹中的所有文件(不是dist文件夹),然后将其粘贴到desktop-app/app文件夹中。经过上述修改后的desktop-app最终结构如下:
.

├── app

│ ├── favicon.ico

│ ├── index.html

│ ├── inline.bundle.js

│ ├── inline.bundle.js.map

│ ├── main.bundle.js

│ ├── main.bundle.js.map

│ ├── polyfills.bundle.js

│ ├── polyfills.bundle.js.map

│ ├── scripts.bundle.js

│ ├── scripts.bundle.js.map

│ ├── styles.bundle.js

│ ├── styles.bundle.js.map

│ ├── vendor.bundle.js

│ └── vendor.bundle.js.map

├── freeport.js

├── index.css

├── index.html

├── index.js

├── license

├── package.json

├── readme.md

└── server.js
要测试驱动器,请运行以下命令:
npm start 然后,当我们导航到查看设备页面时,我们应该会看到以下内容:
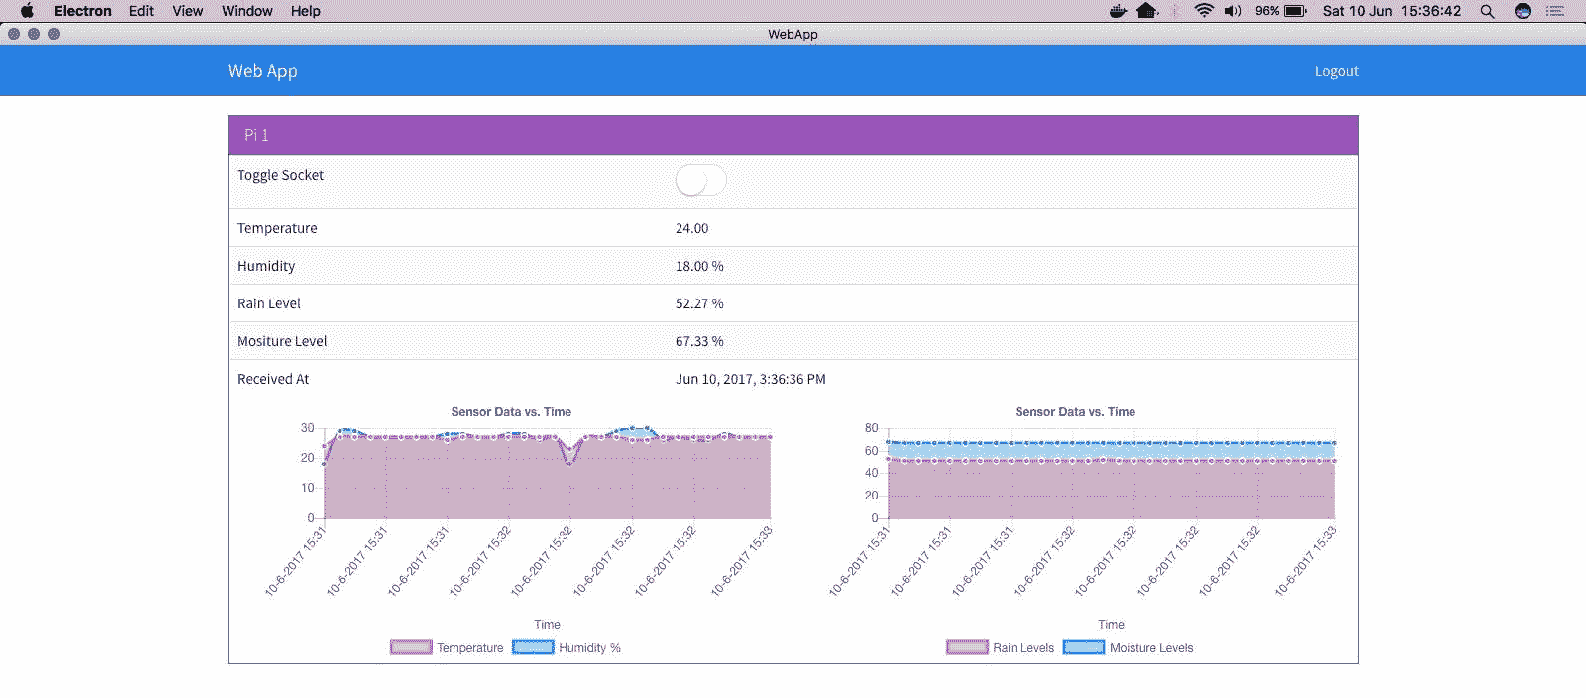
使用切换按钮,我们应该能够打开/关闭继电器。
至此,我们完成了桌面应用的开发。在下一部分,我们将更新手机应用。
在最后一部分,我们已经更新了桌面应用。在本节中,我们将使用切换开关组件更新移动应用模板。因此,使用这个拨动开关,我们可以打开/关闭智能插座。
首先,我们将更新视图设备模板。更新mobile-app/src/pages/view-device/view-device.html,如下:
<ion-header>
    <ion-navbar>
        <ion-title>Mobile App</ion-title>
    </ion-navbar>
</ion-header>
<ion-content padding>
    <div *ngIf="!lastRecord">
        <h3 class="text-center">Loading!</h3>
    </div>
    <div *ngIf="lastRecord">
        <ion-list>
            <ion-item>
                <ion-label>Name</ion-label>
                <ion-label>{{device.name}}</ion-label>
            </ion-item>
            <ion-item>
                <ion-label>Toggle LED</ion-label>
                <ion-toggle [(ngModel)]="toggleState" (click)="toggleChange($event)"></ion-toggle>
            </ion-item>
            <ion-item>
                <ion-label>Temperature</ion-label>
                <ion-label>{{lastRecord.data.t}}</ion-label>
            </ion-item>
            <ion-item>
                <ion-label>Humidity</ion-label>
                <ion-label>{{lastRecord.data.h}} %</ion-label>
            </ion-item>
            <ion-item>
                <ion-label>Rain Level</ion-label>
                <ion-label>{{lastRecord.data.r}} %</ion-label>
            </ion-item>
            <ion-item>
                <ion-label>Moisture Level</ion-label>
                <ion-label>{{lastRecord.data.m}} %</ion-label>
            </ion-item>
            <ion-item>
                <ion-label>Received At</ion-label>
                <ion-label>{{lastRecord.createdAt | date: 'medium'}}</ion-label>
            </ion-item>
        </ion-list>
    </div>
</ion-content>接下来,我们将添加管理切换按钮所需的逻辑。更新mobile-app/src/pages/view-device/view-device.ts,如下:
import { Component } from '@angular/core';
import { IonicPage, NavController, NavParams } from 'ionic-angular';

import { DevicesService } from '../../services/device.service';
import { DataService } from '../../services/data.service';
import { ToastService } from '../../services/toast.service';
import { SocketService } from '../../services/socket.service';

@IonicPage()
@Component({
   selector: 'page-view-device',
   templateUrl: 'view-device.html',
})
export class ViewDevicePage {
   device: any;
   data: Array<any>;
   toggleState: boolean = false;
   private subData: any;
   lastRecord: any;

   constructor(private navCtrl: NavController,
         private navParams: NavParams,
         private socketService: SocketService,
         private deviceService: DevicesService,
         private dataService: DataService,
         private toastService: ToastService) {
         this.device = navParams.get("device");
         console.log(this.device);
   }

   ionViewDidLoad() {
         this.deviceService.getOne(this.device._id).subscribe((response) => {
               this.device = response.json();
               this.getData();
               this.socketInit();
         });
   }

   getData() {
         this.dataService.get(this.device.macAddress).subscribe((response) => {
               this.data = response.json();
               this.lastRecord = this.data[0]; // descending order data
               if (this.lastRecord) {
                     this.toggleState = this.lastRecord.data.s;
               }
         });
   }
   socketInit() {
         this.subData = this.socketService.getData(this.device.macAddress).subscribe((data) => {
               if (this.data.length <= 0) return;
               this.data.splice(this.data.length - 1, 1); // remove the last record
               this.data.push(data); // add the new one
               this.lastRecord = data;
         });
   }

   toggleChange(state) {
         let data = {
               macAddress: this.device.macAddress,
               data: {
                     t: this.lastRecord.data.t,
                     h: this.lastRecord.data.h,
                     m: this.lastRecord.data.m,
                     r: this.lastRecord.data.r,
                     s: !state
               },
               topic: 'socket'
         }

         console.log(data);

         this.dataService.create(data).subscribe((resp) => {
               if (resp.json()._id) {
                     this.toastService.toggleToast('Device Notified!');
               }
         }, (err) => {
               console.log(err);
               this.toastService.toggleToast('Device Notification Failed. Check console for the error!');
         })
   }

   ionViewDidUnload() {
         this.subData && this.subData.unsubscribe && this.subData.unsubscribe(); //unsubscribe if subData is defined
   }
}
这里,我们添加了管理切换按钮所需的逻辑。保存所有文件并运行:
ionic serve 或者,您也可以通过运行以下命令将相同内容部署到您的设备上:
ionic run android 或者:
ionic run ios 一旦应用启动,当我们导航到查看设备页面时,我们应该会看到以下内容:
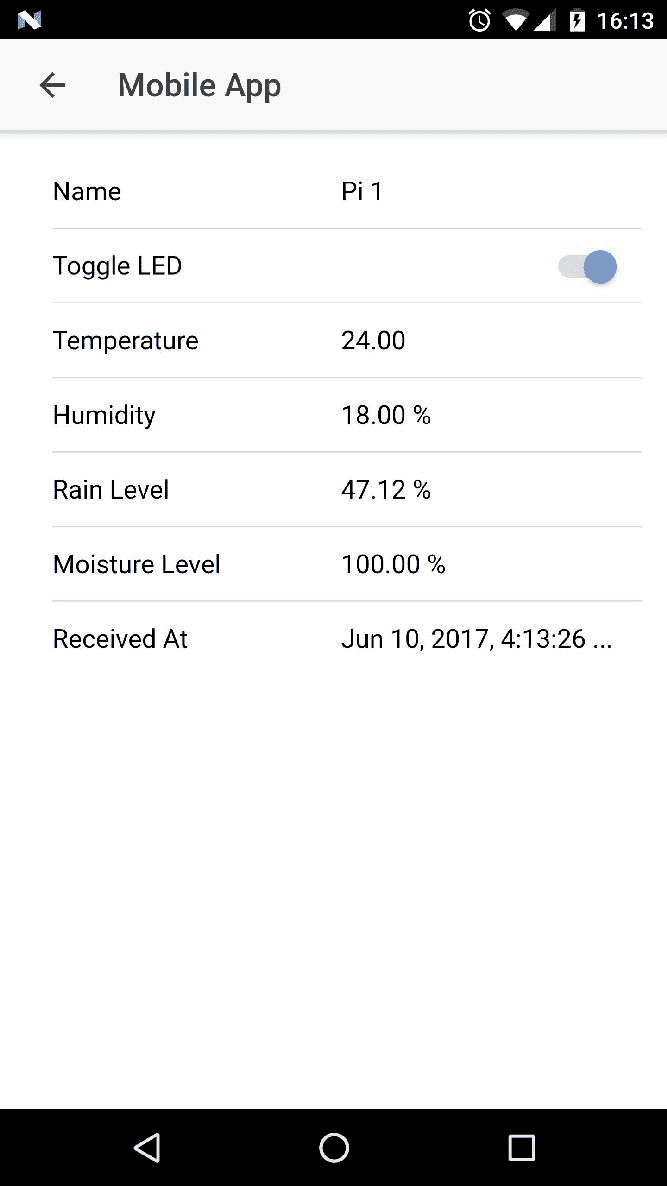
我们应该能够使用手机应用上的切换按钮来控制插座。
这样,我们就完成了智能马达的设置。
在下一节中,我们将为亚马逊 Alexa 构建一个新技能。
在上一节中,我们已经看到了如何构建一个智能插座,并将其与我们现有的智能气象站集成。在本节中,我们将构建一种新的技能,用于将我们的智能设备与亚马逊 Alexa 接口。
我们将创建一个名为 smarty app 的新技能,然后向其中添加两个语音模型:
- 获取最新天气状况
- 打开/关闭插座
If you are new to Alexa and its skill development, I would recommend watching the following series before you continue: Developing Alexa skills: https://www.youtube.com/playlist?list=PL2KJmkHeYQTO6ci5KF08mvHYdAZu2jgkJ
为了快速概述我们的技能创建,我们将遵循以下步骤:
- 登录亚马逊开发者门户网站,创建并设置一项新技能
- 训练语音模型
- 在 AWS lambda 服务中编写所需的业务逻辑
- 部署并测试设置
那么,让我们开始吧。
我们要做的第一件事就是登录https://developer.amazon.com。登录后,点击页面顶部的 Alexa。您应该在如下页面上着陆:

点击阿列克谢技能工具包下面的入门>按钮,您将被重定向到一个页面,在那里您可以查看现有的技能集或创建新的技能集。点击右上角的金色按钮“添加新技能”。
您应该被重定向到一个页面,如下所示:
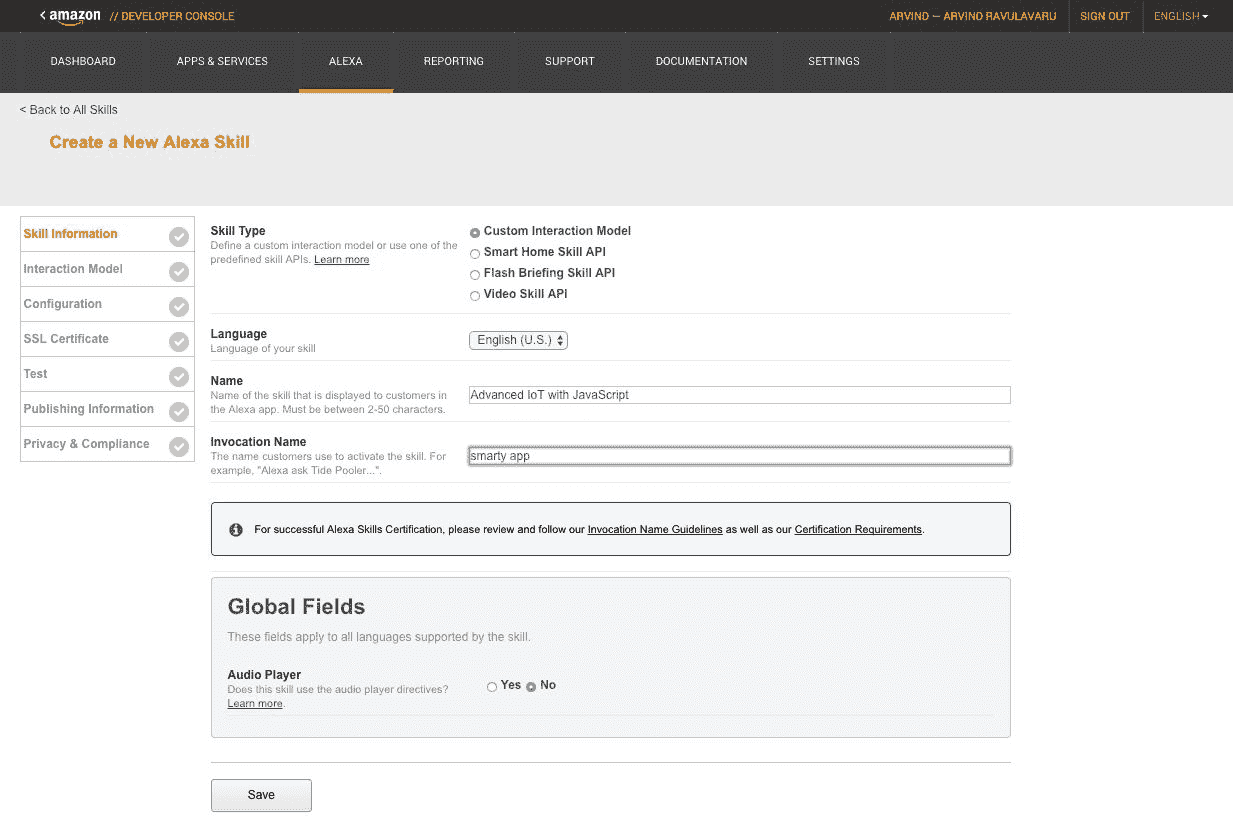
我已经给出了前面的信息。你可以随意配置。单击保存,然后单击左侧菜单上的交互模型,您将被重定向到交互模型设置,如下所示:

我们将使用技能构建器,在撰写本文时,它仍处于测试阶段。技能构建器是一个简单的界面来训练我们的语音模型。
单击启动技能构建器按钮。
一旦我们进入技能构建器,我们将开始训练模型。在我们的应用中,我们将有两个意图:
-
WeatherStatusIntent:获取所有四个传感器的值 -
ControlMotorIntent:开启/关闭电机
除此之外,您还可以根据自己的需求添加其他意向。您可以添加仅用于获取湿度传感器值的湿度传感器或仅用于获取雨量传感器值的雨量传感器。
现在,我们将继续设置这些意图并创建插槽。
进入技能构建器后,您应该会看到类似以下内容的内容:
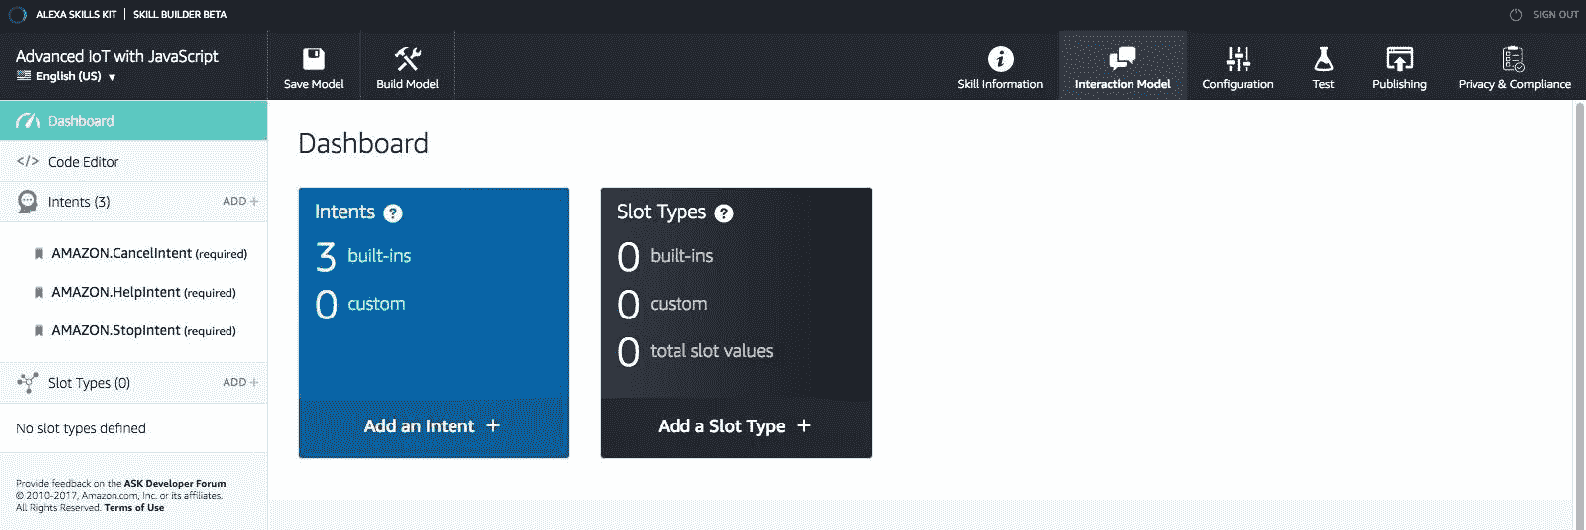
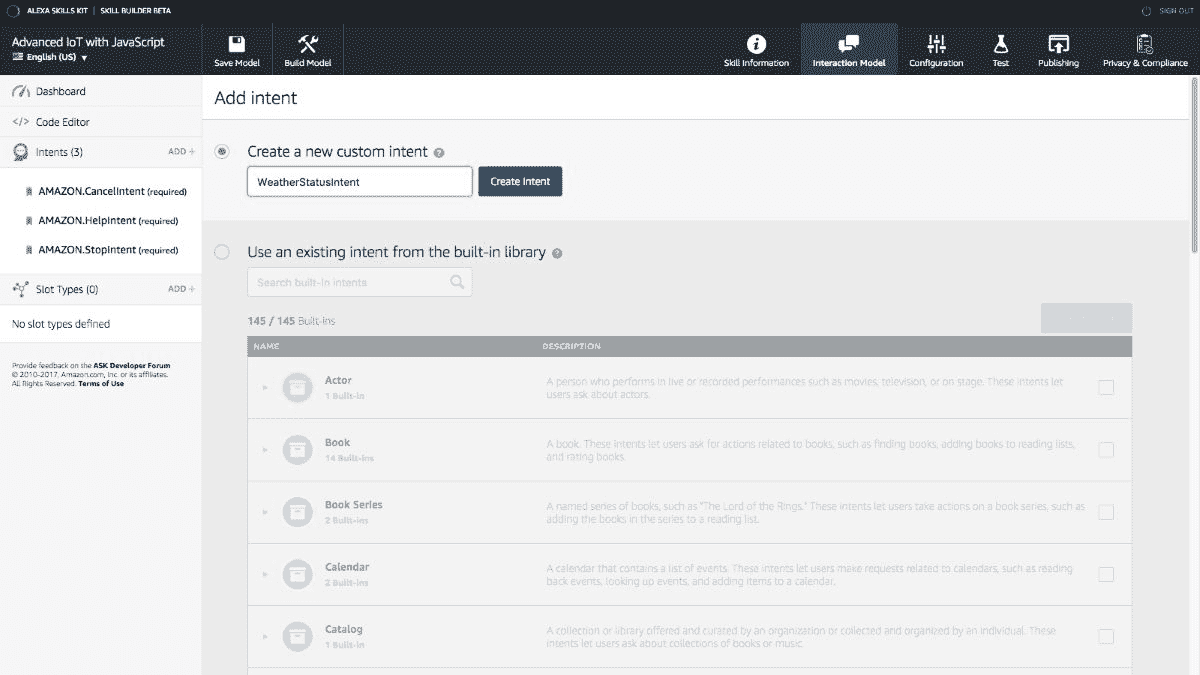
现在,使用左侧意图旁边的添加+,创建一个新的自定义意图并将其命名为WeatherStatusIntent,如下所示:
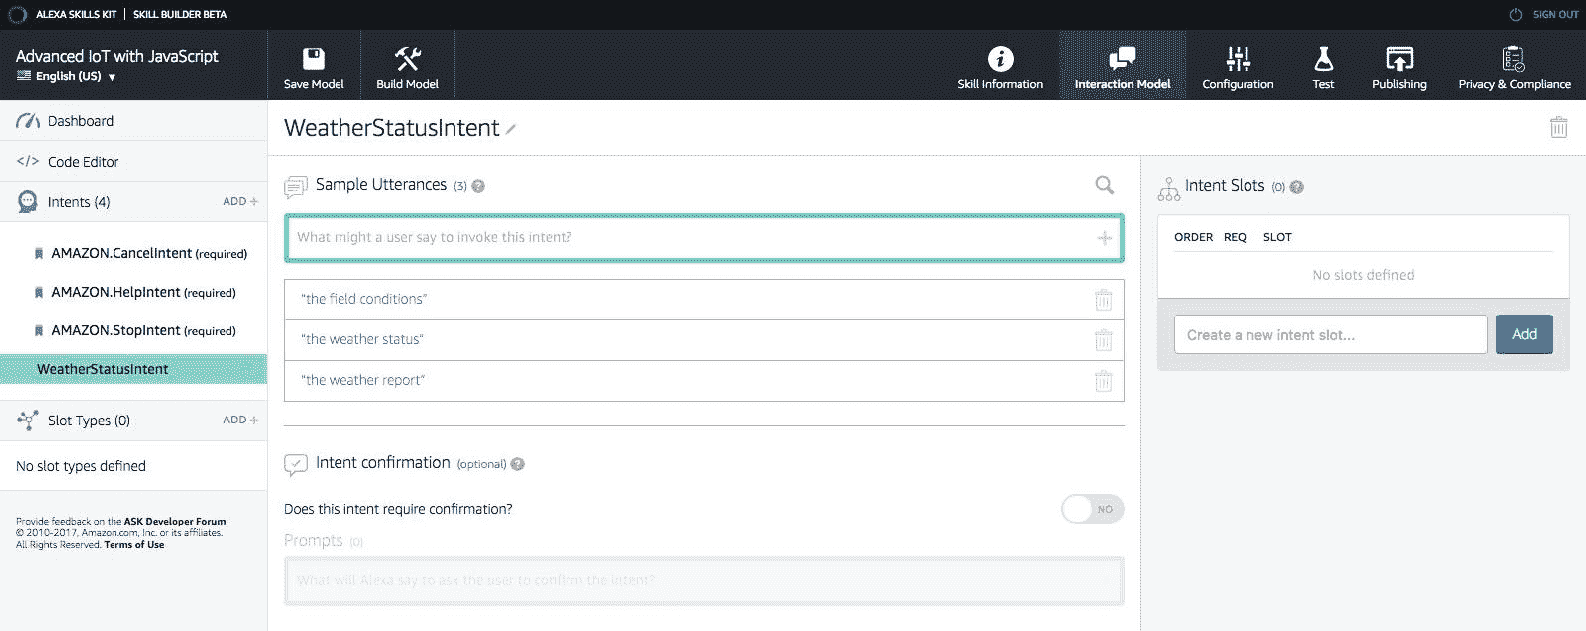
现在,我们要训练语音模型。创建意图后,单击左侧菜单上的意图名称。现在,我们应该看到一个名为示例话语的部分。我们将提供用户将如何调用我们的服务的示例话语。
为了简单起见,我只添加了三个示例:
Alexa,问问 smarty app:
- 天气预报
- 天气状况
- 现场条件
您可以在下面的截图中看到这一点:
接下来,我们将使用相同的过程创建另一个名为ControlMotorIntent的意图。点击左侧菜单上的控制内容,我们将看到示例话语部分。
为了这个意图,我们要做一些不同的事情;我们将创建一些名为插槽的东西。我们将获取用户说出的样本话语,并提取其中的一部分作为变量。
比如用户说, Alexa,让 smarty app 开启电机,或者 Alexa,让 smarty app 关闭电机,除了开启或者关闭,其他都是一样的,所以我们想把这些转换成变量,对每个指令处理不同。
如果插槽打开,我们打开电机,如果插槽关闭,我们将关闭电机。
因此,一旦输入了打开电机等示例话语,选择文本turn on,如下图所示:
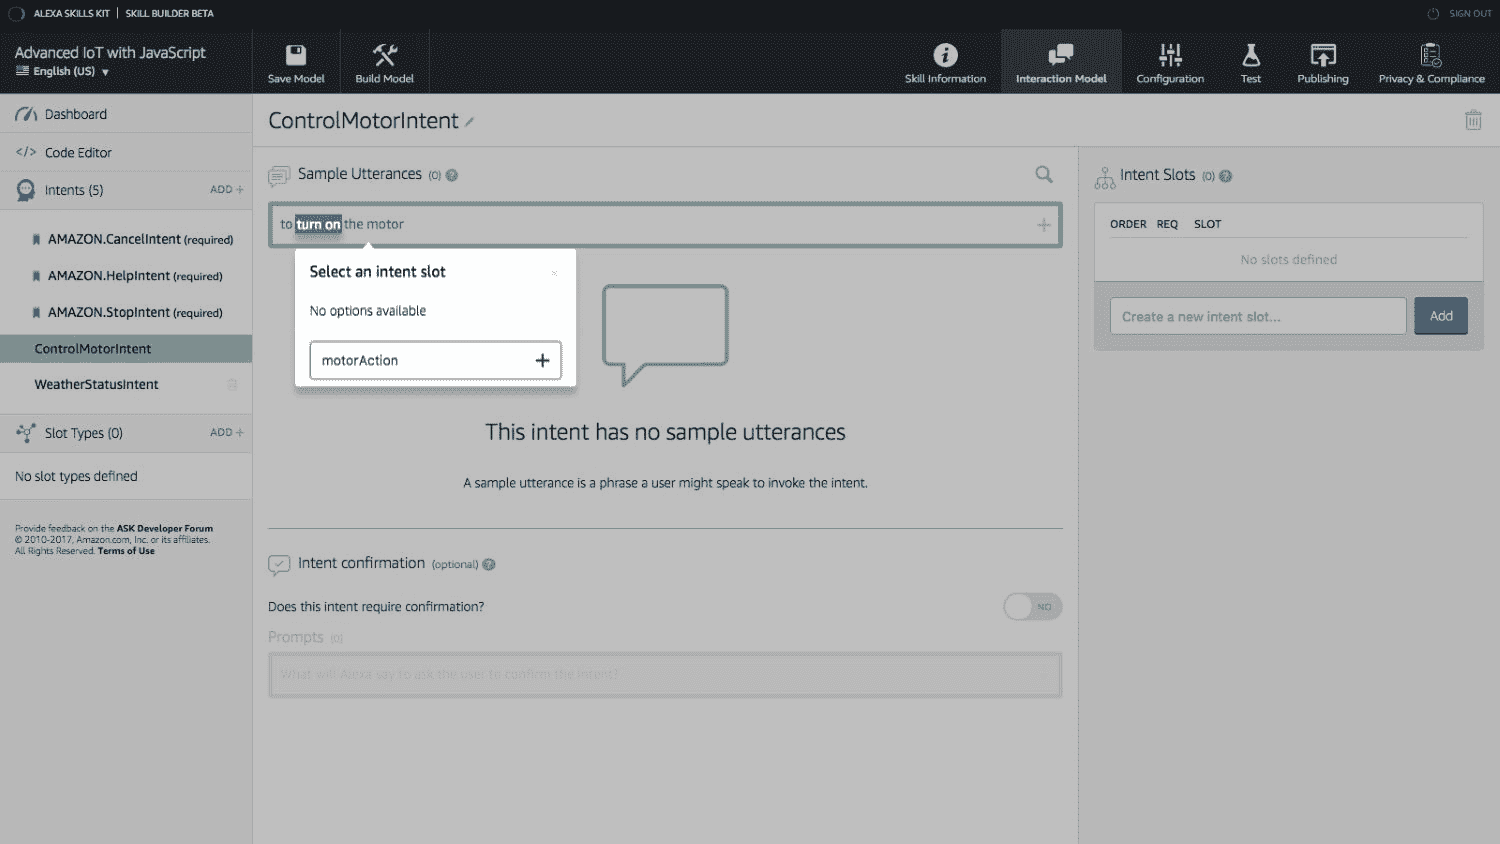
一旦你选择了文本,输入一个自定义的意图槽名称 motorAction,点击加上图标。
对于这个意图,我们只有一种表达方式。接下来,我们需要配置 motorAction 意图槽。
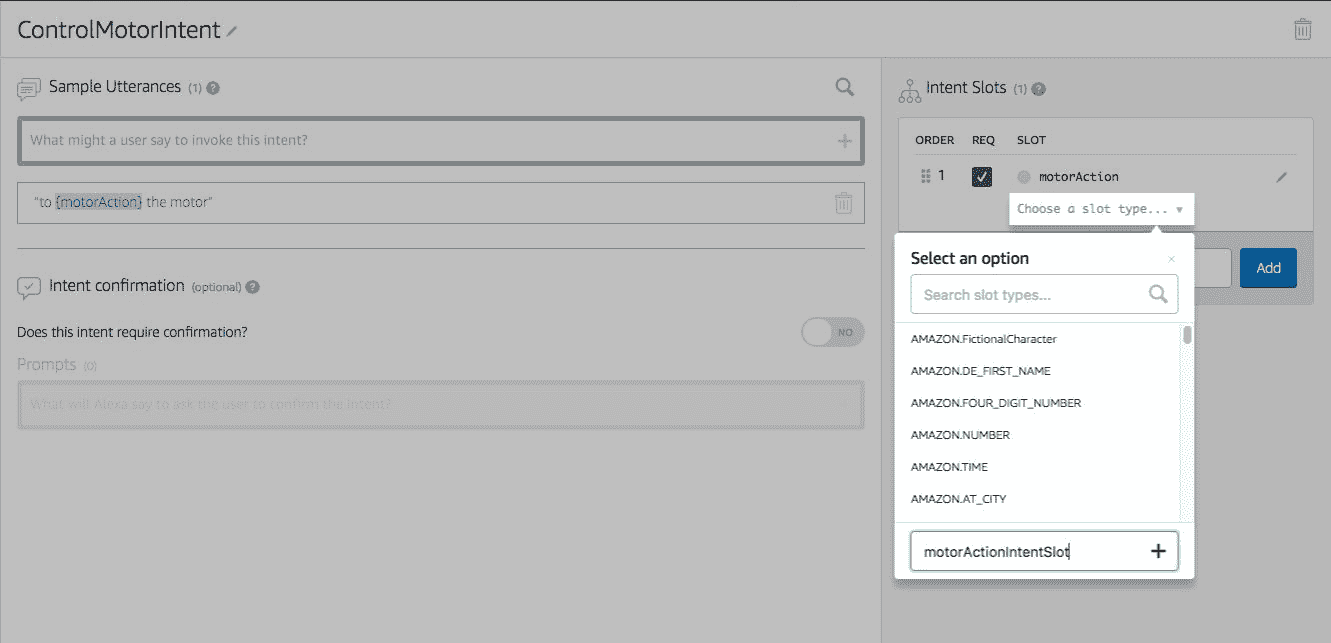
在页面的右侧,您应该会看到新创建的意图槽。选中请求列下的复选框。这意味着该值是调用意图所必需的。接下来,单击选择插槽名称下方的插槽类型。
在这里,我们必须定义一个自定义的意图槽类型。增加motorActionIntentSlot,如下:
接下来,我们必须设置值。点击左侧菜单中的motorActionIntentSlot,添加两个值;打开和关闭,如下所示:
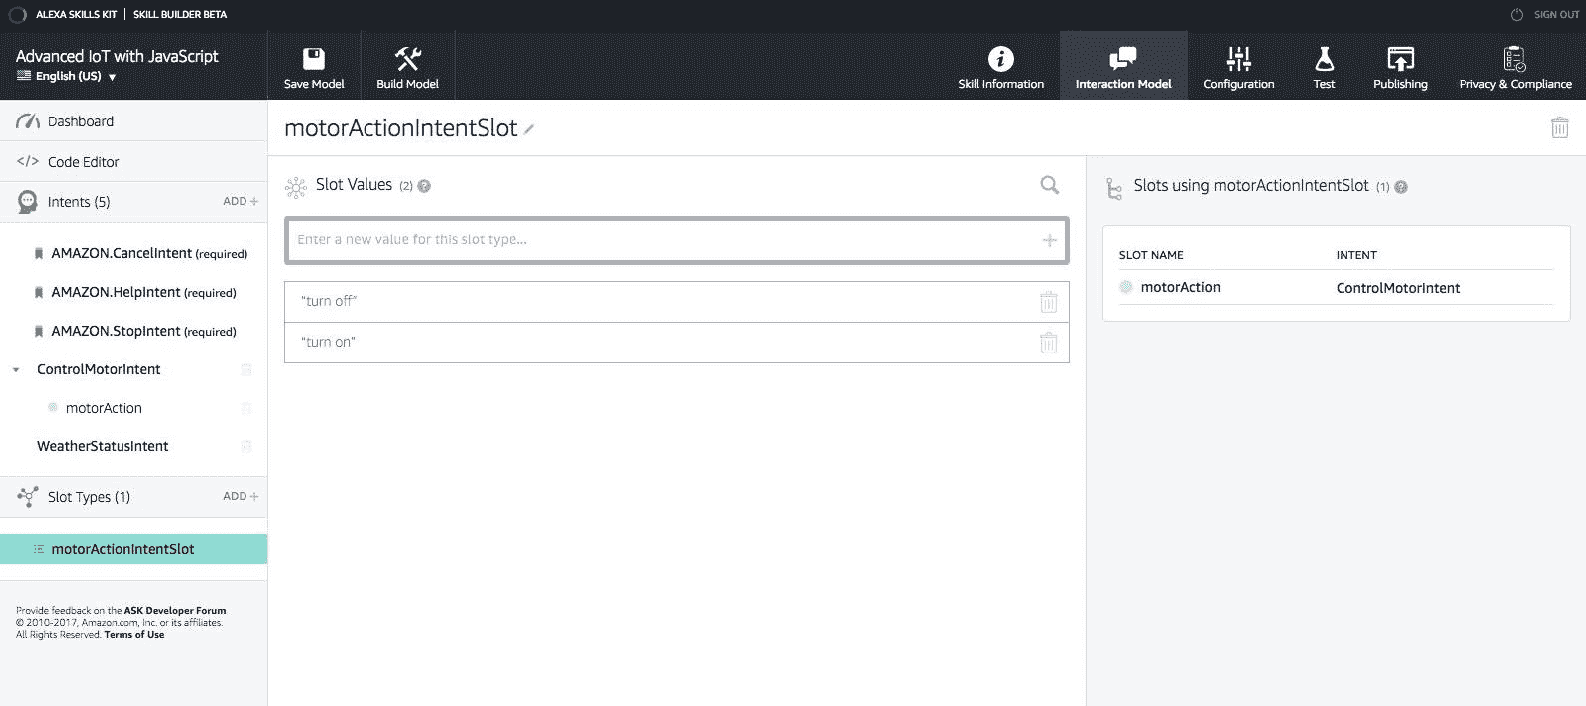
完成后,我们需要设置当用户没有说出我们定义的两个槽值时将发出的提示。点击对话框模型下方“控制驾驶内容”下的{驾驶动作},输入Do you want me to turn on or turn off the motor?等提示,如下:
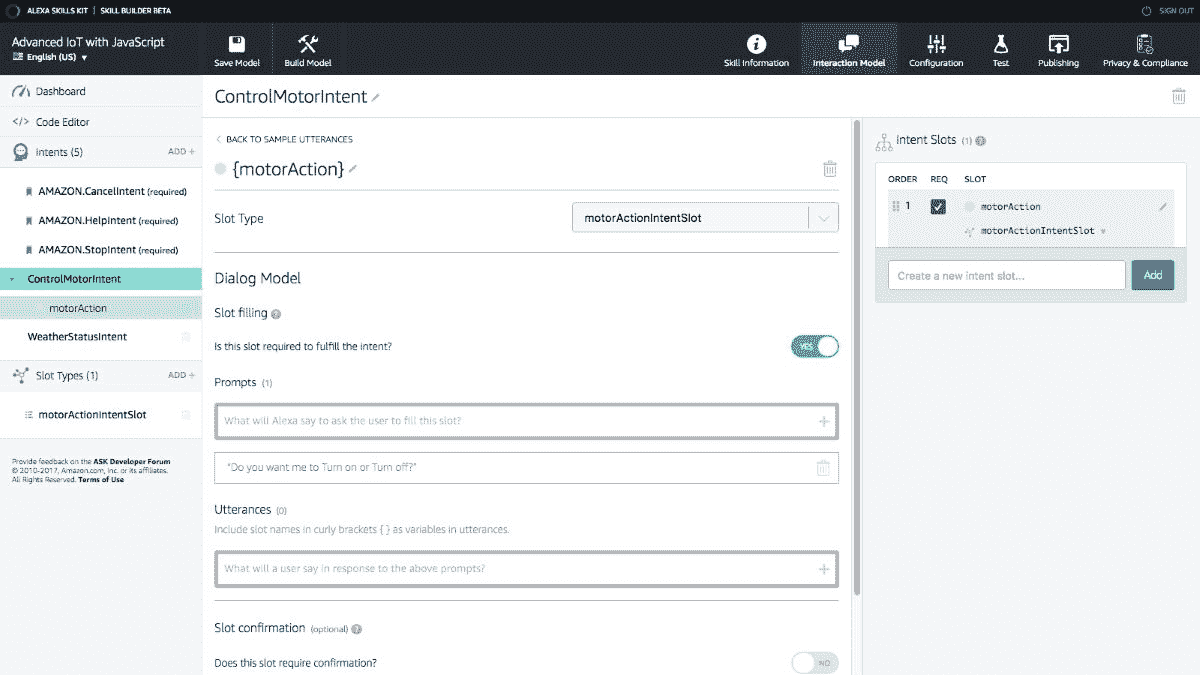
这样,我们就完成了对语音模型的定义。
现在,我们需要请 Alexa 技能引擎来构建我们的语音模型,并将其添加到其技能引擎中。使用页面顶部的“保存模型”按钮,保存模型,然后构建模型:
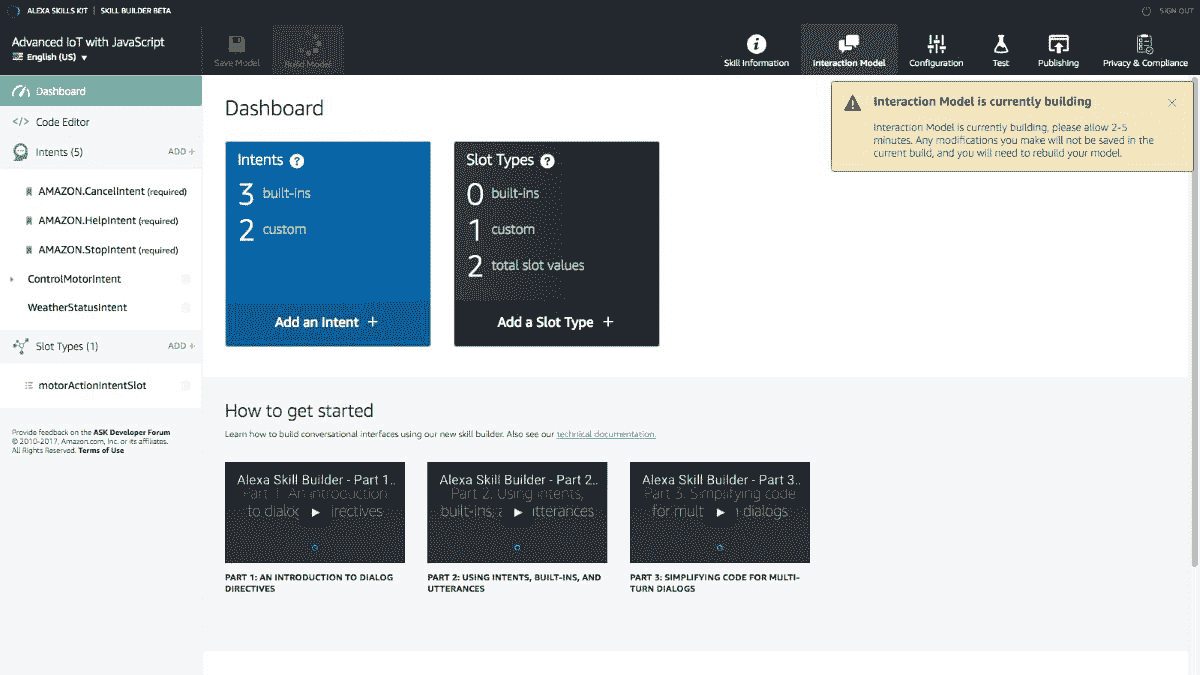
构建通常需要五分钟或更少的时间来完成。
在我们继续并开始使用 lambda 服务之前,我们需要首先将我们的 API 引擎公开为具有公共 URL,如在http://iotfwjs.com/api中,因此当用户向 Alexa 技能服务询问问题或发出命令时,Alexa 技能服务可以通过 lambda 服务联系我们。
到目前为止,我们一直在使用基于本地 IP 的配置与 API 引擎、代理、web 应用或树莓 PI 进行交互。但是,那在我们想要的时候不起作用,阿列克谢技能服务找我们。
因此,我们将使用名为ngrok(https://ngrok.com/)的服务来临时托管我们的本地代码,该代码带有一个公共 URL,亚马逊 Alexa 服务可以使用该 URL 通过 lambda 服务找到我们。
要设置ngrok,请按照以下步骤操作:
- 从这里下载
ngrok安装程序:运行 API 引擎的操作系统的https://ngrok.com/download - 将
ngrok下载的 zip 文件的内容解压并复制到api-engine文件夹的根目录下 - 通过运行以下命令,从
broker文件夹的根目录启动 Mosca:
mosca -c index.js -v | pino - 通过运行以下命令,从
api-engine文件夹的根目录启动应用编程接口引擎:
npm start - 现在从
ngrok开始掘进。从api-engine文件夹的根目录,我们复制了ngrok可执行文件,运行:
./ngrok http 9000 运行./ngrok http 9000将在本地主机和ngrok服务器的公共实例之间启动一个新的隧道,我们应该会看到以下内容:

每次击杀重启ngrok,转发网址都会发生变化。在前面的例子中,ngrok: http://add7231d.ngrok.io的公共 URL 被映射到我的本地服务器:http://localhost:9000。这不是很容易吗?
要快速测试公共网址,打开web-app/src/app/app.global.ts并更新,如下:
export const Globals = Object.freeze({
   // BASE_API_URL: 'http://localhost:9000/',
   BASE_API_URL: 'https://add7231d.ngrok.io/',
   API_AUTH_TOKEN: 'AUTH_TOKEN',
   AUTH_USER: 'AUTH_USER'
});
现在,您可以从任何地方启动您的网络应用,它将使用公共网址与应用接口引擎对话。
Do read the terms of service (https://ngrok.com/tos) and privacy policy (https://ngrok.com/privacy) of ngrok before proceeding further.
现在语音模型已经训练好了,我们有了一个公共的 URL 来访问 API 引擎,我们将编写所需的服务来响应用户的交互。
当用户去 Alexa,问 smarty app 天气报告时,Alexa 会向 AWS lambda 函数发出请求,lambda 函数会调用 API 引擎进行适当的活动。
引用自 AWS:https://aws.amazon.com/lambda/details/
The AWS Lambda is a serverless compute service that runs your code in response to events and automatically manages the underlying compute resources for you. You can use AWS Lambda to extend other AWS services with custom logic, or create your own back-end services that operate at AWS scale, performance, and security.
要了解更多关于 AWS lambda 的信息,请参考:https://aws.amazon.com/lambda/details/。
要开始,前往 AWS 控制台:https://console.aws.amazon.com/并选择该地区作为北弗吉尼亚。从今天起,北美和欧洲托管的 AWS lambda 服务只允许与 Alexa Skill 链接。
接下来,从顶部的服务菜单中,选择计算部分下的 Lambda。这将把我们带到 lambda 服务的函数屏幕。点击创建一个 Lambda 函数,我们将被要求选择一个蓝图。选择空白函数。接下来,您将被要求选择一个触发器;选择阿列克谢技能集,如下所示:
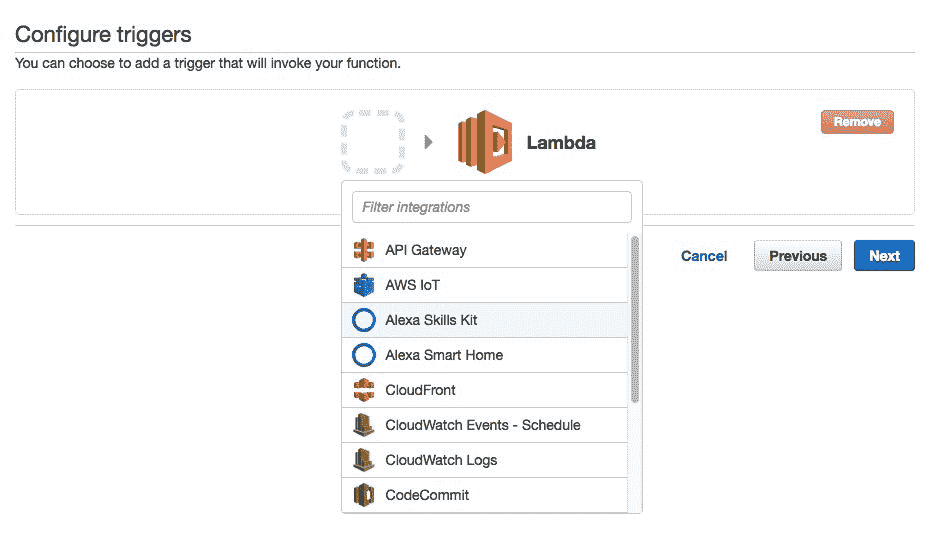
点击下一步。现在,我们需要配置该功能。更新如下:
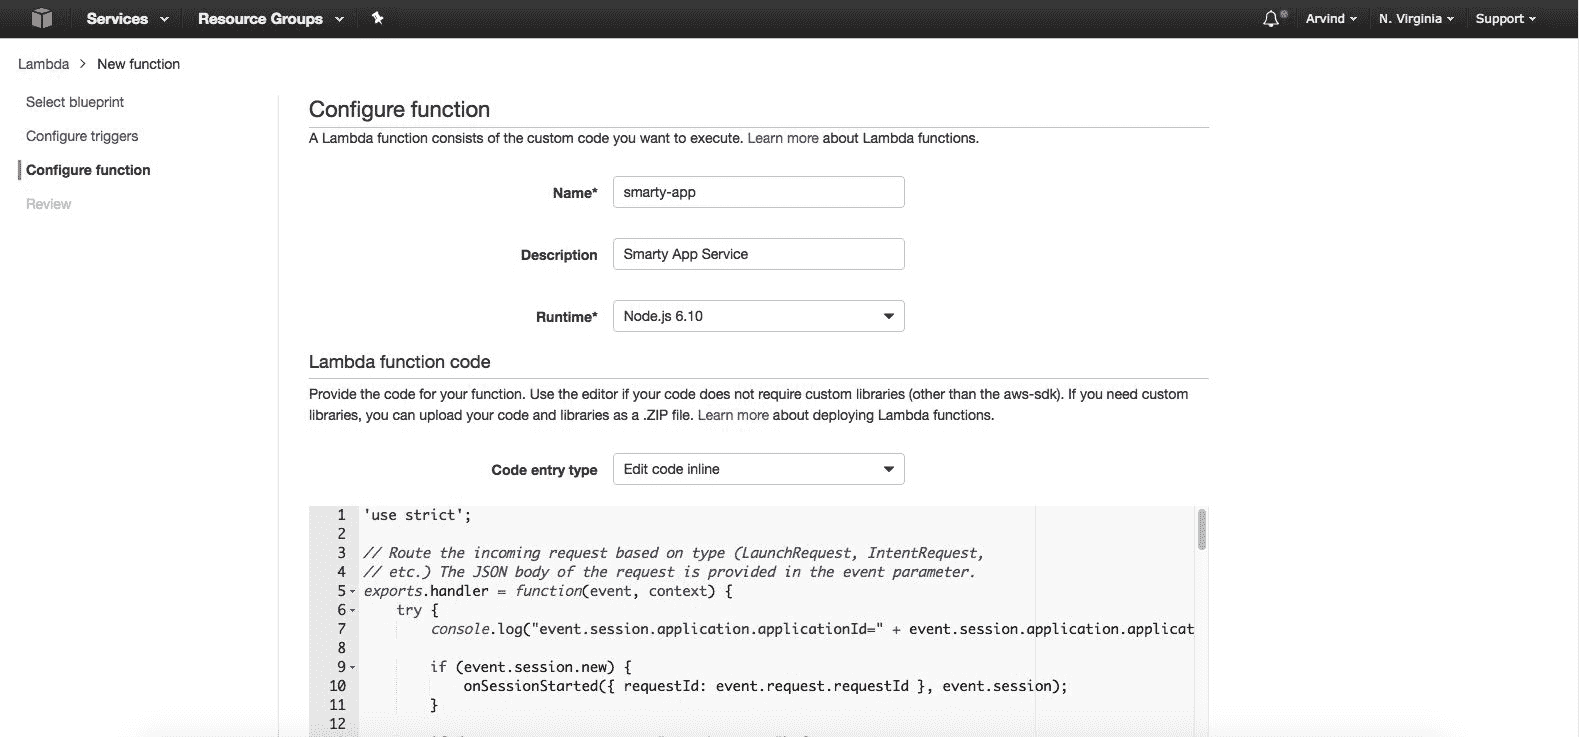
对于 Lambda 函数代码,输入以下代码:
'use strict';

// Route the incoming request based on type (LaunchRequest, IntentRequest,
// etc.) The JSON body of the request is provided in the event parameter.
exports.handler = function(event, context) {
    try {
        console.log("event.session.application.applicationId=" + event.session.application.applicationId);

        if (event.session.new) {
            onSessionStarted({ requestId: event.request.requestId }, event.session);
        }

        if (event.request.type === "LaunchRequest") {
            onLaunch(event.request,
                event.session,
                function callback(sessionAttributes, speechletResponse) {
                    context.succeed(buildResponse(sessionAttributes, speechletResponse));
                });
        } else if (event.request.type === "IntentRequest") {
            onIntent(event.request,
                event.session,
                function callback(sessionAttributes, speechletResponse) {
                    context.succeed(buildResponse(sessionAttributes, speechletResponse));
                });
        } else if (event.request.type === "SessionEndedRequest") {
            onSessionEnded(event.request, event.session);
            context.succeed();
        }
    } catch (e) {
        context.fail("Exception: " + e);
    }
};

/**
 * Called when the session starts.
 */
function onSessionStarted(sessionStartedRequest, session) {
    console.log("onSessionStarted requestId=" + sessionStartedRequest.requestId + ", sessionId=" + session.sessionId);

    // add any session init logic here
}

/**
 * Called when the user invokes the skill without specifying what they want.
 */
function onLaunch(launchRequest, session, callback) {
    console.log("onLaunch requestId=" + launchRequest.requestId + ", sessionId=" + session.sessionId);

    var cardTitle = "Smarty App"
    var speechOutput = "Hello, What would you like to know about your farm today?"
    callback(session.attributes,
        buildSpeechletResponse(cardTitle, speechOutput, "", true));
}

/**
 * Called when the user specifies an intent for this skill.
 */
function onIntent(intentRequest, session, callback) {
    console.log("onIntent requestId=" + intentRequest.requestId + ", sessionId=" + session.sessionId);

    var intent = intentRequest.intent,
        intentName = intentRequest.intent.name;

    // dispatch custom intents to handlers here
    if (intentName == 'WeatherStatusIntent') {
        handleWSIRequest(intent, session, callback);
    } else if (intentName == 'ControlMotorIntent') {
        handleCMIRequest(intent, session, callback);
    } else {
        throw "Invalid intent";
    }
}

/**
 * Called when the user ends the session.
 * Is not called when the skill returns shouldEndSession=true.
 */
function onSessionEnded(sessionEndedRequest, session) {
    console.log("onSessionEnded requestId=" + sessionEndedRequest.requestId + ", sessionId=" + session.sessionId);

    // Add any cleanup logic here
}

function handleWSIRequest(intent, session, callback) {
    getData(function(speechOutput) {
        callback(session.attributes,
            buildSpeechletResponseWithoutCard(speechOutput, "", "true"));
    });
}

function handleCMIRequest(intent, session, callback) {
    var speechOutput = 'Got ';
    var status;
    var motorAction = intent.slots.motorAction.value;
    speechOutput += motorAction;
    if (motorAction === 'turn on') {
        status = 1;
    }

    if (motorAction === 'turn off') {
        status = 0;
    }
    setData(status, function(speechOutput) {
        callback(session.attributes,
            buildSpeechletResponseWithoutCard(speechOutput, "", "true"));
    });

}

function getData(cb) {
    var http = require('http');
    var chunk = '';
    var options = {
        host: '31d664cf.ngrok.io',
        port: 80,
        path: '/api/v1/data/b8:27:eb:39:92:0d/30',
        agent: false,
        timeout: 10000,
        method: 'GET',
        headers: {
            'AlexSkillRequest': true,
            'authorization': 'Bearer eyJhbGciOiJIUzI1NiIsInR5cCI6IkpXVCJ9.eyJfaWQiOiI1OTFmZGI5ZGNlYjBiODM2YjIzMmI3MjMiLCJpYXQiOjE0OTcxNjE4MTUsImV4cCI6MTQ5NzI0ODIxNX0.ua-SXAqLb-XUEtbgY55TX_pKdD2Xj5OSM7b9Iox_Rd8'
        }
    };

    var req = http.request(options, function(res) {
        res.on('data', function(_chunk) {
            chunk += _chunk;
        });

        res.on('end', function() {
            var resp = chunk;
            if (typeof chunk === 'string') {
                resp = JSON.parse(chunk);
            }

            if (resp.length === 0) {
                cb('Looks like we have not gathered any data yet! Please try again later!');
            }

            var d = resp[0].data;

            if (!d) {
                cb('Looks like there is something wrong with the data we got! Please try again later!');
            }

            var temp = d.t || 'invalid';
            var humd = d.h || 'invalid';
            var mois = d.m || 'invalid';
            var rain = d.r || 'invalid';

            cb('The temperature is ' + temp + ' degrees celsius, the humidity is ' + humd + ' percent, The moisture level is ' + mois + ' percent and the rain level is ' + rain + ' percent!');

        });

        res.on('error', function() {
            console.log(arguments);
            cb('Looks like something went wrong.');
        });
    });
    req.end();
}

function setData(status, cb) {
    var http = require('http');
    var chunk = '';
    var data = {
        'status': status,
        'macAddress': 'b8:27:eb:39:92:0d'
    };

    data = JSON.stringify(data);

    var options = {
        host: '31d664cf.ngrok.io',
        port: 80,
        path: '/api/v1/data',
        agent: false,
        timeout: 10000,
        method: 'POST',
        headers: {
            'AlexSkillRequest': true,
            'Content-Type': 'application/json',
            'Content-Length': Buffer.byteLength(data),
            'authorization': 'Bearer eyJhbGciOiJIUzI1NiIsInR5cCI6IkpXVCJ9.eyJfaWQiOiI1OTFmZGI5ZGNlYjBiODM2YjIzMmI3MjMiLCJpYXQiOjE0OTcxNjE4MTUsImV4cCI6MTQ5NzI0ODIxNX0.ua-SXAqLb-XUEtbgY55TX_pKdD2Xj5OSM7b9Iox_Rd8'
        }
    };

    var req = http.request(options, function(res) {
        res.on('data', function(_chunk) {
            chunk += _chunk;
        });

        res.on('end', function() {
            var resp = chunk;
            if (typeof chunk === 'string') {
                resp = JSON.parse(chunk);
            }

            cb('Motor has been successfully ' + (status ? 'turned on' : 'turned off'));

        });

        res.on('error', function() {
            console.log(arguments);
            cb('Looks like something went wrong.');
        });
    });

    // post the data
    req.write(data);
    req.end();
}

// ------- Helper functions to build responses -------

function buildSpeechletResponse(title, output, repromptText, shouldEndSession) {
    return {
        outputSpeech: {
            type: "PlainText",
            text: output
        },
        card: {
            type: "Simple",
            title: title,
            content: output
        },
        reprompt: {
            outputSpeech: {
                type: "PlainText",
                text: repromptText
            }
        },
        shouldEndSession: shouldEndSession
    };
}

function buildSpeechletResponseWithoutCard(output, repromptText, shouldEndSession) {
    return {
        outputSpeech: {
            type: "PlainText",
            text: output
        },
        reprompt: {
            outputSpeech: {
                type: "PlainText",
                text: repromptText
            }
        },
        shouldEndSession: shouldEndSession
    };
}

function buildResponse(sessionAttributes, speechletResponse) {
    return {
        version: "1.0",
        sessionAttributes: sessionAttributes,
        response: speechletResponse
    };
} 代码中有很多内容。exports.handler()是我们需要为 lambda 设置的默认函数。其中,我们已经定义了传入请求的类型。如果来电者是IntentRequest,我们称之为onIntent()。在onIntent()中,我们获取intentName并调用适当的逻辑。
如果intentName是WeatherStatusIntent,我们叫handleWSIRequest(),否则如果国际名称是ControlMotorIntent,我们叫handleCMIRequest()。
在handleWSIRequest()内部,我们调用getData(),它将向我们的ngrok网址发出一个 HTTP GET请求。一旦数据到达,我们构建一个响应,并将其返回给技能服务。
并且,handleCMIRequest()也是这样做的,只不过它先得到motorAction槽值,然后调用setData(),它将调用或打开/关闭电机。
一旦复制了代码,您应该会在底部找到额外的配置。我们将保持现状。对于该角色,单击创建自定义角色,并进行设置,如下所示:
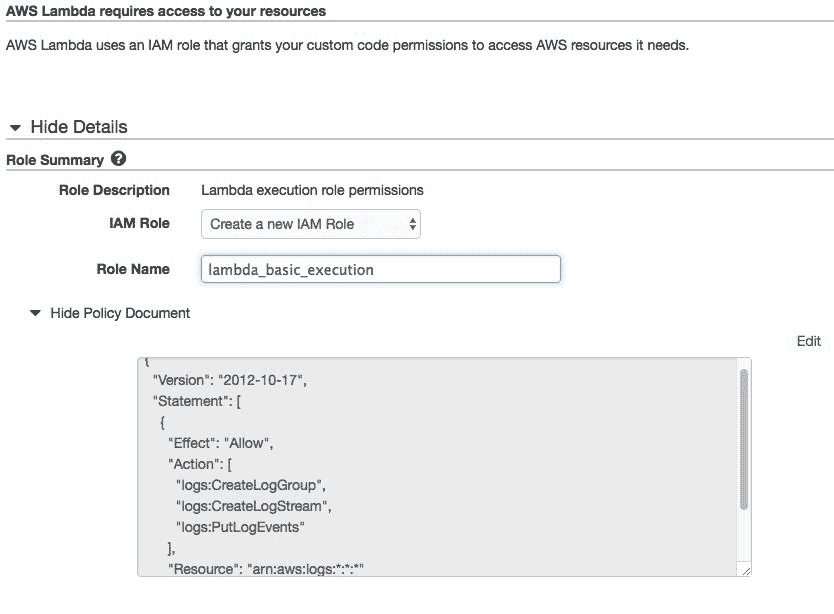
然后单击允许。这将创建一个新角色,该角色将在现有角色*中填充,如下所示:

完成后,单击下一步。验证摘要并点击页面底部的创建功能。
如果一切顺利,您应该会看到以下屏幕:

请注意右上角的 ARN。这是我们 lambda 函数的亚马逊资源名 ( ARN )。我们需要将此作为 Alexa 技能套件的输入。
现在我们已经有了所有的片段,我们将在我们创建的 Alexa 技能中配置 ARN。回到阿列克谢技能,点击配置,更新配置如下:
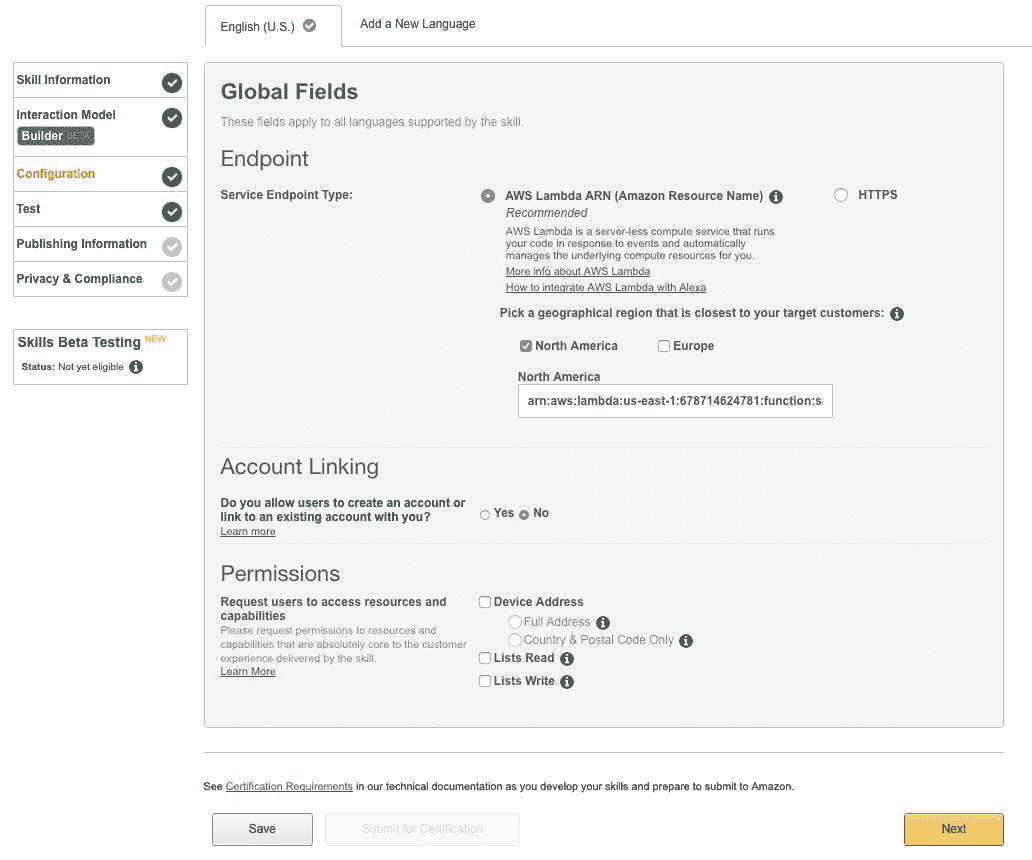
单击下一步。如果一切设置正确,我们可以测试设置。
在测试页面的底部,我们应该会看到一个名为Service Emulator的部分。您可以测试它,如下所示:
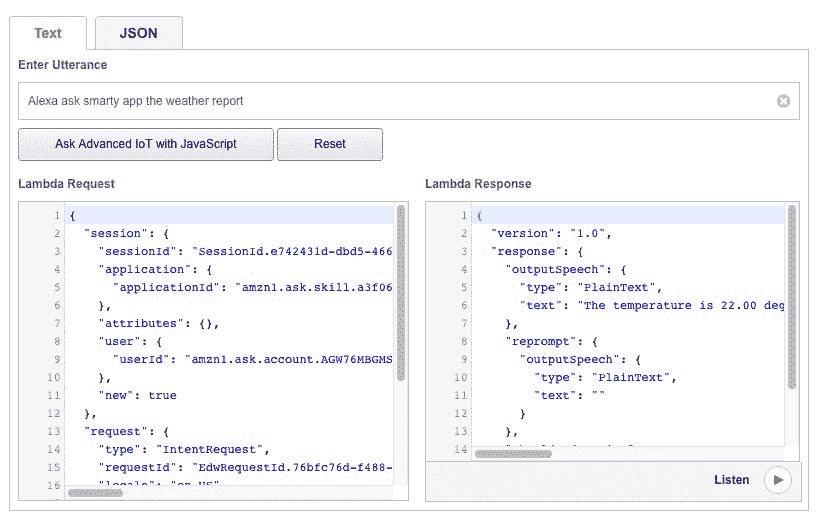
下面的截图显示了 lambda 从 Alexa 收到的请求:
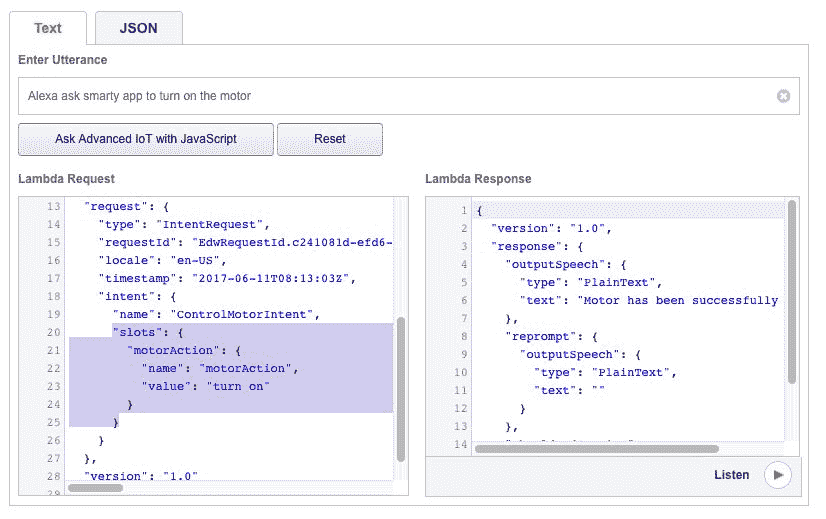
至此,我们已经完成了 Alexa 与我们的 IoT.js 框架的集成。
在这一章中,我们探讨了如何将像 Alexa 这样的语音 AI 服务与我们开发的 IoTFW.js 框架相集成。我们从第 4 章、智能农业继续同样的例子,通过设置可以开启/关闭电机的继电器开始本章。接下来,我们已经了解了 Alexa 是如何工作的。我们创建了一个新的自定义技能,然后设置所需的语音模型。之后,我们在 AWS lambda 中编写了所需的业务逻辑,它将获得最新的天气状态以及控制电机。
我们最终使用 reverb 应用测试了一切,并验证了一切。
在第 6 章智能可穿戴中,我们将关注物联网和医疗保健。
 PDF电子书集合