- JavaScript 物联网编程
- JavaScript 物联网实战
 PDF电子书集合
JavaScript 智能农业详解
在本章中,我们将采用我们在第 2 章、 IoTFW.js - I 和第 3 章、 IoTFW.js - II、中构建的框架,并开始处理各种用例。在本章中,我们将从农业部门开始,构建一个智能气象站。
对任何农民来说,一个简单的要求就是要有能力了解农场附近和周围的环境因素。所以,我们要建立一个便携式气象站的原型。我们将在本章中讨论以下主题:
比彻姆研究公司(Beecham Research)的一份报告预测,到 2025 年,世界人口将达到 80 亿,到 2050 年将达到 96 亿,为了跟上这一速度,到 2050 年,粮食产量必须增加 70%。这是报告
这意味着我们需要找到更快、更高效的耕作方式。随着我们不断向 2050 年迈进,土地和资源将变得越来越稀缺。这是什么时候,给定的资源,我们将需要养活比以往任何时候都多的嘴,除非僵尸启示录来了,我们所有人都被其他僵尸吃掉!
这是技术提供解决方案来实现这一目标的一个非常好的机会。物联网几乎总是关于智能家居、智能办公室和便利性,但它可以做得更多。这就是我们在这一章要讲的内容。我们将建立一个智能气象站,农民可以在他们的农场部署,以获得实时指标,如温度、湿度、土壤湿度和雨水检测。
根据可用性和需要,可以添加其他传感器。
既然我们已经知道了我们在建造什么以及为什么建造,让我们开始设计吧。我们要做的第一件事是确定所需的传感器。在这个智能气象站中,我们将使用以下内容:
- 温度传感器
- 湿度传感器
- 土壤湿度传感器
- 雨水探测器传感器
我挑选了现成的传感器来展示概念验证。它们中的大多数将很好地用于测试、验证一个想法,或者作为一种爱好,但是不适合生产。
我们将把这些传感器连接到我们的树莓 Pi 3 上。我们将使用以下型号的传感器:
- 温湿度:https://www . Amazon . com/Gowoops-温湿度-数字-树莓/dp/B01H3J3H82/ref=sr_1_5
- 土壤湿度传感器:https://www . Amazon . com/湿度计-湿度-检测-湿度-Arduino/DP/b01 fdguhbm/ref = Sr 1 4
- 雨水探测器传感器:https://www . Amazon . com/Uxcell-a 13082300 UX 1431-雨水-探测-3-3V-5V/dp/B00GN7O7JE
你也可以在其他地方买到这些传感器。
正如我们在第三章、 IoTFW.js - II 中看到的,温湿度传感器是一个数字传感器,我们要用node-dht-sensor模块读取温湿度值。土壤湿度传感器是模拟传感器,树莓 Pi 3 没有任何模拟引脚。为此,我们将使用名为 MCP3208 的微芯片的 12 位模数集成电路来转换传感器的模拟输出,并通过 SPI 协议将其馈送给树莓 Pi。
维基百科对 SPI 协议的定义如下:
The Serial Peripheral Interface (SPI) bus is a synchronous serial communication interface specification used for short distance communication, primarily in embedded systems. The interface was developed by Motorola in the late 1980s and has become a de facto standard. For more information on SPI, refer to: https://en.wikipedia.org/wiki/Serial_Peripheral_Interface_Bus.
雨量探测器传感器可以读取为模拟和数字。我们将使用模拟输出来检测降雨量,而不仅仅是是否下雨。
回到 MCP3208,它是一个 16 引脚封装,可以一次读取 8 个模拟输入,并可以转换它们,通过 SPI 协议馈入树莓 Pi。您可以在这里阅读更多关于 MCP3208 IC 的信息: http://ww1.microchip.com/downloads/en/DeviceDoc/21298c.pdf 。可以从这里购买:https://www . Amazon . com/Adafruit-MCP 3008-8-Channel-Interface-树莓/dp/B00NAY3RB2/ref=sr_1_1 。
我们将温湿度传感器直接连接到树莓 Pi 3,湿度传感器和雨量传感器连接到 MCP3208,MCP3208 将通过 SPI 连接到树莓 Pi 3。
关于经纪人,我们不会改变任何事情。在 API 引擎中,我们将向名为weather-status的 MQTT 客户端添加一个新的主题,然后将树莓 Pi 3 的数据发送到这个主题。
在 web 应用上,我们将更新用于查看天气指标的模板。桌面应用和移动应用也是如此。
让我们从示意图开始。
设置树莓 Pi 3 和传感器,如下所示:
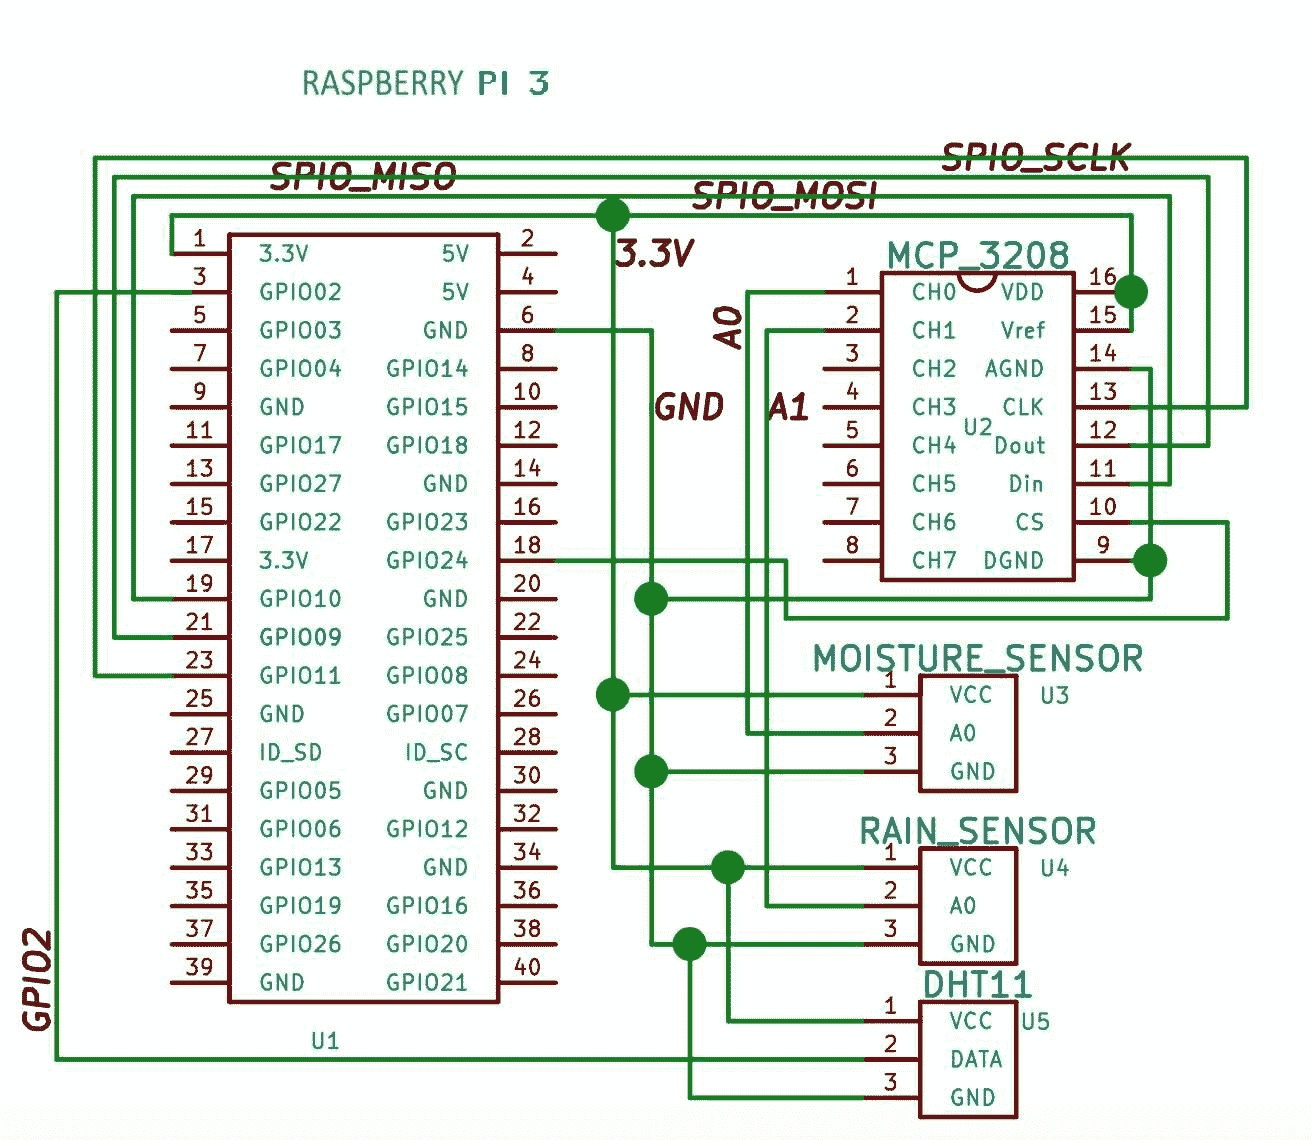
下表显示了这些连接:
请参考下表:
| 树莓派针号-针名 | MCP3208 引脚编号-引脚名称 | | 1 - 3.3V | 16 - VDD | | 1 - 3.3V | 15 - AREF | | 6 - GND | 2014 年夏季奥林匹克运动会 | | 23 - GPIO11,SPI0_SCLK | 13 - CLK | | S7-1200 可编程控制器 | 12 位 DOUT | | 19 -GPIO10,SPI0_MOSI | 11 - DIN | | 24 - GPIO08,首席执行官 | 10 - CS | | 6 - GND | 9 - DGND |
请参考下表:
| MCP3208 引脚编号-引脚名称 | 传感器名称 - 针号 | | 1 - A0 | 雨量传感器- A0 | | 2 - A1 | 湿度传感器- A0 |
请参考下表:
| 树莓派号-销名 | 传感器名称 - 针号 | | 3 - GPIO2 | DHT11 -数据 |
所有接地和所有 3.3V 都连接到一个公共点。
如前所示,一旦我们连接了传感器,我们将编写与传感器接口所需的代码。
在我们继续之前,我们将把整个第 2 章、 IoTFW.js - I 和第 3 章、 IoTFW.js - II 代码复制到另一个名为chapter4的文件夹中。
chapter4文件夹应该如下图所示:
.

├── api-engine

│ ├── package.json

│ └── server

├── broker

│ ├── certs

│ └── index.js

├── desktop-app

│ ├── app

│ ├── freeport.js

│ ├── index.css

│ ├── index.html

│ ├── index.js

│ ├── license

│ ├── package.json

│ ├── readme.md

│ └── server.js

├── mobile-app

│ ├── config.xml

│ ├── hooks

│ ├── ionic.config.json

│ ├── package.json

│ ├── platforms

│ ├── plugins

│ ├── resources

│ ├── src

│ ├── tsconfig.json

│ ├── tslint.json

│ └── www

└── web-app

├── README.md

├── e2e

├── karma.conf.js

├── package.json

├── protractor.conf.js

├── src

├── tsconfig.json

└── tslint.json我们将返回树莓派和pi-client文件夹内,我们将更新index.js文件。更新pi-client/index.js,如下图:
var config = require('./config.js');

var mqtt = require('mqtt');

var GetMac = require('getmac');

var async = require('async');

var rpiDhtSensor = require('rpi-dht-sensor');

var McpAdc = require('mcp-adc');

var adc = new McpAdc.Mcp3208();

var dht11 = new rpiDhtSensor.DHT11(2);

var temp = 0,

prevTemp = 0;

var humd = 0,

prevHumd = 0;

var macAddress;

var state = 0;

var moistureVal = 0,

prevMoistureVal = 0;

var rainVal = 0,

prevRainVal = 0;

var client = mqtt.connect({

port: config.mqtt.port,

protocol: 'mqtts',

host: config.mqtt.host,

clientId: config.mqtt.clientId,

reconnectPeriod: 1000,

username: config.mqtt.clientId,

password: config.mqtt.clientId,

keepalive: 300,

rejectUnauthorized: false

});

client.on('connect', function() {

client.subscribe('rpi');

GetMac.getMac(function(err, mac) {

if (err) throw err;

macAddress = mac;

client.publish('api-engine', mac);

});

});

client.on('message', function(topic, message) {

message = message.toString();

if (topic === 'rpi') {

console.log('API Engine Response >> ', message);

} else {

console.log('Unknown topic', topic);

}

});

// infinite loop, with 3 seconds delay

setInterval(function() {

readSensorValues(function(results) {

console.log('Temperature: ' + temp + 'C, ' + 'humidity: ' + humd + '%, ' + ' Rain level (%):' + rainVal + ', ' + 'moistureVal (%): ' + moistureVal);

// if the temperature and humidity values change

// then only publish the values

if (temp !== prevTemp || humd !== prevHumd || moistureVal !== prevMoistureVal || rainVal != prevRainVal) {

var data2Send = {

data: {

t: temp,

h: humd,

r: rainVal,

m: moistureVal

},

macAddress: macAddress

};

// console.log('Data Published');

client.publish('weather-status', JSON.stringify(data2Send));

// reset prev values to current

// for next loop

prevTemp = temp;

prevHumd = humd;

prevMoistureVal = moistureVal;

prevRainVal = rainVal;

}

});

}, 3000); // every three second

// `CB` expects {

// dht11Values: val,

// rainLevel: val,

// moistureLevel: val

// }

function readSensorValues(CB) {

async.parallel({

dht11Values: function(callback) {

var readout = dht11.read();

// update global variable

temp = readout.temperature.toFixed(2);

humd = readout.humidity.toFixed(2);

callback(null, { temp: temp, humidity: humd });

},

rainLevel: function(callback) {

// we are going to connect rain sensor

// on channel 0, hence 0 is the first arg below

adc.readRawValue(0, function(value) {

// update global variable

rainVal = value;

rainVal = (100 - parseFloat((rainVal / 4096) * 100)).toFixed(2);

callback(null, { rain: rainVal });

});

},

moistureLevel: function(callback) {

// we are going to connect moisture sensor

// on channel 1, hence 1 is the first arg below

adc.readRawValue(1, function(value) {

// update global variable

moistureVal = value;

moistureVal = (100 - parseFloat((moistureVal / 4096) * 100)).toFixed(2);

callback(null, { moisture: moistureVal });

});

}

}, function done(err, results) {

if (err) {

throw err;

}

// console.log(results);

if (CB) CB(results);

});

}
在前面的代码中,我们保持了 MQTT 设置不变。我们增加了mcp-adc(https://github.com/anha1/mcp-adc)和async(https://github.com/caolan/async)模块。mcp-adc管理 MCP3208 暴露的 SPI 协议接口,我们正在使用async模块并行读取所有传感器的数据。
我们从通过 MQTTS 与代理建立连接开始。然后,我们使用setInterval()建立了一个无限循环,两次执行之间有 3 秒的时间延迟。在setInterval()的callback中,我们调用了readSensorValues()来获取最新的传感器值。
readSensorValues()使用async.parallel()并行读取三个传感器,更新我们定义的全局变量中的数据。一旦收集了所有的传感器数据,我们就将结果传递给callback函数作为参数。
一旦我们收到传感器数据,我们将检查温度、湿度、雨水和湿度值之间是否有变化。如果什么都没变,我们就会变得冷漠;否则,我们将把这个数据发布给天气状态主题的代理。
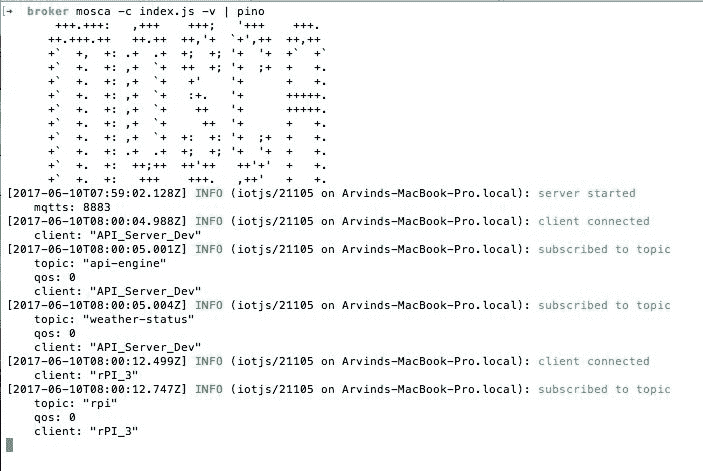
保存所有文件。现在,我们将从桌面计算机启动 Mosca 代理:
mosca -c index.js -v | pinoOnce you have started the Mosca server, check the IP address of the server on which Mosca is running. Update the same IP in your Raspberry Pi config.js file. Otherwise, Raspberry Pi cannot post data to the broker.
一旦 Mosca 成功启动,并且我们已经验证了该 IP,请在树莓 Pi 上运行该程序:
sudo node index.js这将启动服务器,我们将看到以下内容:
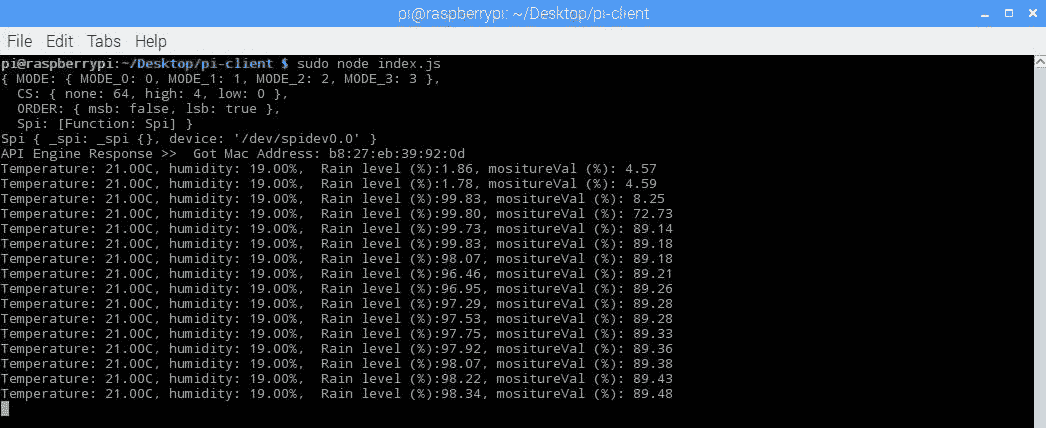
当我启动树莓 Pi 时,雨水传感器是干的,湿度传感器被放置在干土壤中。最初,雨量传感器的值为1.86%,湿度传感器的值为4.57%。
当我给植物/水分传感器加水时,百分比增加到98.83%;同样,当我在雨量传感器上模拟降雨时,数值上升到89.48%。
这是我的智能气象站原型设置:

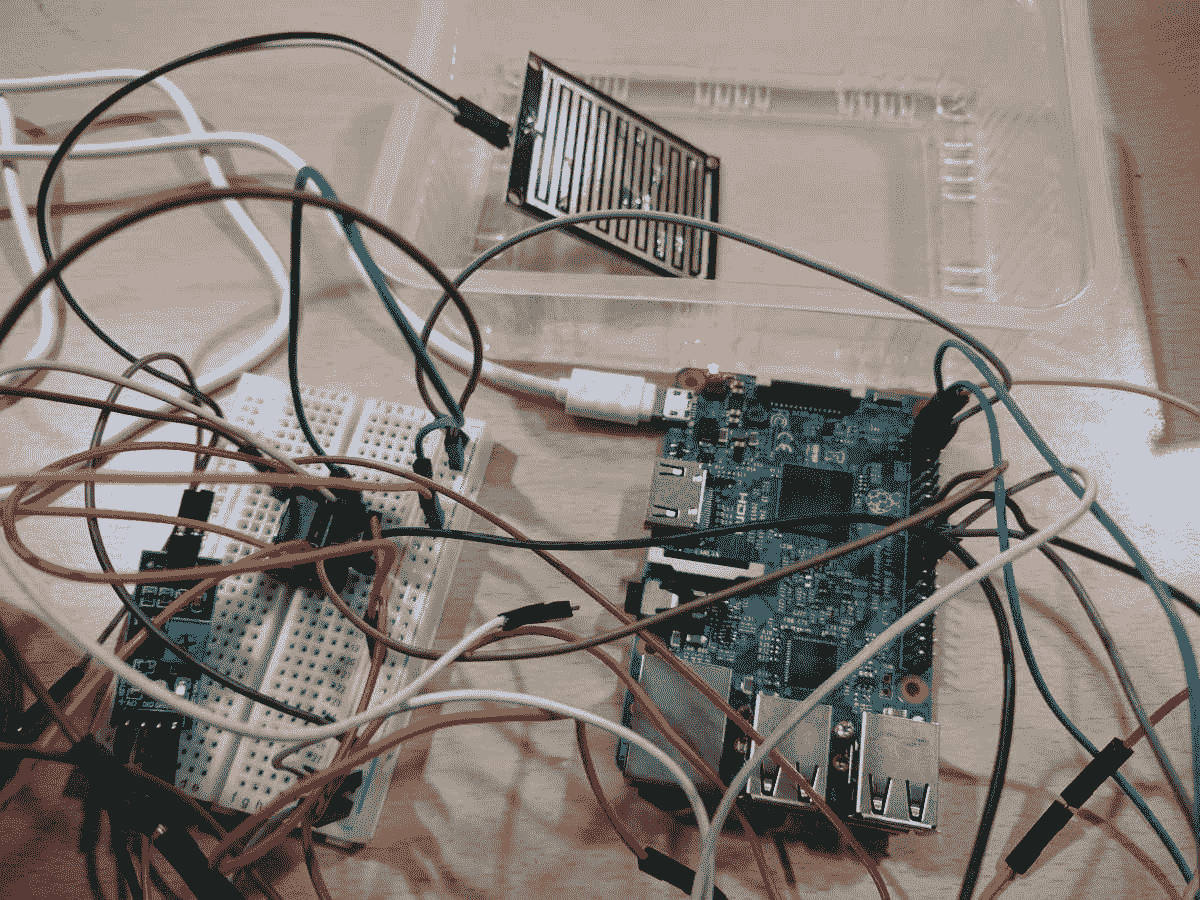
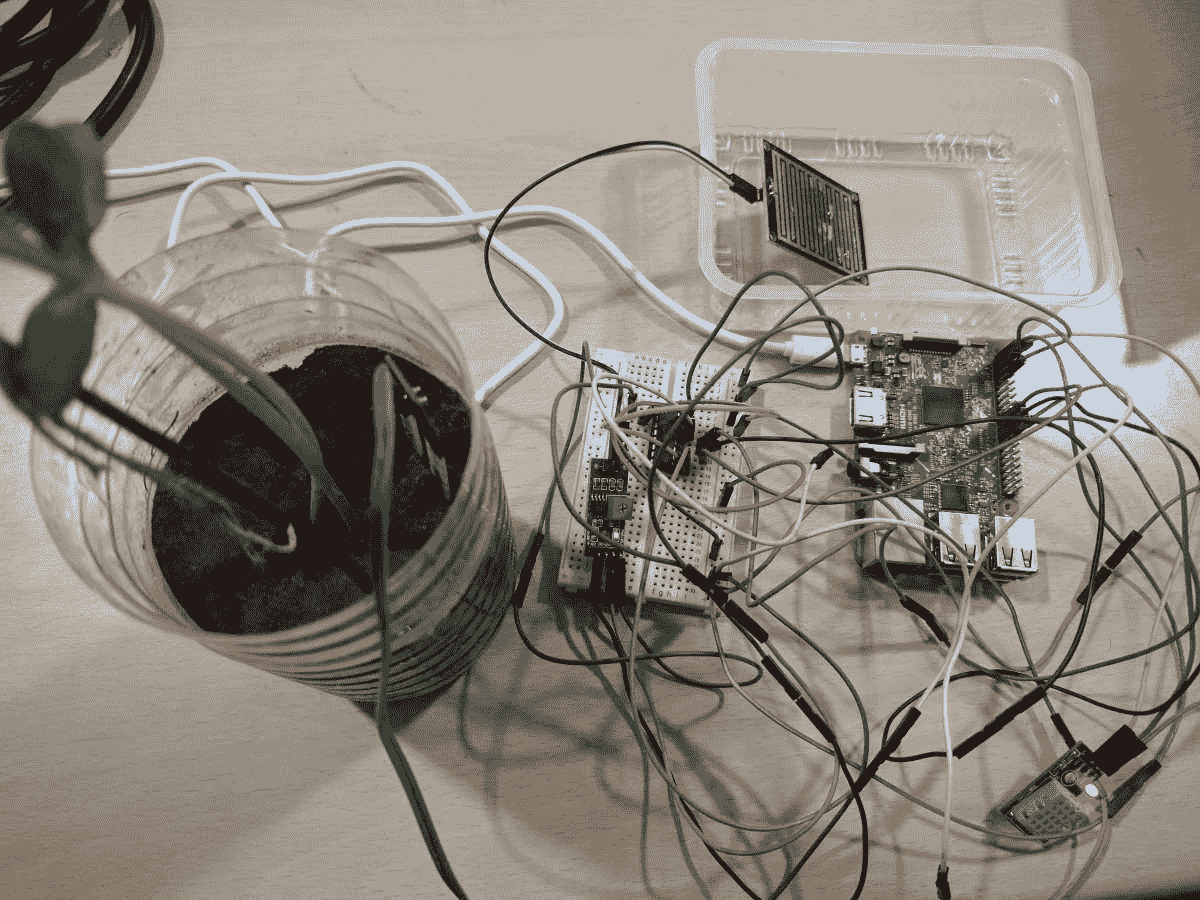

The blue chip is DHT11, the moisture sensor is plotted inside my desk-side plant, and the rain sensor is placed inside a plastic tray for collecting rainwater. The breadboard has the MCP3208 IC and the required connections.
很多电线!
至此,我们完成了树莓 Pi 3 所需的代码。在下一节中,我们将设置 API 引擎所需的代码。
在最后一节中,我们已经看到了如何使用树莓 Pi 3 设置智能气象站所需的组件和代码。现在,我们将致力于管理我们在 API 引擎上从树莓 Pi 3 接收的数据。
打开api-engine/server/mqtt/index.js并更新,如下图:
var Data = require('../api/data/data.model');
var mqtt = require('mqtt');
var config = require('../config/environment');

var client = mqtt.connect({
port: config.mqtt.port,
protocol: 'mqtts',
host: config.mqtt.host,
clientId: config.mqtt.clientId,
reconnectPeriod: 1000,
username: config.mqtt.clientId,
password: config.mqtt.clientId,
keepalive: 300,
rejectUnauthorized: false
});

client.on('connect', function() {
console.log('Connected to Mosca at ' + config.mqtt.host + ' on port ' + config.mqtt.port);
client.subscribe('api-engine');
client.subscribe('weather-status');
});

client.on('message', function(topic, message) {
    // message is Buffer
    // console.log('Topic >> ', topic);
    // console.log('Message >> ', message.toString());
if (topic === 'api-engine') {
varmacAddress = message.toString();
console.log('Mac Address >> ', macAddress);
client.publish('rpi', 'Got Mac Address: ' + macAddress);
    } else if (topic === 'weather-status') {
var data = JSON.parse(message.toString());
        // create a new data record for the device
Data.create(data, function(err, data) {
if (err) return console.error(err);
            // if the record has been saved successfully,
            // websockets will trigger a message to the web-app
console.log('Data Saved :', data.data);
        });
    } else {
console.log('Unknown topic', topic);
    }
}); 在这里,我们正在等待weather-status主题的消息,当我们从树莓 Pi 接收到数据时,我们将其保存到我们的数据库中,然后将数据推送到网络应用、移动应用和桌面应用中。
这些都是我们需要做的改变,以吸收树莓 Pi 3 的数据,并将其传递给网络、桌面和移动应用。
保存所有文件并运行以下代码:
npm start 这将启动 API 引擎并连接到 Mosca,以及树莓 PI:
如果让 API 引擎运行一段时间,我们应该会看到以下内容:
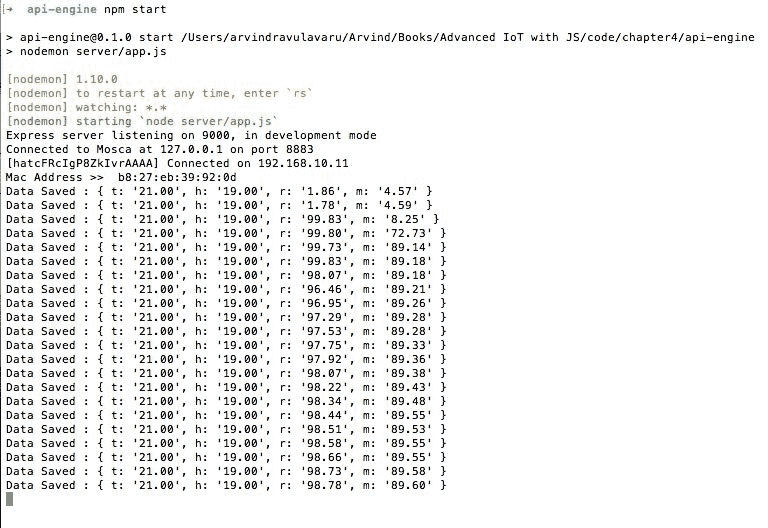
来自设备的数据记录在这里。
在下一节中,我们将更新 web 应用,以便它能够表示来自 API 引擎的数据。
现在我们已经完成了应用编程接口引擎,我们将开发显示树莓 Pi 3 天气输出所需的界面。
打开web-app/src/app/device/device.component.html并更新,如下图:
<div class="container">
    <br>
    <div *ngIf="!device">
        <h3 class="text-center">Loading!</h3>
    </div>
    <div class="row" *ngIf="lastRecord">
        <div class="col-md-12">
            <div class="panel panel-info">
                <div class="panel-heading">
                    <h3 class="panel-title">
                        {{device.name}}
                    </h3>
                    <span class="pull-right btn-click">
                        <i class="fa fa-chevron-circle-up"></i>
                    </span>
                </div>
                <div class="clearfix"></div>
                <div class="table-responsive">
                    <table class="table table-striped">
                        <tr *ngIf="lastRecord">
                            <td>Temperature</td>
                            <td>{{lastRecord.data.t}}</td>
                        </tr>
                        <tr *ngIf="lastRecord">
                            <td>Humidity</td>
                            <td>{{lastRecord.data.h}} %</td>
                        </tr>
                        <tr *ngIf="lastRecord">
                            <td>Rain Level</td>
                            <td>{{lastRecord.data.r}} %</td>
                        </tr>
                        <tr *ngIf="lastRecord">
                            <td>Mositure Level</td>
                            <td>{{lastRecord.data.m}} %</td>
                        </tr>
                        <tr *ngIf="lastRecord">
                            <td>Received At</td>
                            <td>{{lastRecord.createdAt | date: 'medium'}}</td>
                        </tr>
                    </table>
                    <div class="col-md-6" *ngIf="tempHumdData.length > 0">
                        <canvas baseChart [datasets]="tempHumdData" [labels]="lineChartLabels" [options]="lineChartOptions" [legend]="lineChartLegend" [chartType]="lineChartType"></canvas>
                    </div>

                    <div class="col-md-6" *ngIf="rainMoisData.length > 0">
                        <canvas baseChart [datasets]="rainMoisData" [labels]="lineChartLabels" [options]="lineChartOptions" [legend]="lineChartLegend" [chartType]="lineChartType"></canvas>
                    </div>
                </div>
            </div>
        </div>
    </div>
</div>
在前面的代码中,我们在显示温度、湿度、降雨量和湿度的表格中添加了四行。我们还设置了画布来显示图表中的值。
接下来是DeviceComponent的类定义,出现在web-app/src/app/device/device.component.ts中。更新web-app/src/app/device/device.component.ts,如下图:
import { Component, OnInit, OnDestroy } from '@angular/core';
import { DevicesService } from '../services/devices.service';
import { Params, ActivatedRoute } from '@angular/router';
import { SocketService } from '../services/socket.service';
import { DataService } from '../services/data.service';
import { NotificationsService } from 'angular2-notifications';

@Component({
   selector: 'app-device',
   templateUrl: './device.component.html',
   styleUrls: ['./device.component.css']
})
export class DeviceComponent implements OnInit, OnDestroy {
   device: any;
   data: Array<any>;
   toggleState: boolean = false;
   privatesubDevice: any;
   privatesubData: any;
   lastRecord: any;

   // line chart config
   publiclineChartOptions: any = {
         responsive: true,
         legend: {
               position: 'bottom',
         }, hover: {
               mode: 'label'
         }, scales: {
               xAxes: [{
                     display: true,
                     scaleLabel: {
                           display: true,
                           labelString: 'Time'
                     }
               }],
               yAxes: [{
                     display: true,
                     ticks: {
                           beginAtZero: true,
                           // steps: 10,
                           // stepValue: 5,
                           // max: 70
                     }
               }]
         },
         title: {
               display: true,
               text: 'Sensor Data vs. Time'
         }
   };
   publiclineChartLegend: boolean = true;
   publiclineChartType: string = 'line';
   publictempHumdData: Array<any> = [];
   publicrainMoisData: Array<any> = [];
   publiclineChartLabels: Array<any> = [];

   constructor(private deviceService: DevicesService,
         privatesocketService: SocketService,
         privatedataService: DataService,
         private route: ActivatedRoute,
         privatenotificationsService: NotificationsService) { }

   ngOnInit() {
         this.subDevice = this.route.params.subscribe((params) => {
               this.deviceService.getOne(params['id']).subscribe((response) => {
                     this.device = response.json();
                     this.getData();
                     this.socketInit();
               });
         });
   }

   getData() {
         this.dataService.get(this.device.macAddress).subscribe((response) => {
               this.data = response.json();
               this.lastRecord = this.data[0]; // descending order data
               this.genChart();
         });
   }

   socketInit() {
         this.subData = this.socketService.getData(this.device.macAddress).subscribe((data) => {
               if (this.data.length<= 0) return;
               this.data.splice(this.data.length - 1, 1); // remove the last record
               this.data.push(data); // add the new one
               this.lastRecord = data;
               this.genChart();
         });
   }

   ngOnDestroy() {
         this.subDevice.unsubscribe();
         this.subData ? this.subData.unsubscribe() : '';
   }

   genChart() {
         let data = this.data;
         let _thArr: Array<any> = [];
         let _rmArr: Array<any> = [];
         let _lblArr: Array<any> = [];

         lettmpArr: Array<any> = [];
         lethumArr: Array<any> = [];
         letraiArr: Array<any> = [];
         letmoiArr: Array<any> = [];

         for (vari = 0; i<data.length; i++) {
               let _d = data[i];
               tmpArr.push(_d.data.t);
               humArr.push(_d.data.h);
               raiArr.push(_d.data.r);
               moiArr.push(_d.data.m);
               _lblArr.push(this.formatDate(_d.createdAt));
         }

         // reverse data to show the latest on the right side
         tmpArr.reverse();
         humArr.reverse();
         raiArr.reverse();
         moiArr.reverse();
         _lblArr.reverse();

         _thArr = [
               {
                     data: tmpArr,
                     label: 'Temperature'
               },
               {
                     data: humArr,
                     label: 'Humidity %'
               }
         ]

         _rmArr = [
               {
                     data: raiArr,
                     label: 'Rain Levels'
               },
               {
                     data: moiArr,
                     label: 'Moisture Levels'
               }
         ]

         this.tempHumdData = _thArr;
         this.rainMoisData = _rmArr;

         this.lineChartLabels = _lblArr;
   }

   privateformatDate(originalTime) {
         var d = new Date(originalTime);
         vardatestring = d.getDate() + "-" + (d.getMonth() + 1) + "-" + d.getFullYear() + " " +
               d.getHours() + ":" + d.getMinutes();
         returndatestring;
   }

} 在前面的代码中,我们使用了ngOnInit钩子并请求获取设备数据。使用socketInit(),连同数据,我们将为当前设备注册套接字数据事件。
在getData()中,我们从服务器获取数据,提取最新的记录,并将其设置为lastRecord属性。最后,我们调用genChart()来绘制图表。
现在,我们已经完成了所需的更改。保存所有文件并运行以下命令:
ng server如果我们导航到http://localhost:4200,登录,点击查看设备,我们应该会看到以下内容:
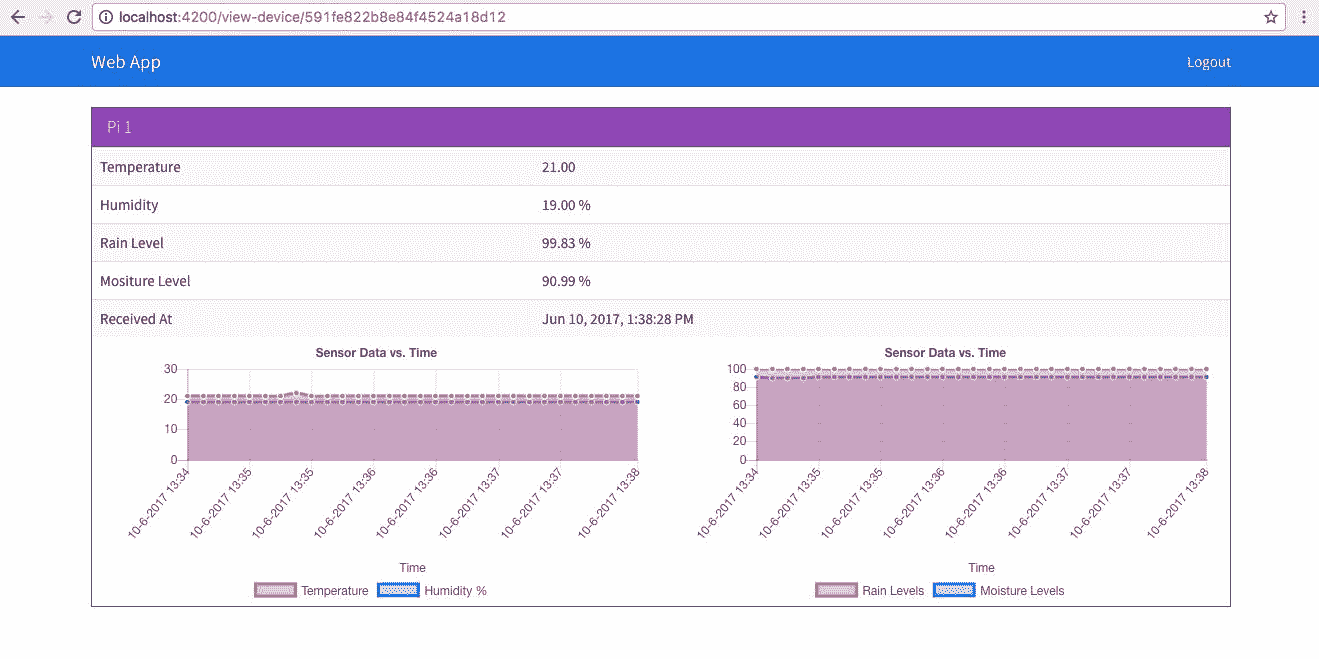
每当数据发生变化时,我们应该会看到 UI 自动更新。
在下一节中,我们将构建相同的应用,并在电子外壳中显示它。
在最后一部分,我们开发了 web 应用的模板和界面。在本节中,我们将构建相同的东西,并将其转储到桌面应用中。
要开始,返回web-app文件夹的终端/提示符,运行以下命令:
ng build --env=prod这将在名为dist的web-app文件夹内创建一个新文件夹。dist文件夹的内容应包括:
.

├── favicon.ico

├── index.html

├── inline.bundle.js

├── inline.bundle.js.map

├── main.bundle.js

├── main.bundle.js.map

├── polyfills.bundle.js

├── polyfills.bundle.js.map

├── scripts.bundle.js

├── scripts.bundle.js.map

├── styles.bundle.js

├── styles.bundle.js.map

├── vendor.bundle.js

└── vendor.bundle.js.map我们编写的所有代码最终都被打包到前面的文件中。我们将抓取dist文件夹中的所有文件(不是dist文件夹),然后将其粘贴到desktop-app/app文件夹中。经过上述更改后,桌面应用的最终结构如下:
.

├── app

│ ├── favicon.ico

│ ├── index.html

│ ├── inline.bundle.js

│ ├── inline.bundle.js.map

│ ├── main.bundle.js

│ ├── main.bundle.js.map

│ ├── polyfills.bundle.js

│ ├── polyfills.bundle.js.map

│ ├── scripts.bundle.js

│ ├── scripts.bundle.js.map

│ ├── styles.bundle.js

│ ├── styles.bundle.js.map

│ ├── vendor.bundle.js

│ └── vendor.bundle.js.map

├── freeport.js

├── index.css

├── index.html

├── index.js

├── license

├── package.json

├── readme.md

└── server.js
要测试驱动流程,请运行以下命令:
npm start导航至查看设备页面,我们将看到以下内容:
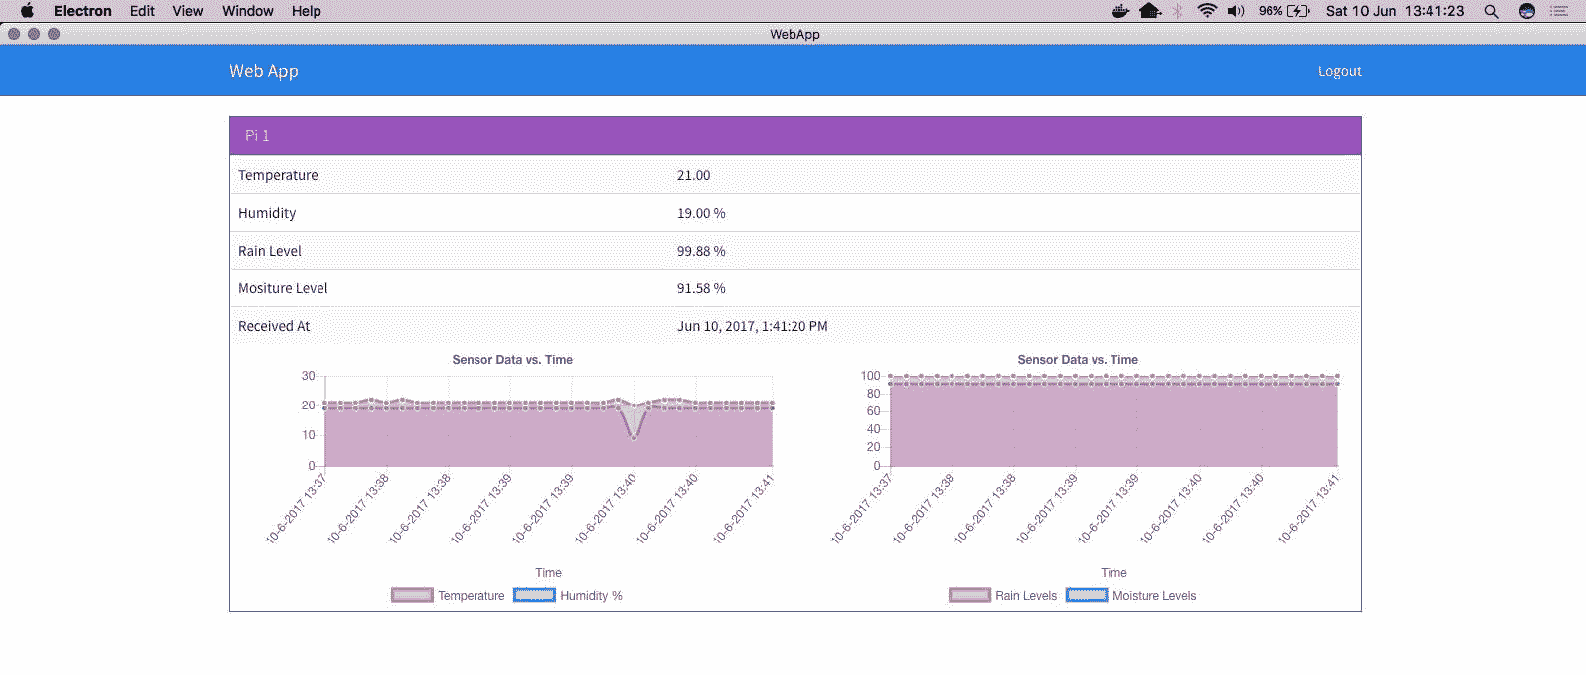
每当数据发生变化时,我们应该会看到 UI 自动更新。
至此,我们完成了桌面应用的开发。在下一部分,我们将更新手机应用。
在最后一节中,我们看到了如何为智能气象站构建和运行桌面应用。在这一部分,我们将更新移动应用的模板,以显示气象站数据。
打开mobile-app/src/pages/view-device/view-device.html并更新,如下图:
<ion-header>
    <ion-navbar>
        <ion-title>Mobile App</ion-title>
    </ion-navbar>
</ion-header>
<ion-content padding>
    <div *ngIf="!lastRecord">
        <h3 class="text-center">Loading!</h3>
    </div>
    <div *ngIf="lastRecord">
        <ion-list>
            <ion-item>
                <ion-label>Name</ion-label>
                <ion-label>{{device.name}}</ion-label>
            </ion-item>
            <ion-item>
                <ion-label>Temperature</ion-label>
                <ion-label>{{lastRecord.data.t}}</ion-label>
            </ion-item>
            <ion-item>
                <ion-label>Humidity</ion-label>
                <ion-label>{{lastRecord.data.h}} %</ion-label>
            </ion-item>
            <ion-item>
                <ion-label>Rain Level</ion-label>
                <ion-label>{{lastRecord.data.r}} %</ion-label>
            </ion-item>
            <ion-item>
                <ion-label>Moisture Level</ion-label>
                <ion-label>{{lastRecord.data.m}} %</ion-label>
            </ion-item>
            <ion-item>
                <ion-label>Received At</ion-label>
                <ion-label>{{lastRecord.createdAt | date: 'medium'}}</ion-label>
            </ion-item>
        </ion-list>
    </div>
</ion-content>在前面的代码中,我们在列表视图中创建了四个项目来显示温度、湿度、降雨量和湿度。ViewDevicePage类所需的逻辑将出现在mobile-app/src/pages/view-device/view-device.ts中。更新mobile-app/src/pages/view-device/view-device.ts,如下图:
import { Component } from '@angular/core';
import { IonicPage, NavController, NavParams } from 'ionic-angular';

import { DevicesService } from '../../services/device.service';
import { DataService } from '../../services/data.service';
import { ToastService } from '../../services/toast.service';
import { SocketService } from '../../services/socket.service';

@IonicPage()
@Component({
   selector: 'page-view-device',
   templateUrl: 'view-device.html',
})
export class ViewDevicePage {
   device: any;
   data: Array<any>;
   toggleState: boolean = false;
   privatesubData: any;
   lastRecord: any;

   constructor(private navCtrl: NavController,
         privatenavParams: NavParams,
         privatesocketService: SocketService,
         privatedeviceService: DevicesService,
         privatedataService: DataService,
         privatetoastService: ToastService) {
         this.device = navParams.get("device");
         console.log(this.device);
   }

   ionViewDidLoad() {
         this.deviceService.getOne(this.device._id).subscribe((response) => {
               this.device = response.json();
               this.getData();
               this.socketInit();
         });
   }

   getData() {
         this.dataService.get(this.device.macAddress).subscribe((response) => {
               this.data = response.json();
               this.lastRecord = this.data[0]; // descending order data
         });
   }

   socketInit() {
         this.subData = this.socketService.getData(this.device.macAddress).subscribe((data) => {
               if(this.data.length<= 0) return;
               this.data.splice(this.data.length - 1, 1); // remove the last record
               this.data.push(data); // add the new one
               this.lastRecord = data;
         });
   }

   ionViewDidUnload() {
         this.subData&&this.subData.unsubscribe&&this.subData.unsubscribe(); //unsubscribe if subData is defined
   }
} 在前面的代码中,我们使用getData()从 API 引擎获取最新数据。然后,使用socketInit(),我们正在订阅数据的最新更改。
Check the IP address of the server on which the API engine is running. Update the same IP in your mobile app's mobile-app/src/app/app.globals.ts file. Otherwise, the mobile app cannot communicate with the API engine.
现在,保存所有文件并运行以下命令:
ionic serve或者,您也可以通过运行以下命令将相同内容部署到您的设备上:
ionic run android 或者
ionic run ios一旦应用启动,当我们导航到查看设备页面时,我们应该会在屏幕上看到以下内容:
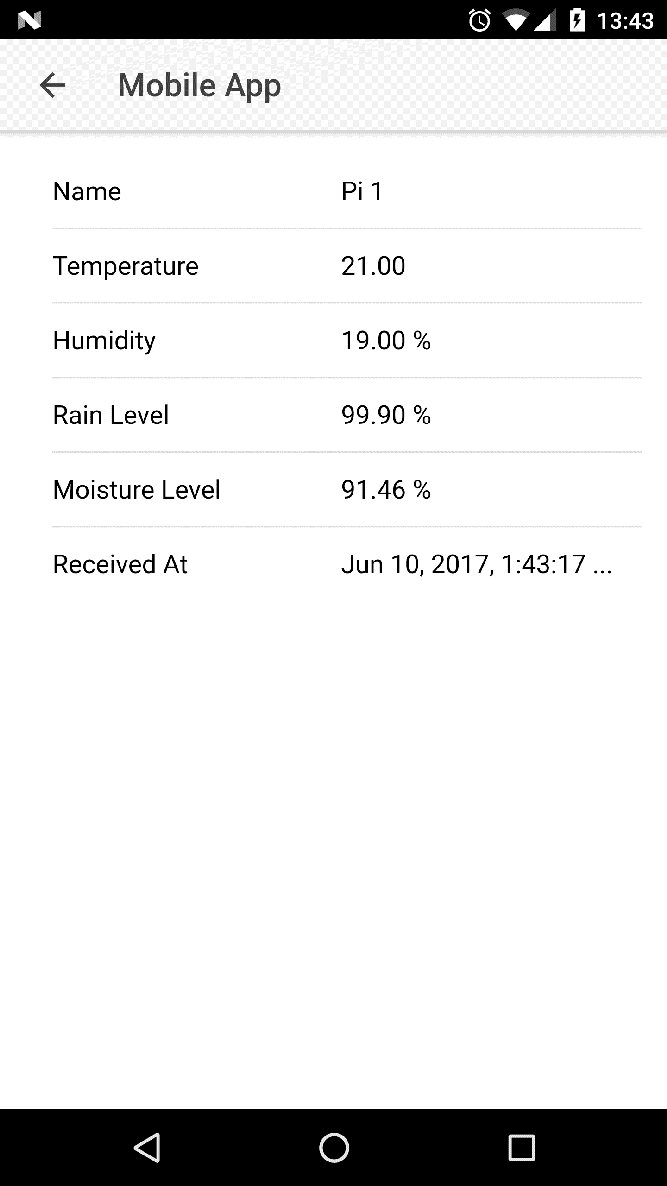
从图像中我们可以看到,我们能够实时查看数据更新。
在这一章中,我们利用在第二章和第三章中获得的知识,构建了一个智能气象站的原型。我们从识别建造气象站所需的传感器开始。接下来,我们将它们设置在树莓 Pi 3 上。我们编写了与传感器接口所需的代码。完成后,我们更新了应用编程接口引擎,从树莓 Pi 3 中读取关于新主题的数据。一旦应用编程接口引擎接收到数据,我们就将其保存在数据库中,然后通过网络套接字将其发送到网络、桌面和移动应用。最后,我们更新了网络、桌面和移动应用上的演示模板;然后,我们在网络、桌面和移动应用上显示了树莓派的数据。
在第 5 章智能农业和语音 AI 中,我们将与语音人工智能合作,使用亚马逊的 Alexa 和我们构建的智能气象站。