- 简介
- Kafka
- Flume
- Spark
- HBase
- Flink
- Hive
- Hadoop
- Zookeeper
 PDF电子书集合
关注我们

案例实践详解
案例实践
Spark Shell仅在测试和验证我们的程序时使用的较多,在生产环境中,通常会在IDE中编制程序,然后打成jar包,然后提交到集群,最常用的是创建一个Maven项目,利用Maven来管理jar包的依赖。
一、WordCount程序
1、创建一个Maven项目WordCount并导入依赖
如果是创建父子项目的话,如果只是一个项目则一起写在一个xml文件中即可
父module的xml文件编写
<dependencies>
    <dependency>
        <groupId>org.apache.spark</groupId>
        <artifactId>spark-core_2.11</artifactId>
        <version>2.1.1</version>
    </dependency>
</dependencies>

子module的xml文件编写
<build>
    <plugins>
        <plugin>
            <groupId>net.alchim31.maven</groupId>
            <artifactId>scala-maven-plugin</artifactId>
            <version>3.2.2</version>
            <executions>
                <execution>
                    <goals>
                        <goal>compile</goal>
                        <goal>testCompile</goal>
                    </goals>
                </execution>
            </executions>
        </plugin>
        <plugin>
            <groupId>org.apache.maven.plugins</groupId>
            <artifactId>maven-assembly-plugin</artifactId>
            <version>3.0.0</version>
            <configuration>
                <archive>
                    <manifest>
                        <mainClass>com.atguigu.WordCount</mainClass>
                    </manifest>
                </archive>
                <descriptorRefs>
                    <descriptorRef>jar-with-dependencies</descriptorRef>
                </descriptorRefs>
            </configuration>
            <executions>
                <execution>
                    <id>make-assembly</id>
                    <phase>package</phase>
                    <goals>
                        <goal>single</goal>
                    </goals>
                </execution>
            </executions>
        </plugin>
    </plugins>
</build>
2、编写代码
def main(args: Array[String]): Unit = {
  //创建配置文件
  val conf = new SparkConf().setAppName("wc")

  //创建SparkContext
  val sc = new SparkContext(conf);

  //读取数据
  val lines = sc.textFile(args(0))

  //flatmap压平(一行行读取数据)
  val words = lines.flatMap(_.split(" "))

  //map(word,1)
  val k2v = words.map((_,1))

  //reduceByKey(word,1)
  val result = k2v.reduceByKey(_+_)

  //保存数据
  result.saveAsTextFile(args(1))

  //关闭连接
  sc.stop();
}
3、打包成jar包到集群中运行(一般公司运行调试)
将jar包上传到集群的spark下,最好是把路径修改为HDFS的,本地路径可能有问题
bin/spark-submit \
--class com.WordCount \
--master spark://hadoop102:7077 \
--executor-memory 1G \
--total-executor-cores 2 \
./wordcount.jar \
hdfs://hadoop102:9000/red.txt \
hdfs://hadoop102:9000/out1
4、本地测试(一般用于Debug)
本地Spark程序调试需要使用local提交模式,即将本机当做运行环境,Master和Worker都为本机。运行时直接加断点调试即可。
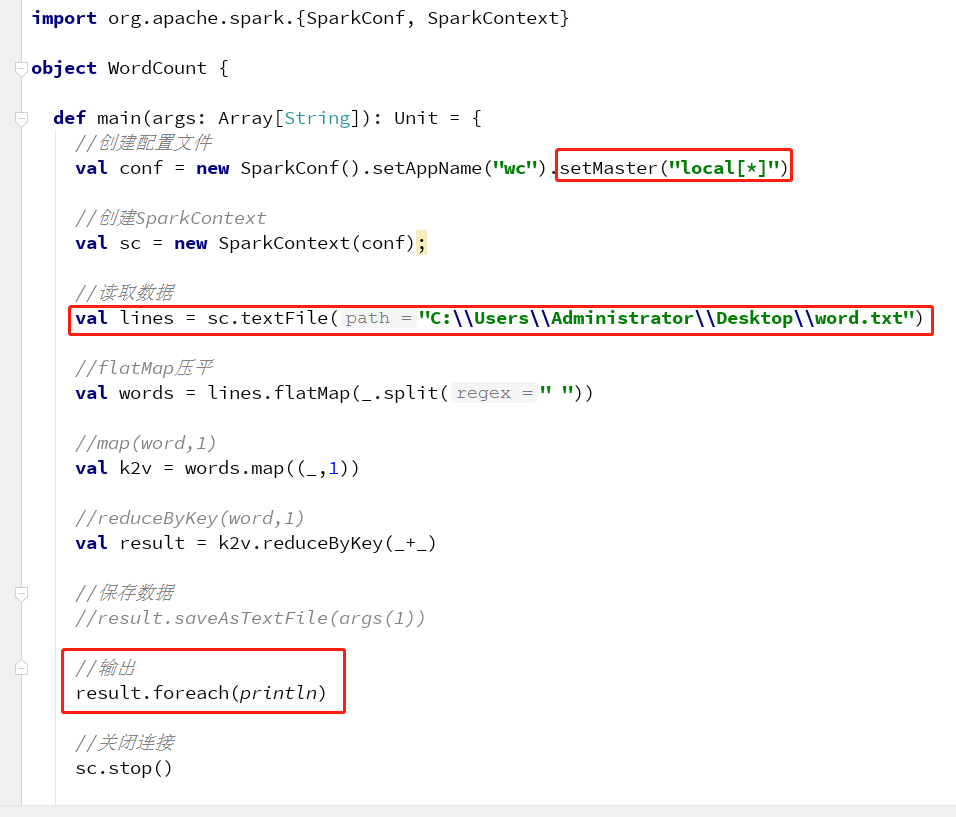
执行结果:

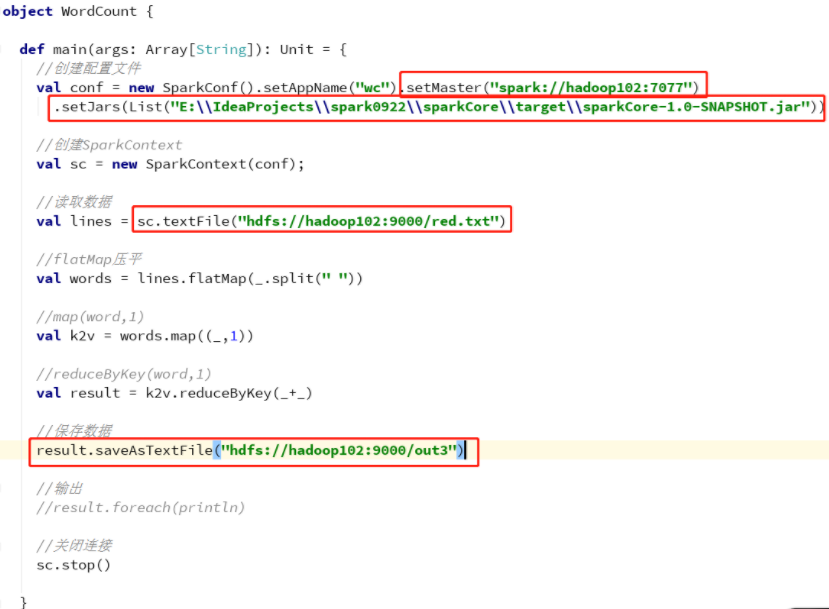
5、远程调试
将jar包放在本地,通过集群远程调试代码,输出结果保存到hdfs上
def main(args: Array[String]): Unit = {
  //创建配置文件
  val conf = new SparkConf().setAppName("wc").setMaster("spark://hadoop102:7077")
    .setJars(List("E:\\IdeaProjects\\spark0922\\sparkCore\\target\\sparkCore-1.0-SNAPSHOT.jar"))

  //创建SparkContext
  val sc = new SparkContext(conf);

  //读取数据
  val lines = sc.textFile("hdfs://hadoop102:9000/red.txt")

  //flatMap压平
  val words = lines.flatMap(_.split(" "))

  //map(word,1)
  val k2v = words.map((_,1))

  //reduceByKey(word,1)
  val result = k2v.reduceByKey(_+_)

  //保存数据
  result.saveAsTextFile("hdfs://hadoop102:9000/out3")

  //关闭连接
  sc.stop()