- 基础教程
 《NativeScript入门教程》
NativeScript - 数据绑定

数据绑定使UI组件能够显示/更新应用程序数据模型的当前值,而无需进行任何编程工作。
NativeScript支持两种类型的数据绑定。它们如下-
单向数据绑定 - 每次更改模型时都更新UI。
双向数据绑定 - 同步用户界面和模型。每当更新模型时,UI都会自动更新,并且每当UI从用户那里获取数据时,模型也会被更新。
让无涯教程学习本节中的两个概念。
单向数据绑定
NativeScript提供了一个简单的选项,可以在UI组件中启用单向数据绑定。要启用单向数据绑定,只需在目标用户界面的属性中添加方括号,然后为其分配必要的模型属性。
例如,要更新Label组件的文本内容,只需如下更改UI代码-
<Label [text]='this.model.prop' />
this.model.prop 是指模型的属性this.model。
更改BlankNgApp来了解单向数据绑定。
第1步 - 添加新模型User(src/model/user.ts),如下所示-
export class User {
   name: string
}
第2步 - 打开组件 src/app/home/home.component.html 的用户界面,并更新以下代码-
<ActionBar>
   <Label text="Home"></Label>
</ActionBar>
<GridLayout columns="*" rows="auto, auto, auto">
   <Button text="Click here to greet" class="-primary" color='gray'
      (tap)='onButtonTap($event)' row='1' column='0'>
   </Button>
   <Label [text]='this.user.name' row='2' column='0'
      height="50px" textAlignment='center' style='font-size: 16px;
      font-weight: bold; margin: 0px 32px 0 25px;'>
   </Label>
</GridLayout>
Label的text设置为用户模型的属性名称。
Button点击事件已附加到onButtonTap方法上。
第3步 - 打开home组件 src/app/home/home.component.ts 的代码,并更新代码,如下所示-
import { Component, OnInit } from "@angular/core";
import { User } from "../../model/user"
@Component({
   selector: "Home",
   templateUrl: "./home.component.html"
})
export class HomeComponent implements OnInit {
   public user: User;
   constructor() {
      // Use the component constructor to inject providers.
      this.user = new User();
      this.user.name = "User1";
   }
   ngOnInit(): void {
      // Init your component properties here.
   }
   onButtonTap(args: EventData) {
      this.user.name = 'User2';
   }
}
user model已导入
User object 是在组件的构造函数中创建的
onButtonTap事件已实现。 onButtonTap的实现会更新User对象,并将属性名称设置为User2
第4步 - 编译并运行该应用程序,然后单击按钮更改模型,它将自动更改Label 文本。
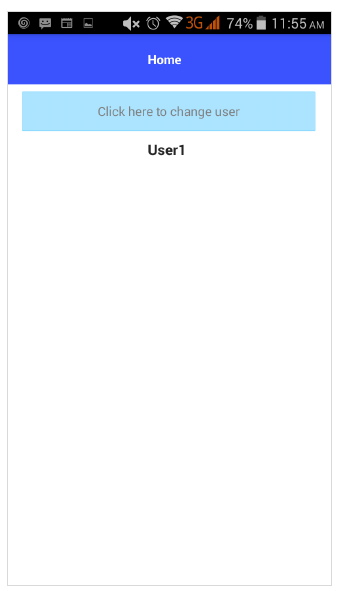
应用程序的初始和最终状态如下-
Initial State
单向数据绑定初始状态如下所示-
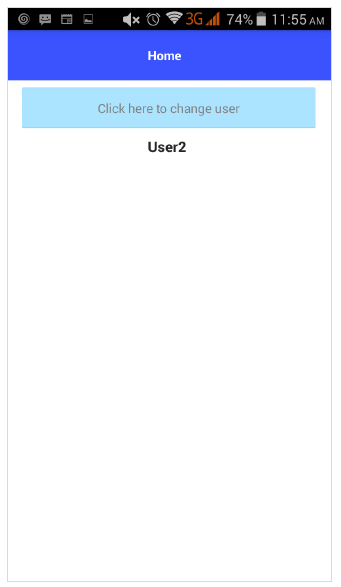
Final State
单向数据绑定最终状态如下所示-
双向数据绑定
NativeScript还提供双向数据绑定以实现高级函数。它将模型数据绑定到UI,还将UI中更新的数据绑定到模型。
要进行双向数据绑定,请使用ngModel属性,然后将其用[]和()包围,如下所示-
<TextField [(ngModel)]='this.user.name'></TextField>
更改BlankNgApp应用程序以更好地理解双向数据绑定。
第1步 - 如下所示将NativeScriptFormsModule导入HomeModule( src/app/home/home.module.ts )-
import { NgModule, NO_ERRORS_SCHEMA } from "@angular/core";
import { NativeScriptCommonModule } from "nativescript-angular/common";
import { HomeRoutingModule } from "./home-routing.module";
import { HomeComponent } from "./home.component";
import { NativeScriptFormsModule } from "nativescript-angular/forms";
@NgModule({
   imports: [
      NativeScriptCommonModule,
      HomeRoutingModule,
      NativeScriptFormsModule
   ],
   declarations: [
      HomeComponent
   ],
   schemas: [
      NO_ERRORS_SCHEMA
   ]
})
export class HomeModule { }
NativeScriptFormsModule启用双向数据绑定。否则,双向数据绑定将无法按预期进行。
第2步 - 如下所示更改home组件的UI-
<ActionBar> <Label text="Home"></Label></ActionBar>
<GridLayout columns="*" rows="auto, auto">
   <TextField hint="Username" row='0' column='0' color="gray"
      backgroundColor="lightyellow" height="75px" [(ngModel)]='this.user.name'>
   </TextField>
   <Label [text]='this.user.name' row='1' column='0' height="50px"
      textAlignment='center' style='font-size: 16px; font-weight: bold;
      margin: 0px 32px 0 25px;'>
   </Label>
</GridLayout>
Label组件的text属性设置为单向数据绑定。如果模型用户已更新,则其text属性将自动获取更新。
TextField组件将ngModel设置为this.user.name。如果模型用户已更新,则其text属性将自动更新。同时,如果用户更改了TextField的值,则模型也会更新。
第3步 - 运行该应用程序,然后尝试更改文本框的值。
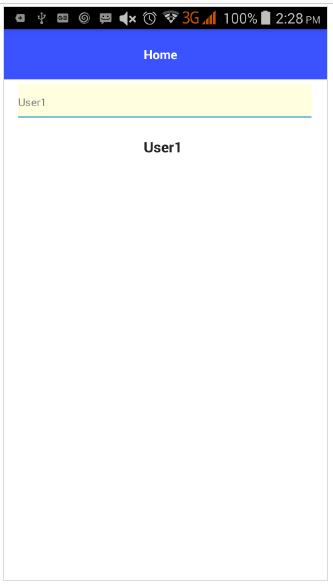
Initial State
双向数据绑定–初始状态如下-
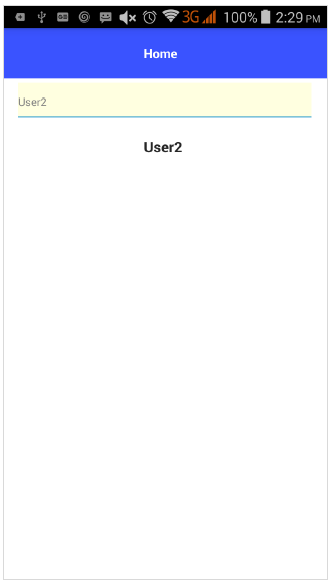
Final State
双向数据绑定–最终状态如下所示-
祝学习愉快!(内容编辑有误?请选中要编辑内容 -> 右键 -> 修改 -> 提交!)