- 入门教程
- 进阶教程
- 基本组件
 《Flutter入门教程》
Flutter - Container

Flutter中的容器是一个父窗口小部件,可以包含多个子窗口小部件,并通过width,height,padding,background color等有效地对其进行管理。它是一个结合了子窗口小部件的常见painting,positioning和大小的窗口小部件。用于存储一个或多个窗口小部件并将其根据无涯教程的需要放置在屏幕上。通常,它类似于用于存储内容的盒子。它允许用户使用许多属性来装饰其子窗口小部件,例如使用margin将容器与其他内容分隔开。
容器小部件与html中的<div>标签相同。如果此窗口小部件不包含任何子窗口小部件,它将自动填充屏幕上的整个区域。否则,它将根据指定的高度和宽度包装子小部件。请注意,没有任何父窗口小部件,该窗口小部件将无法直接渲染。无涯教程可以使用Scaffold widget, Center widget, Padding widget, Row widget, or Column widget 作为其父小部件。
Flutter容器小部件
如果无涯教程有一个需要一些后台造型的小部件,可以是颜色,形状或大小约束,无涯教程可能会尝试将其包装在集合小部件中。此小部件可帮助无涯教程撰写,装饰和定位其子小部件。如果无涯教程将无涯教程的小部件包装在集合中,则在不使用任何参数的情况下,无涯教程不会注意到其外观的任何差异。但是,如果无涯教程在集合中添加颜色,边距,填充等的任何属性,无涯教程可以根据无涯教程的需求在屏幕上屏蔽无涯教程的小部件。
如果无涯教程有一个需要某种背景样式的窗口小部件,可能是颜色,形状或大小限制,则可以尝试将其包装在容器窗口小部件中。如果将小部件包装在容器中,则在不使用任何参数的情况下,无涯教程将不会注意到其外观上的任何差异。但是,如果无涯教程在容器中添加任何属性,例如颜色(color),边距(margin),填充(padding)等,则可以根据需要在屏幕上设置窗口小部件的样式。
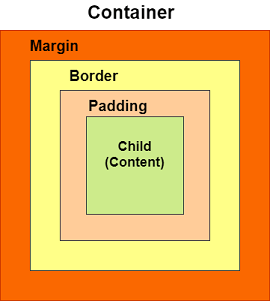
基本容器的子控件周围具有边距(margin),边框(border)和填充(padding)属性,如下图所示:
容器构造函数
以下是容器类构造函数的语法:
Container({Key key,
           AlignmentGeometry alignment,
           EdgeInsetsGeometry padding,
           Color color,
           double width,
           double height,
           Decoration decoration,
           Decoration foregroundDecoration,
           BoxConstraints constraints,
           Widget child,
           Clip clipBehavior: Clip.none
});
容器部件属性
让无涯教程详细了解容器小部件的一些基本属性。
Child
此属性用于存储容器的子窗口小部件。假设无涯教程已将“Text”小部件作为其子小部件,可以在以下示例中显示:
Container(
	child: Text("Hello! I am in the container widget", style: TextStyle(fontSize: 25)),
)
Color
此属性用于设置文本的背景色。它还会更改整个容器的背景颜色。请参见以下示例:
Container(
	color: Colors.green,
	child: Text("Hello! I am in the container widget", style: TextStyle(fontSize: 25)),
)
Height and Width
此属性用于根据无涯教程的需要设置容器的高度和宽度。默认情况下,容器始终根据其子窗口小部件占用空间。请参见以下代码:
Container(
	width: 200.0,
	height: 100.0,
	color: Colors.green,
	child: Text("Hello! I am in the container widget", style: TextStyle(fontSize: 25)),
)
margin
此属性用于包围容器周围的空白区域。无涯教程可以通过查看容器周围的空白来观察到这一点。假设无涯教程使用了EdgeInsets.all(25),它在所有四个方向上都设置了相等的边距,如以下示例所示:
Container(
	width: 200.0,
	height: 100.0,
	color: Colors.green,
	margin: EdgeInsets.all(20),
	child: Text("Hello! I am in the container widget", style: TextStyle(fontSize: 25)),
)
padding
此属性用于设置容器的边框(所有四个方向)与其子控件之间的距离。无涯教程可以通过查看容器和子窗口小部件之间的空间来观察这一点。在这里,无涯教程使用了EdgeInsets.all(35)来设置文本和所有四个容器方向之间的间距:
Container(
	width: 200.0,
	height: 100.0,
	color: Colors.green,
	padding: EdgeInsets.all(35),
	margin: EdgeInsets.all(20),
	child: Text("Hello! I am in the container widget", style: TextStyle(fontSize: 25)),
)
Alignment
此属性用于设置子项在容器中的位置。 Flutter允许用户以各种方式对齐其元素,例如中center,bottom,bottom center,topLeft,centerRight,left,right等。在下面的示例中,无涯教程将其子项对齐到右下角的位置。
Container(
	width: 200.0,
	height: 100.0,
	color: Colors.green,
	padding: EdgeInsets.all(35),
	margin: EdgeInsets.all(20),
	alignment: Alignment.bottomRight,
	child: Text("Hello! I am in the container widget", style: TextStyle(fontSize: 25)),
)
Decoration
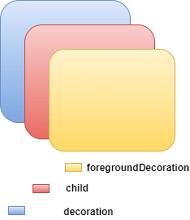
此属性允许开发人员在小部件上添加装饰。它装饰或绘制孩子后面的小部件。如果要在孩子面前装饰或绘画,则需要使用forgroundDecoration参数。下图说明了两者之间的区别,其中,前台装饰覆盖子对象和子对象后面的装饰涂料。
装饰属性支持许多参数,例如颜色(color),渐变(gradient),背景图像(background image),边框(border),阴影(shadow)等。这是确保无涯教程可以在容器或装饰中使用color属性,但不能同时在两者中使用。请参阅下面的代码,其中无涯教程添加了border和shadow属性来装饰盒子:
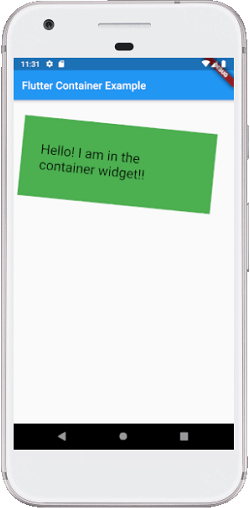
import 'package:flutter/material.dart';

void main() => runApp(MyApp());

/// 这个小部件是主要的应用小部件。
class MyApp extends StatelessWidget {

  @override
  Widget build(BuildContext context) {
    return MaterialApp(
      home: Scaffold(
        appBar: AppBar(
          title: Text("Flutter Container Example"),
        ),
        body: Container(
          padding: EdgeInsets.all(35),
          margin: EdgeInsets.all(20),
          decoration: BoxDecoration(
            border: Border.all(color: Colors.black, width: 4),
            borderRadius: BorderRadius.circular(8),
            boxShadow: [
              new BoxShadow(color: Colors.green, offset: new Offset(6.0, 6.0),),
            ],
          ),
          child: Text("Hello! I am in the container widget decoration box!!",
              style: TextStyle(fontSize: 30)),
        ),
      ),
    );
  }
}
无涯教程将看到以下输出如下屏幕截图:

Transform
transform属性允许开发人员旋转容器。它可以沿任何方向旋转容器,即在父窗口小部件中更改容器坐标。在下面的示例中,无涯教程将沿z-axis旋转容器。
Container(
	width: 200.0,
	height: 100.0,
	color: Colors.green,
	padding: EdgeInsets.all(35),
	margin: EdgeInsets.all(20),
	alignment: Alignment.bottomRight,
	transform: Matrix4.rotationZ(0.1),
	child: Text("Hello! I am in the container widget", style: TextStyle(fontSize: 25)),
)
Constraints
当无涯教程要向子级添加其他约束时,将使用此属性。它包含各种构造函数,例如tight,loose,expand等。让无涯教程看看如何在无涯教程的应用程序中使用这些构造函数:
tight - 如果在此使用size属性,它将为子级赋予固定值。
Container(
	color: Colors.green,
	constraints: BoxConstraints.tight(Size size)
		: minWidth = size.width, maxWidth = size.width,
		  minHeight = size.height, maxHeight = size.height;
	child: Text("Hello! I am in the container widget", style: TextStyle(fontSize: 25)),
)
expand - 在这里,无涯教程可以选择子项的高度(height),宽度(width)或两者(both)。
Container(
	color: Colors.green,
	constraints: BoxConstraints.expand(height: 60.0),
	child: Text("Hello! I am in the container widget", style: TextStyle(fontSize: 25)),
)
让无涯教程通过一个示例来理解它,在该示例中,无涯教程将尝试覆盖大多数容器属性。打开main.dart文件,并将其替换为以下代码:
import 'package:flutter/material.dart';

void main() => runApp(MyApp());

/// 这个小部件是主要的应用小部件。
class MyApp extends StatelessWidget {

  @override
  Widget build(BuildContext context) {
    return MaterialApp(
      home: MyContainerWidget(),
    );
  }
}

class MyContainerWidget extends StatelessWidget {
  @override
  Widget build(BuildContext context) {
    return MaterialApp(
      home: Scaffold(
        appBar: AppBar(
          title: Text("Flutter Container Example"),
        ),
        body: Container(
          width: double.infinity,
          height: 150.0,
          color: Colors.green,
          margin: EdgeInsets.all(25),
          padding: EdgeInsets.all(35),
          alignment: Alignment.center,
          transform: Matrix4.rotationZ(0.1),
          child: Text("Hello! I am in the container widget!!",
              style: TextStyle(fontSize: 25)),
        ),
      ),
    );
  }
}
当无涯教程运行此应用程序时,它将提供以下屏幕截图:
链接:https://www.learnfk.comhttps://www.learnfk.com/flutter/flutter-container.html
来源:LearnFk无涯教程网
祝学习愉快!(内容编辑有误?请选中要编辑内容 -> 右键 -> 修改 -> 提交!)