- 基础教程
 《Codeigniter入门教程》
 关注我们

CodeIgniter - 文件上传

使用File Uploading类,无涯教程可以上传文件,也可以限制要上传文件的类型和大小。按照给定示例步骤操作,以了解CodeIgniter中的文件上传过程。
文件上传示例
复制以下代码并将其存储在 application/view/Upload_form.php 中。
<html>

   <head>
      <title>Upload Form</title>
   </head>

   <body>
      <?php echo $error;?>
      <?php echo form_open_multipart('upload/do_upload');?>

      <form action="" method="">
         <input type="file" name="userfile" size="20" />
         <br /><br />
         <input type="submit" value="upload" />
      </form>

   </body>

</html>
复制下面给出的代码,并将其存储在 application/view/Upload_success.php
链接:https://www.learnfk.comhttps://www.learnfk.com/codeigniter/codeigniter-file-uploading.html
来源:LearnFk无涯教程网
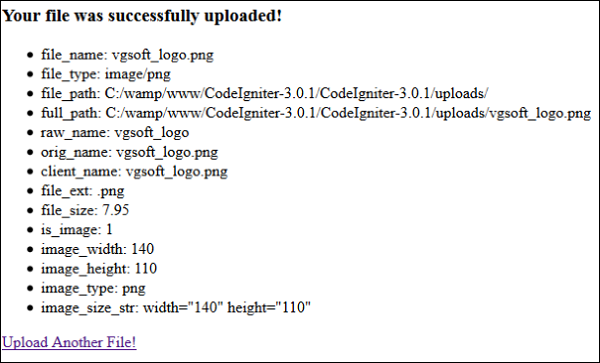
<html>

   <head>
      <title>Upload Form</title>
   </head>

   <body>
      <h3>Your file was successfully uploaded!</h3>

      <ul>
         <?phpforeach ($upload_data as $item => $value):?>
         <li><?php echo $item;?>: <?php echo $value;?></li>
         <?phpendforeach; ?>
      </ul>

      <p><?php echo anchor('upload', 'Upload Another File!'); ?></p>
   </body>

</html>
复制下面给出的代码,并将其存储在 application/controllers/Upload.php 中。在CodeIgniter的根目录中创建" uploads "文件夹。
<?php

   class Upload extends CI_Controller {

      public function __construct() {
         parent::__construct();
         $this->load->helper(array('form', 'url'));
      }

      public function index() {
         $this->load->view('upload_form', array('error' => ' ' ));
      }

      public function do_upload() {
         $config['upload_path']  ='./uploads/';
         $config['allowed_types']='gif|jpg|png';
         $config['max_size']     =100;
         $config['max_width']    =1024;
         $config['max_height']   =768;
         $this->load->library('upload', $config);

         if ( ! $this->upload->do_upload('userfile')) {
            $error=array('error' => $this->upload->display_errors());
            $this->load->view('upload_form', $error);
         }

         else {
            $data=array('upload_data' => $this->upload->data());
            $this->load->view('upload_success', $data);
         }
      }
   }
?>
在 application/config/routes.php 中的路由文件中进行以下更改,并在文件末尾添加以下行。
$route['upload']='Upload';
现在,让无涯教程通过在浏览器中访问以下URL来执行此示例。将URL替换为yoursite.com。
http://yoursite.com/index.php/upload
它将产生以下屏幕-

成功上传文件后,您将看到以下屏幕-
祝学习愉快!(内容编辑有误?请选中要编辑内容 -> 右键 -> 修改 -> 提交!)
好记忆不如烂笔头。留下您的足迹吧 :)