- 入门教程
- Vue3.0 从入门到放弃
 《VueJs入门教程》
VueJS - 渲染函数

无涯教程已经看到了组件及其用法。例如有一个需要在整个项目中重复使用的内容。可以将其转换为组件并将其使用。
现在看一个简单组件的示例,看看其中的render函数必须做什么。
<html>
   <head>
      <title>VueJs Instance</title>
      <script type = "text/javascript" src = "js/vue.js"></script>
   </head>
   <body>
      <div id = "component_test">
         <testcomponent></testcomponent>
      </div>
      <script type = "text/javascript">
         Vue.component('testcomponent',{
            template : '<h1>Hello World</h1>',
            data: function() {
            },
            methods:{
            }
         });
         var vm = new Vue({
            el: '#component_test'
         });
      </script>
   </body>
</html>
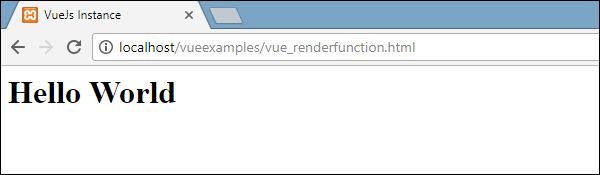
考虑上面的示例简单示例,该示例可打印Hello World,如以下屏幕截图所示。
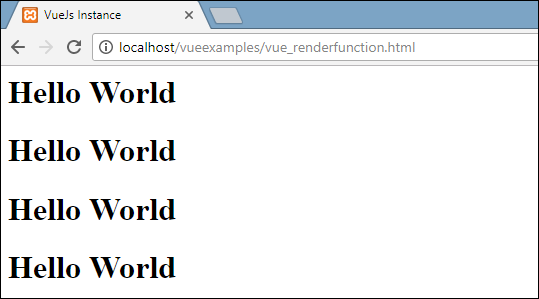
现在,如果想重用该组件,可以通过再次打印来实现。例如,
<div id = "component_test">
   <testcomponent></testcomponent>
   <testcomponent></testcomponent>
   <testcomponent></testcomponent>
   <testcomponent></testcomponent>
</div>
输出结果如下。
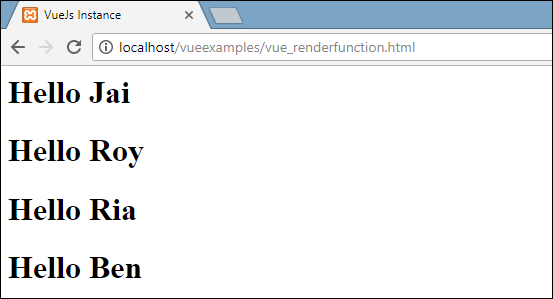
但是,现在需要对该组件进行一些更改,不希望打印相同的文本。考虑以下示例,看看会发生什么。
<div id = "component_test">
   <testcomponent>Hello Jai</testcomponent>
   <testcomponent>Hello Roy</testcomponent>
   <testcomponent>Hello Ria</testcomponent>
   <testcomponent>Hello Ben</testcomponent>
</div>
输出结果与之前看到的相同。它不会根据需要更改文本。
组件确实提供了称为slots的东西。利用slots看看是否能达到预期的效果。
<html>
   <head>
      <title>VueJs Instance</title>
      <script type = "text/javascript" src = "js/vue.js"></script>
   </head>
   <body>
      <div id = "component_test">
         <testcomponent>Hello Jai</testcomponent>
         <testcomponent>Hello Roy</testcomponent>
         <testcomponent>Hello Ria</testcomponent>
         <testcomponent>Hello Ben</testcomponent>
      </div>
      <script type = "text/javascript">
         Vue.component('testcomponent',{
            template : '<h1><slot></slot></h1>',
            data: function() {
            },
            methods:{
            }
         });
         var vm = new Vue({
            el: '#component_test'
         });
      </script>
   </body>
</html>
如上面的代码所示,在模板中添加了slots,因此现在需要使用值在组件内部发送,如以下屏幕截图所示。
现在,让无涯教程考虑要更改颜色和大小。例如,当前正在使用h1标签,并且希望将同一组件的HTML标签更改为p标签或div标签。
<html>
   <head>
      <title>VueJs Instance</title>
      <script type = "text/javascript" src = "js/vue.js"></script>
   </head>
   <body>
      <div id = "component_test">
         <testcomponent :elementtype = "'div,red,25,div1'">Hello Jai</testcomponent>
         <testcomponent :elementtype = "'h3,green,25,h3tag'">Hello Roy</testcomponent>
         <testcomponent :elementtype = "'p,blue,25,ptag'">Hello Ria</testcomponent>
         <testcomponent :elementtype = "'div,green,25,divtag'">Hello Ben</testcomponent>
      </div>
      <script type = "text/javascript">
         Vue.component('testcomponent',{
            render :function(createElement){
               var a = this.elementtype.split(",");
               return createElement(a[0],{
                  attrs:{
                     id:a[3],
                     style:"color:"+a[1]+";font-size:"+a[2]+";"
                  }
               },
               this.$slots.default
               )
            },
            props:{
               elementtype:{
                  attributes:String,
                  required:true
               }
            }
         });
         var vm = new Vue({
            el: '#component_test'
         });
      </script>
   </body>
</html>
在上面的代码中,更改了组件,并使用以下代码添加了带有props属性的render函数。
Vue.component('testcomponent',{
   render :function(createElement){
      var a = this.elementtype.split(",");
      return createElement(a[0],{
         attrs:{
            id:a[3],
            style:"color:"+a[1]+";font-size:"+a[2]+";"
         }
      },
      this.$slots.default
      )
   },
   props:{
      elementtype:{
         attributes:String,
         required:true
      }
   }
});
props如下所示。
props:{
   elementtype:{
      attributes:String,
      required:true
   }
}
无涯教程定义了一个名为elementtype的属性,该属性采用字符串类型的attribute字段。另一个必填字段,其中提到该字段是必填字段。
在render函数中,使用了elementtype属性,如以下代码所示。
render :function(createElement){
   var a = this.elementtype.split(",");
   return createElement(a[0],{
      attrs:{
         id:a[3],
         style:"color:"+a[1]+";font-size:"+a[2]+";"
      }
   },
   this.$slots.default
   )
}
渲染函数将createElement作为参数并返回相同的值。 CreateElement以与JavaScript中相同的方式创建DOM元素。还使用attrs字段中的值在逗号上拆分了元素类型。
CreateElement将第一个参数作为要创建的elementtag。使用以下代码将其传递给组件。
链接:https://www.learnfk.comhttps://www.learnfk.com/vuejs/vuejs-render-function.html
来源:LearnFk无涯教程网
<testcomponent :elementtype = "'div,red,25,div1'">Hello Jai</testcomponent>
组件需要使用props字段,如上所示。它以:和props名称开头。在这里,传递了元素标签,颜色,字体大小和元素的id。
在render函数中,在createElement中,按逗号分割,因此第一个元素是elementtag,它被赋予createElemet,如以下代码所示。
return createElement(
   a[0],{
      attrs:{
         id:a[3],
         style:"color:"+a[1]+";font-size:"+a[2]+";"
      }
   },
   this.$slots.default
)
a [0] 是html元素标签。下一个参数是element标签的属性。它们在以下代码的attr字段中定义。
attrs:{
   id:a[3],
   style:"color:"+a[1]+";font-size:"+a[2]+";"
}
为元素标签定义了两个属性- id 和 style 。要传递给id,要传递a [3],这是在用逗号分割后的值。使用样式,定义了颜色和字体大小。
最后是slots,这是在以下代码部分中给出的消息。
<testcomponent :elementtype = "'div,red,25,div1'">Hello Jai</testcomponent>
使用以下代码定义了要在createElement中打印的文本。
this.$slots.default
它采用在组件字段中分配的默认值。
以下是在浏览器中获得的输出。
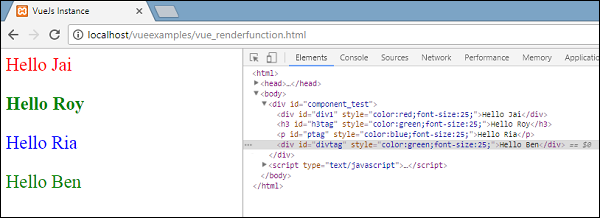
元素还显示了结构。这些是无涯教程定义的组件-
<div id = "component_test">
   <testcomponent :elementtype = "'div,red,25,div1'">Hello Jai</testcomponent>
   <testcomponent :elementtype = "'h3,green,25,h3tag'">Hello Roy</testcomponent>
   <testcomponent :elementtype = "'p,blue,25,ptag'">Hello Ria</testcomponent>
   <testcomponent :elementtype = "'div,green,25,divtag'">Hello Ben</testcomponent>
</div>
祝学习愉快!(内容编辑有误?请选中要编辑内容 -> 右键 -> 修改 -> 提交!)