- MVC教程
- Web Forms
- Validation
- Razor
 《ASP.Net MVC入门教程》
ASP.NET MVC - 辅助类

在ASP.Net Web表单中,开发人员正在使用工具箱在任何特定页面上添加控件,但是,在ASP.NET MVC应用程序中,没有工具箱可用于在视图上拖放HTML控件。在ASP.NET MVC应用程序中,如果要创建视图,则该视图应包含HTML代码,因此,那些刚接触MVC尤其是具有Web表单背景的开发人员会发现这有点困难。
为解决此问题,ASP.NET MVC提供了HtmlHelper类,该类包含帮助您以编程方式创建HTML控件的不同方法,所有HtmlHelper方法都会生成HTML并以String形式返回输出,这些函数在运行时生成最终的HTML, HtmlHelper类旨在生成UI,因此不应在控制器或模型中使用。
有不同类型的辅助方法。
Createinputs - 为文本框和按钮创建输入。
Createlinks - 根据路由表中的信息创建链接。
Createforms - 创建表单标签,这些标签可以发布回我们的操作,也可以发布回其他控制器上的操作。
如果您从上一章从EmployeeController索引操作生成的视图中查看,您会看到以Html开头的操作数量,例如 Html.ActionLink 和 Html.DisplayNameFor 等,如以下代码所示。
@model IEnumerable<MVCSimpleApp.Models.Employee>
@{
   Layout = null;
}

<!DOCTYPE html>
<html>
   <head>
      <meta name = "viewport" content = "width=device-width" />
      <title>Index</title>
   </head>

   <body>
      <p>
         @Html.ActionLink("Create New", "Create")
      </p>

      <table class = "table">
         <tr>
            <th>
               @Html.DisplayNameFor(model => model.Name)
            </th>

            <th>
               @Html.DisplayNameFor(model => model.JoiningDate)
            </th>

            <th>
               @Html.DisplayNameFor(model => model.Age)
            </th>

            <th></th>
         </tr>

         @foreach (var item in Model) {
            <tr>
               <td>
                  @Html.DisplayFor(modelItem => item.Name)
               </td>

               <td>
                  @Html.DisplayFor(modelItem => item.JoiningDate)
               </td>

               <td>
                  @Html.DisplayFor(modelItem => item.Age)
               </td>

               <td>
                  @Html.ActionLink("Edit", "Edit", new { id = item.ID }) |
                  @Html.ActionLink("Details", "Details", new { id = item.ID }) |
                  @Html.ActionLink("Delete", "Delete", new { id = item.ID })
               </td>
            </tr>
         }

      </table>
   </body>
</html>
此HTML是我们从ViewPage基类继承的属性,因此,它在我们所有的视图中都可用,并且返回一个名为HTML Helper的类型的实例。
让我们看一个简单的示例,在该示例中,我们将使用户能够编辑员工,因此,此编辑操作将使用大量不同的HTML Helper。
如果您看上面的代码,您将在最后看到以下HTML Helper方法
@Html.ActionLink("Edit", "Edit", new { id=item.ID })
在ActionLink帮助器中,第一个参数是链接的"EDIT",第二个参数是Controller中的操作方法,也是"EDIT",第三个参数ID是您要编辑的任何特定员工的ID 。
让我们通过添加静态列表来更改EmployeeController类,并使用以下代码来更改index操作。
public static List<Employee> empList = new List<Employee>{
   new Employee{
      ID = 1,
      Name = "Allan",
      JoiningDate = DateTime.Parse(DateTime.Today.ToString()),
      Age = 23
   },

   new Employee{
      ID = 2,
      Name = "Carson",
      JoiningDate = DateTime.Parse(DateTime.Today.ToString()),
      Age = 45
   },

   new Employee{
      ID = 3,
      Name = "Carson",
      JoiningDate = DateTime.Parse(DateTime.Today.ToString()),
      Age = 37
   },

   new Employee{
      ID = 4,
      Name = "Laura",
      JoiningDate = DateTime.Parse(DateTime.Today.ToString()),
      Age = 26
   },

};

public ActionResult Index(){
   var employees = from e in empList
   orderby e.ID
   select e;
   return View(employees);
}
让我们更新"Edit"操作。您将看到两个Edit操作,一个用于 GET ,另一个用于 POST 。让我们更新 Get 的Edit操作,该操作在参数中仅包含ID。
//GET: Employee/Edit/5
public ActionResult Edit(int id){
   List<Employee> empList = GetEmployeeList();
   var employee = empList.Single(m => m.ID == id);
   return View(employee);
}
现在,我们知道可以对"Edit"进行操作,但是对于这些操作没有任何视图。因此,我们还需要添加一个视图。为此,请右键单击"Edit"操作,然后选择"Add View"。
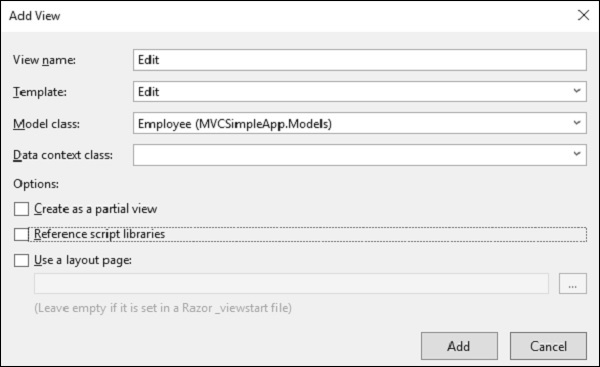
您将看到默认的视图名称。从模板下拉列表中选择编辑,从模型类下拉列表中选择雇员。
以下是"Edit"视图中的默认实现。
@model MVCSimpleApp.Models.Employee
@{
   Layout = null;
}

<!DOCTYPE html>
<html>
   <head>
      <meta name = "viewport" content = "width=device-width" />
      <title>Edit</title>
   </head>

   <body>
      @using (Html.BeginForm()){
         @Html.AntiForgeryToken()
         <div class = "form-horizontal">
            <h4>Employee</h4>
            <hr />
            @Html.ValidationSummary(
               true, "", new { @class = "text-danger" })

            @Html.HiddenFor(model => model.ID)

            <div class = "form-group">
               @Html.LabelFor(
                  model => model.Name, htmlAttributes: new{
                     @class = "control-label col-md-2" })

               <div class = "col-md-10">
                  @Html.EditorFor(model => model.Name, new{
                     htmlAttributes = new {
                        @class = "form-control" } })

                  @Html.ValidationMessageFor(model => model.Name, "", new{
                        @class = "text-danger" })
               </div>

            </div>

            <div class = "form-group">
               @Html.LabelFor(
                  model => model.JoiningDate, htmlAttributes: new{
                     @class = "control-label col-md-2" })

               <div class = "col-md-10">
                  @Html.EditorFor(
                     model => model.JoiningDate, new{
                        htmlAttributes = new{ @class = "form-control" } })

                  @Html.ValidationMessageFor(
                     model => model.JoiningDate, "", new{
                        @class = "text-danger" })
               </div>

            </div>

            <div class = "form-group">
               @Html.LabelFor(
                  model => model.Age, htmlAttributes: new{
                     @class = "control-label col-md-2" })

               <div class = "col-md-10">
                  @Html.EditorFor(
                     model => model.Age, new{
                        htmlAttributes = new{ @class = "form-control" } })

                  @Html.ValidationMessageFor(
                     model => model.Age, "", new{
                        @class = "text-danger" })
               </div>

            </div>

            <div class = "form-group">
               <div class = "col-md-offset-2 col-md-10">
                  <input type = "submit" value = "Save" class = "btn btn-default"/>
               </div>
            </div>

         </div>
      }

      <div>
         @Html.ActionLink("Back to List", "Index")
      </div>

   </body>
</html>
如您所见,使用了许多辅助方法,因此," HTML.BeginForm"在此处编写了一个开始的Form标签,当用户单击"Save"按钮时,还可以确保该方法将为"Submit"。
Html.BeginForm非常有用,因为它使您可以更改URL,更改方法等。
在上面的代码中,您将看到另一个HTML帮助器,即" @HTML.HiddenFor",它发出隐藏字段。
MVC Framework非常聪明,可以确定在模型类中提到了此ID字段,因此需要防止对其进行编辑,这就是为什么将其标签为隐藏的原因。
Html.LabelFor HTML帮助器会在屏幕上创建标签。如果在进行更改时输入了错误的内容,则Html.ValidationMessageFor帮助器会显示正确的错误消息。
我们还需要更改POST的"Edit"操作,因为一旦更新了员工,它将调用此操作。
//POST: Employee/Edit/5
[HttpPost]
public ActionResult Edit(int id, FormCollection collection){
   try{
      var employee = empList.Single(m => m.ID == id);
      if (TryUpdateModel(employee)){
         //To Do:- database code
         return RedirectToAction("Index");
      }
      return View(employee);
   }catch{
      return View();
   }
}
让我们运行该应用程序,并请求以下URL http://localhost:63004/employee 。您将收到以下输出。
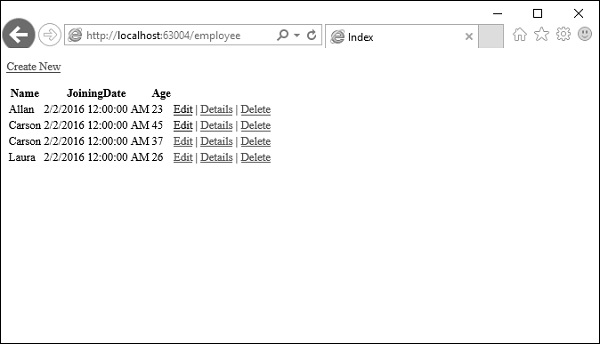
单击任何特定员工的编辑链接,即单击Allan编辑链接。您将看到以下视图。
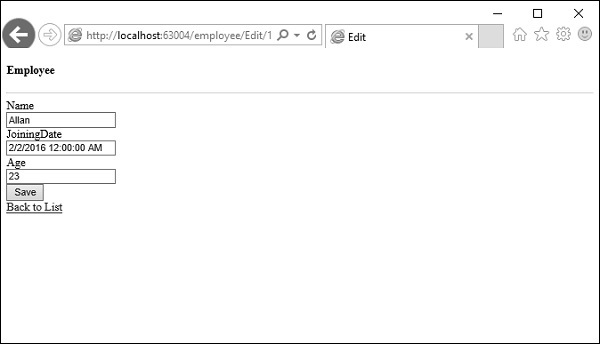
让我们将年龄从23更改为29,然后点击"Save"按钮,然后您会在索引视图中看到更新的年龄。
链接:https://www.learnfk.comhttps://www.learnfk.com/asp.net_mvc/asp.net-mvc-helpers.html
来源:LearnFk无涯教程网

祝学习愉快!(内容编辑有误?请选中要编辑内容 -> 右键 -> 修改 -> 提交!)